
Page and image caching are some of the most beneficial things you can do for your WordPress website. When it’s done right (and when your server is running Litespeed Cache), it makes your website respond much more quickly.
That gives a boost to your Search Engine Optimization (SEO) efforts, which can lead to higher search results rankings.
Not to mention that a more responsive site can increase sales conversions if you have an online store. LiteSpeed Cache is one of the best, most comprehensive WordPress caching plugins available, and we are going to talk about it in this tutorial.
After going over the installation of the plugin, we’ll talk about some of the technical details. Like how cached web pages are served, and the different kinds of caching.
But before we get to all of that, let’s talk a bit about caching.
Important Note: This guide is not designed to show you how to set up Litespeed Cache. Instead, it is designed to explain where all of the settings you need to configure are located. Setting up caching for each website is unique, thus we cannot produce a one-size-fits-all tutorial on what options are the best. Instead, we try to direct users to where each setting is located.
What is Caching?
When we’re talking about the LiteSpeed Cache plugin, we’re primarily talking about page caches. A cached page is a copy or version of a page. But why does it benefit visitors to create a copy of a page?
When a browser requests a WordPress website page, the server performs multiple functions to put the page together.
Before anything is rendered in the browser, the server has to (at the minimum):
- Get the latest posts.
- Generate a header and footer.
- Find and place sidebar widgets.
- Learn how the media should be displayed.
Complex pages like those on e-commerce sites can require dozens of steps to complete to display a page.
Most of the functions happen in milliseconds. But when you start to add them up, they can take some time. Which, in turn, increases the time needed to load a page.
A caching plugin will make a copy of that completed page, made up of all those parts. Then it displays that copy when the page is requested (for a predefined period).
That way, if three visitors request the same page within a minute or two, the page only has to be “built” once. The second and third visitors see the pre-built copy, which loads much faster since there’s no build time.
So caching gives your site the ability to respond more quickly, giving it an overall SEO boost. And perhaps most importantly, making for a better visitor experience.
Enter LiteSpeed Cache (aka LSCache)
LiteSpeed Cache, or LSCache, is an all-in-one cache plugin for WordPress. It features a server-level cache and an expansive collection of optimization features.
LiteSpeed Cache supports multi-site WordPress installations and is compatible with most popular plugins, including Yoast SEO and WooCommerce.
Some of the more popular features include:
- Minifying CSS, JavaScript, and HTML
- Automatically generating critical CSS
- Minifying inline CSS and JavaScript
- Image optimization (lossless/lossy)
- The ability to combine CSS and JavaScript
- Lazyloading images and iframes
And it’s a cliche, but those are just the tip of the iceberg. If you want your website cached without a lot of manual tinkering, the LSCache plugin is for you.
Let’s install the plugin and go over a few of the available options.
How to Use the LiteSpeed Cache Plugin
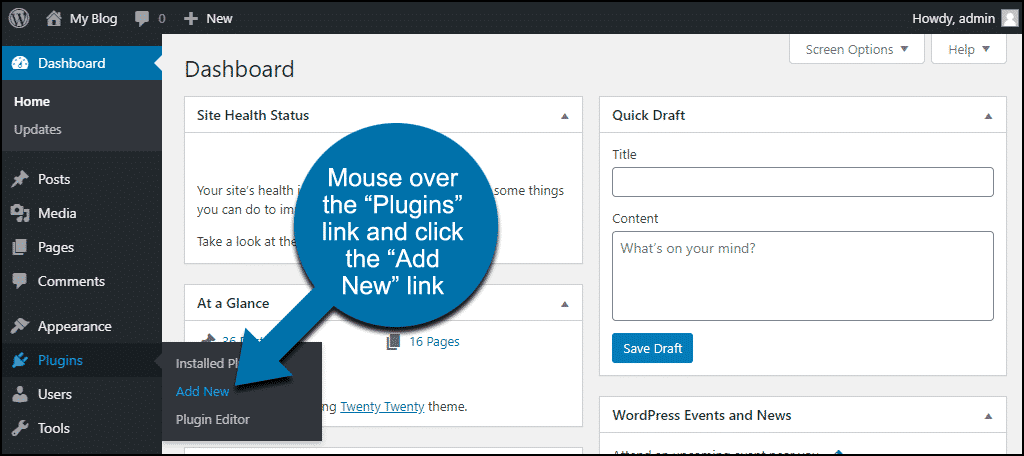
Step 1: Install LiteSpeed Cache
In the left column navigation, mouse over the “Plugins” link and click the “Add New” link.
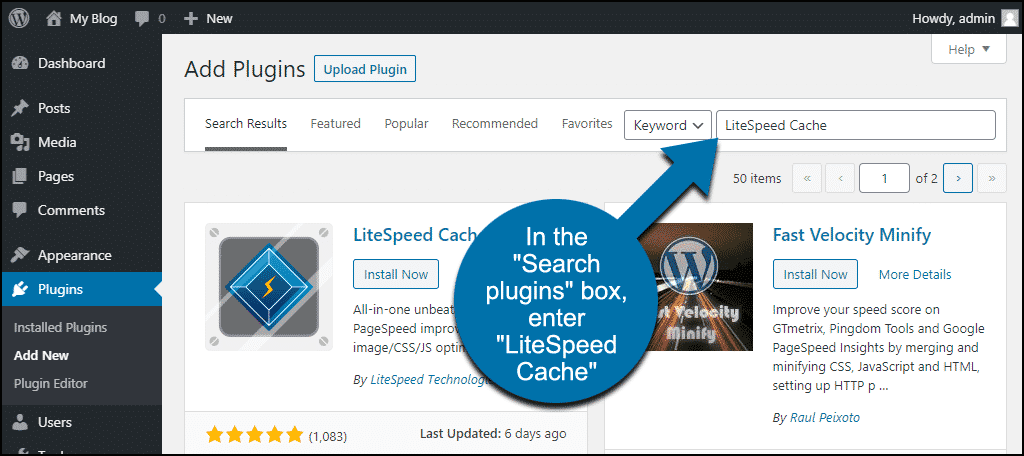
In the “Search plugins…” box, enter, “LiteSpeed Cache.”
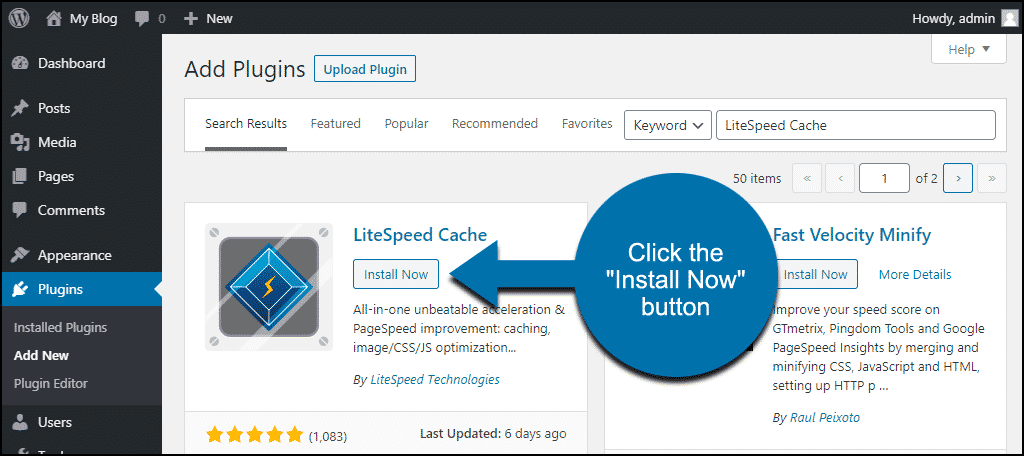
When you find the plugin, click the “Install Now” button.
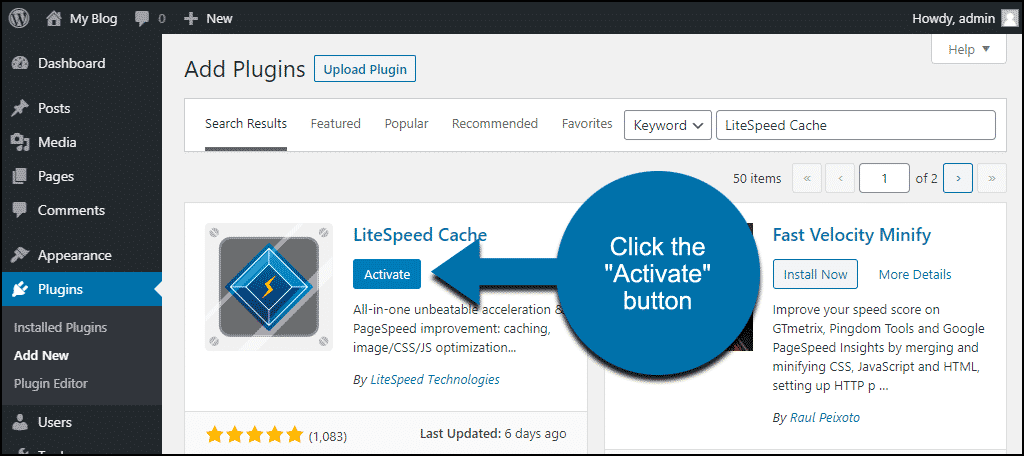
Now the plugin is installed, but it has to be activated before you can use it.
Click the “Activate” button.
Step 2: LiteSpeed Cache Overview
When LiteSpeed Cache is enabled, it begins improving your website speed immediately, before you configure anything.
Before we talk about settings, you should know that the LSCache plugin can run in two ways:
- Without a LiteSpeed server – this essentially means that you can use all the optimization features but not caching.
- With a LiteSpeed Web Server and LSCache license – this option gives you full functionality and both optimization and cache features.
If you want to use the caching features, you may have to contact your hosting provider to switch to a LiteSpeed Web Server.
GreenGeeks Ecosite websites run on LiteSpeed Web Servers, and the LiteSpeed Cache plugin is automatically installed when you install WordPress.
Okay, let’s get to those settings.
In the left column navigation, mouse over the “LiteSpeed Cache” link. You’ll see a number of options.
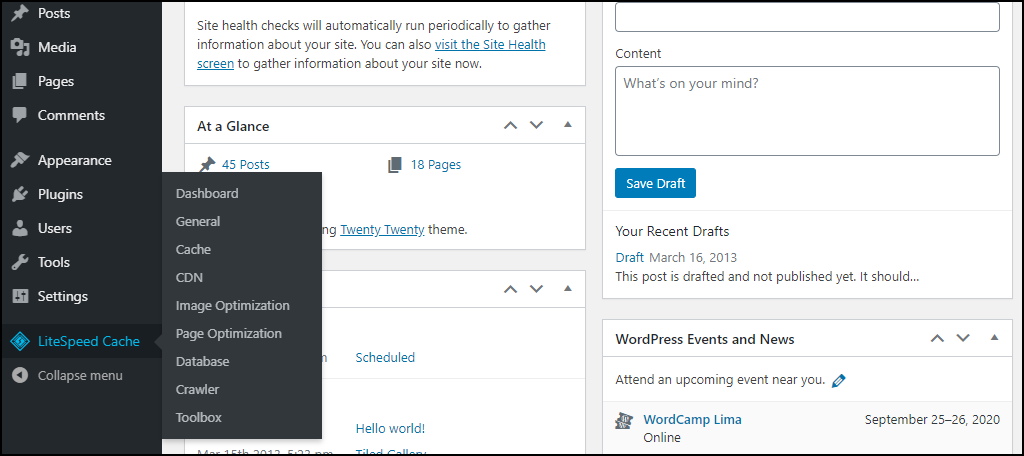
- Dashboard
- General
- Cache
- CDN
- Image Optimization
- Page Optimization
- Database
- Crawler
- Toolbox
Some of the available options are advanced or require a QUIC.cloud account. We aren’t going to cover those in this tutorial.
We’ll be focusing on the simpler LSCache configuration options that are available immediately: Cache and Page Optimization.
That’s a small portion of the tools, but they’re the two groups of controls that will have the greatest impact.
Step 3: LiteSpeed Cache Settings
In the left column navigation, mouse over the “LiteSpeed Cache” link and click the “Cache” link.

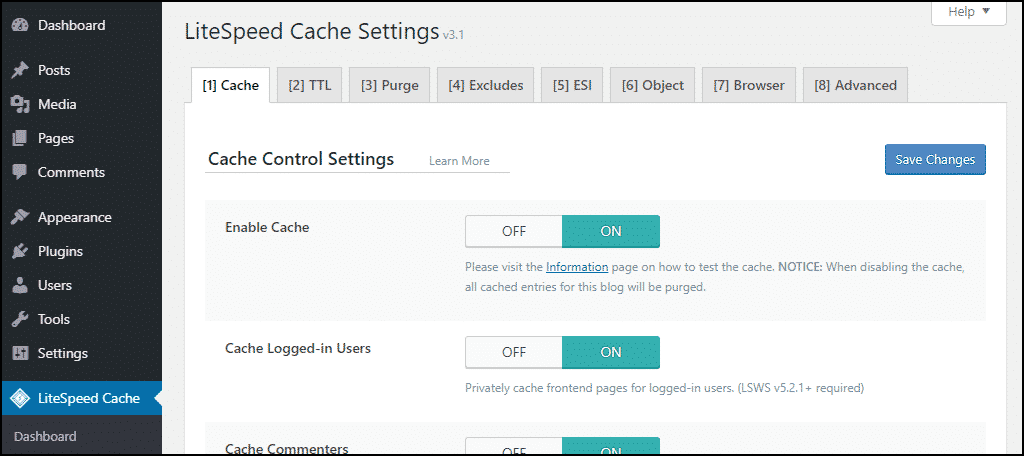
Here’s what’s available on the tabs:
- Cache – settings control cache for special content types, such as REST API calls and login pages.
- TTL – (time-to-live) settings control how long certain content types are saved in the cache.
- Purge – settings for purging content from the cache. By default, the LiteSpeed Cache plugin automatically purges cache when plugins, themes, or the WordPress core is updated.
- Excludes – settings defining the types of content that you do not want to cache.
- ESI – Edge Side Includes settings. ESI is an advanced caching technique for caching portions of pages.
- Object – object cache stores the results of frequent database queries so they can be easily retrieved. That can eliminate the need to repeat some database queries.
- Browser – if you activate this, your site will cache certain files in the visitor’s browser.
- Advanced – advanced settings like login cookie and link hover preloading.
Whenever you make changes to any cache options (or the page optimization options below), be sure to test your site to verify that it is still working correctly. Misconfiguration of some of these options can break site functionality.
Step 4: LiteSpeed Page Optimization Settings
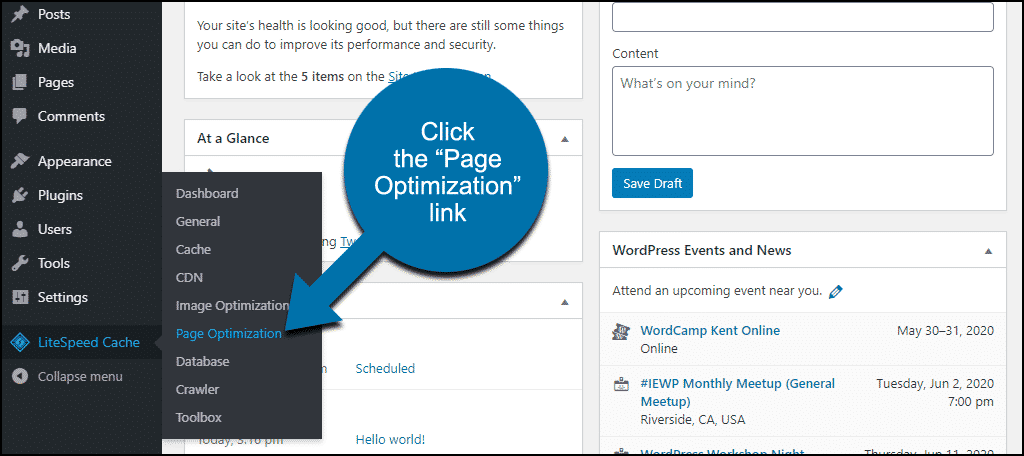
In the left column navigation, mouse over the “LiteSpeed Cache” link and click the “Page Optimization” link.
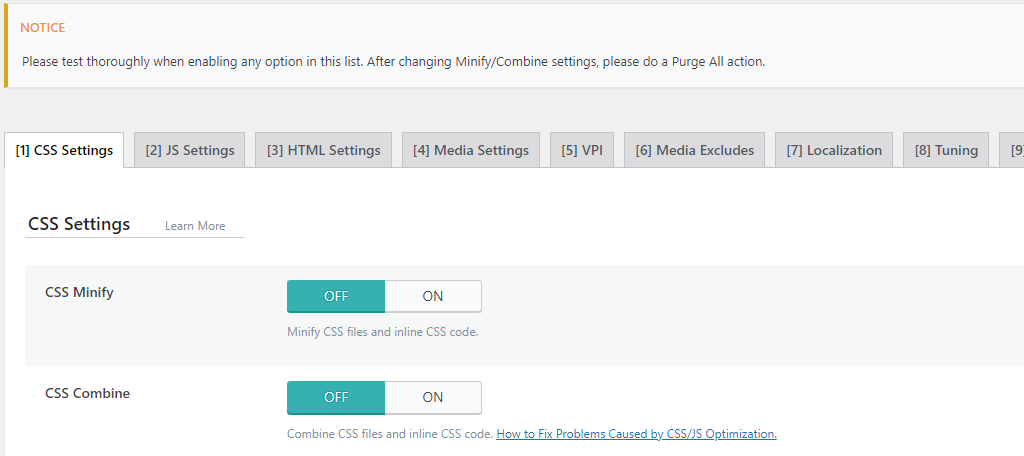
Here’s what the tabs on this page control:
- CSS Settings – including CSS minifying, loading, and caching. A font display control lives here as well.
- JS Settings – includes JS (JavaScript) minifying, combining, inlining, etc.
- HTML Settings – includes minify and lazy load options for HTML. You’ll also find options for WordPress emojis, Google Fonts, and more.
- Media Settings – image placeholder, LQIP (Low-Quality Image Placeholder) settings, etc. There’s a “Lazy Load Images” setting here, but WordPress automatically began lazy loading images in version 5.4. If you run an up-to-date version of WordPress, you don’t need to enable lazy loading in this plugin.
- VPI – controls viewport image settings
- Media Excludes – these settings are all related to lazy loading images.
- Localization – Gravatar cache settings.
- Tuning – for JS files
- Tuning CSS – for CSS files
As you can see, there are many configuration options available in the LiteSpeed Cache plugin. For a deeper dive, you can consult the LiteSpeed Cache documentation.
We’re not really going to go into too deep of detail regarding the intricate settings of LiteSpeed Cache only because every website is going to be different. You’ll have to adjust them according to your own specific needs.
The documentation above is a great starting point as it will help you understand what each point offers.
You can also check out our LiteSpeed webinar for more information about the default settings and how to use the plugin more efficiently.
How Cached Web Pages Are Served
Installing something like the LiteSpeed Cache plugin is a great way to speed up your website. Basically, web pages are served up differently when you have a caching plugin.
When caching is activated, the server stores an HTML file of your web page or pages. Usually, it is stored in the server’s Random Access Memory (RAM), which is very fast.
When a browser requests a web page, the server does not need to perform all the processing talked about above. It simply serves up the page it already has on file, and that leads to much faster page load times.
You might be wondering then what happens when you make changes to your site or add a new post or page. Well, every cache plugin, including LSCache, has a way of dealing with these scenarios. Oftentimes, what happens is based on the settings you are using.
That being said, a cache plugin that has been properly configured on your WordPress website would delete cached versions of your homepage, archives, or other pages you may have set. It would then create new versions of these pages to serve up to future site visitors.
Other pages may remain untouched. Again, this depends on the settings you specify.
There Are (at Least) Two Types of Caching
The most common types of caches are browsers and servers. Browser caching is, as you might expect, done on the visitor’s end. It involves a browser cache like that in Chrome.
Then you have the server-side caching, like LSCache. That’s done on the website server.
Let’s take a look at some of the differences between the two.
Browser Caching: This allows your browser to store files from sites, especially sites you visit a lot. This way, your browser does not have to retrieve new files every time a website is visited.
Server Caching: Instead of processing every single request, a server takes the results of all the requests and stores them to quickly serve up the saved results.
Is Website Caching Important?
Yes, it is very important. When caching is used properly, your website speed will be dramatically improved, and your overall SEO will improve as well. This is because site speed is something Google takes into account when ranking websites.
Final Thoughts on the LiteSpeed Cache Plugin
As you can see from the sections that we looked at, the LiteSpeed Cache plugin is quite advanced. It takes a bit of digging and learning to take full advantage of what it offers.
That being said, LiteSpeed Cache is probably the best plugin available today for caching. Now that is a matter of opinion, and there are several really good ones out there.
Admittedly, there are some easier-to-install and manage cache plugin options, including W3 Cache, WP Cache and WP Super Cache, and Autoptimize. But if you are looking for professional functionality and developer-level caching, LiteSpeed is perfect for you.
And one important note before we go: if you decide to run a different caching plugin, disable LiteSpeed Cache. Never run more than one caching plugin on your WordPress website.
Let us know how LiteSpeed Cache works for you and how you like it. Did you replace a different cache plugin with this one? Do you prefer a simpler plugin with fewer options?
It’s probably worth adding here, or in a linked article, the potentially complicated considerations involved if the site is running through Cloudflare. I don’t think there’s an easy answer or even a consensus on if it’s worth trying to use both in the first place.
That might be more up to user preference. However, LiteSpeed is compatible and utilizes QUIC.cloud. So, if that’s a possibility, you may want to consider that as an option.
So we can reasonably assume that we can just leave the settings as they are installed by default, since you don’t really elaborate on any of that?
I second this. This tutorial doesn’t really explain much other than what the settings are, while at the same time saying that there’s inherent risk in changing any of the settings. Do we just leave the settings as is?
Kristen,
Every site is different. You will want to create settings based on your needs.
I echo the comment above – if we’re on GG hosting, do the defaults work OK?
The default settings can get you started, but it’s ideal if you go through and make adjustments specific to your website. We recently added a webinar about using LiteSpeed cache that might be of interest to you. https://www.greengeeks.com/webinars/optimize-wordpress-with-litespeed-cache/
Can I use ls cache on a Drupal site?
Yes, LiteSpeed does have a cache extension for Drupal websites.
Agree with Susie’s comments. It would be nice to have current settings recommendations for G.Geeks server configurations