Are you looking for a way to add tweet boxes for posts in WordPress? Integrating social media in WordPress has become a priority for every website and how effective you are at it can dictate how fast your website grows. A great way to integrate WordPress and Twitter is to give visitors the ability to directly send tweets from your post content.
This gives visitors the opportunity to immediately share what they thought about the post content with their followers. It is extremely convenient for visitors and significantly increases the chances of a visitor tweeting about your content. Today, I will demonstrate how to add tweet boxes for posts in WordPress using the Better Click to Tweet plugin.
Why Allow Visitors to Tweet from WordPress
Having your content mentioned on social media platforms is extremely important, but it is also very difficult. Adding tweet boxes to WordPress makes it much more convenient for visitors to create tweets related to your content. The more convenient it is, the more likely it is for someone to tweet. Let’s look at the process with and without a tweet box.
A visitor just reads an article he/she really likes on your website. There is a tweet box on that article that allows him/her to create a message and it will automatically link to the post and to the website’s Twitter handle.
If there is no tweet box and he/she wants to share it on the social media platform, he/she needs to go to the platform itself to tweet it. Of course, just saying that the content is great isn’t enough. They would then need to grab the link for the article and your website’s Twitter handle. Most people will not go through the trouble.
As you can imagine, it is much more convenient to have a tweet box in WordPress. It will help make your content more shareable on Twitter.
How to Add Tweet Boxes for Posts in WordPress
Today, I will demonstrate how to add tweet boxes for posts in WordPress using the Better Click to Tweet plugin. This plugin makes adding a tweet box quick and simple. Simply add your Twitter handle and add a shortcode or click on the new option in your toolbar to the post and you have a tweet box ready to go. The only issue with the plugin is that you will have to add the shortcode to every post you want the tweet box to appear on, which can be an issue for larger websites.
If you encounter the “This plugin does not have a valid header.” message when trying to activate the plugin, clear your website’s cache. There are many plugins that can help you manage your website’s cache.
Installing Better Click to Tweet
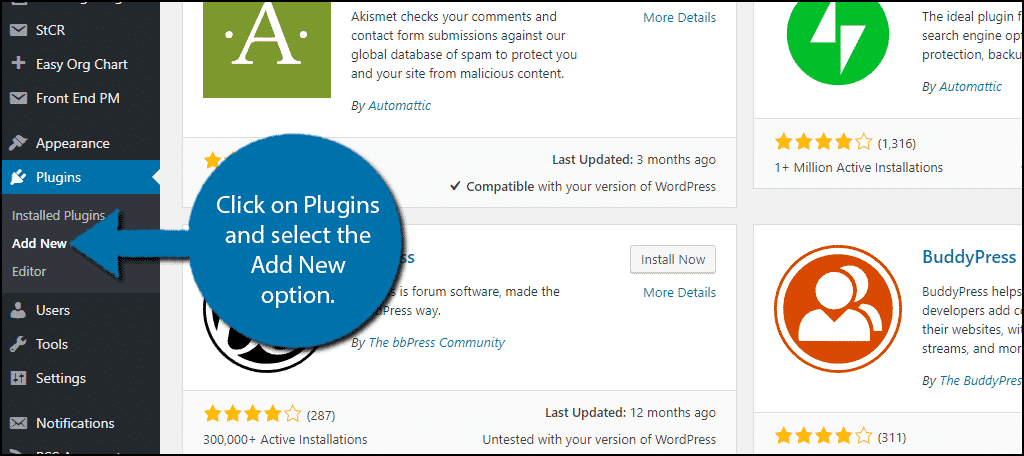
Let’s start by clicking on Plugins and selecting the Add New option on the left-hand admin panel.
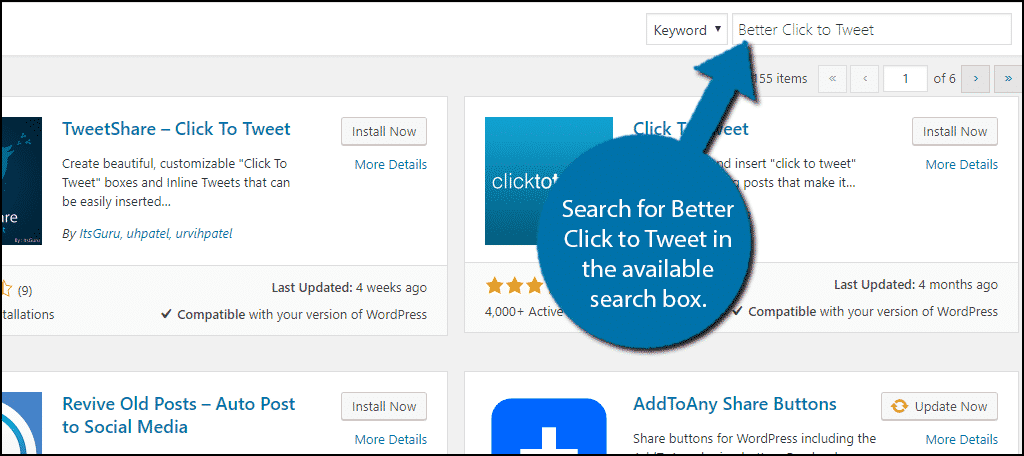
Search for Better Click to Tweet in the available search box. This will pull up additional plugins that you may find helpful.
Scroll down until you find the Better Click to Tweet plugin and click on the “Install Now” button and activate the plugin for use.

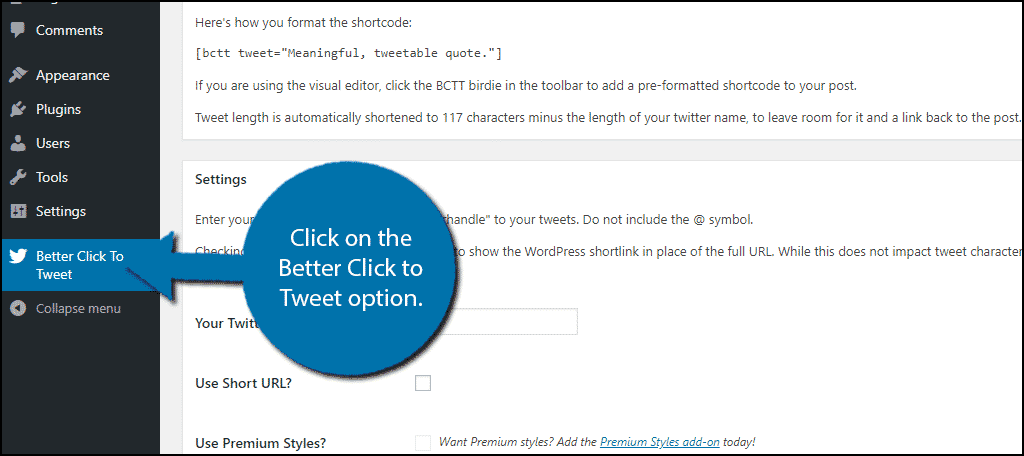
On the left-hand admin panel click on the Better Click to Tweet option. This will pull up the main settings page.
Setting Up Better Click to Tweet
This plugin does not have a lot of settings to change. Instead, it uses shortcodes to do most of the work. At the top of the page, you will see an instructions section. This will give you clear instructions on how to use the shortcodes in your post content, but I will list them later on as well.
Underneath you will find the Settings section. Here you can add your website’s Twitter handle and select to use a short URL or not.
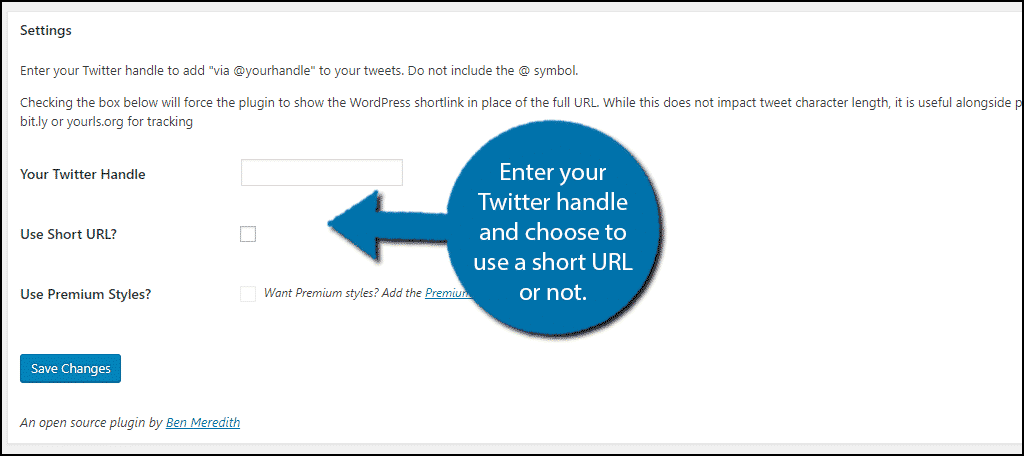
I recommend setting up custom short URLs because they make your content easier to share on social media platforms. Once you are done, click on the “Save Changes” button.
Adding the Tweet Box to Post Content
Now that everything is set up, it is time to actually start adding tweet boxes to your post content. As I said before, this plugin lacks a bulk action feature. You will have to manually insert the shortcode into every post or use the Better Click to Tweet Shortcode Generator button. It’s very simple, but it can be very tedious work for larger websites.
Open any existing post or create a new one. You have two options for adding tweet boxes. Enter the following shortcode: [ht_message mstyle=”info” title=”” show_icon=”” id=”” class=”” style=”” ][bctt tweet=”Enter Tweet Message Here!”][/ht_message]
Or click on the Better Click to Tweet Shortcode Generator button, which is represented by the Twitter icon.
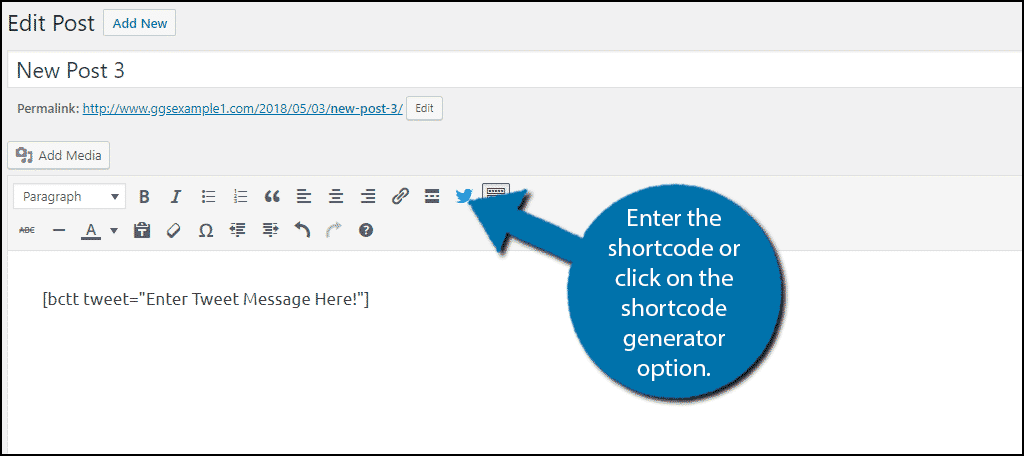
Make sure to place the shortcode exactly where you want the tweet box to appear. Check the page preview or the live page to see the changes.
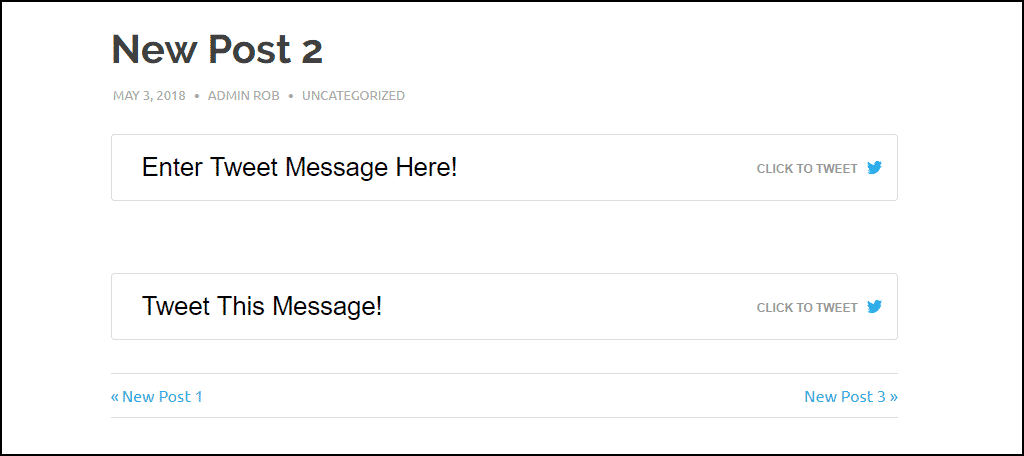
Congratulations, you have successfully added a tweet box to your WordPress post. You will need to repeat this for every single post that you want it to appear on. I recommend placing the tweet box in the exact same location on every post.
Help Visitors Share Your Content
While many visitors will happily share your content on social media platforms, it doesn’t happen as often as you want it to. You need to take the initiative and make it as easy as possible for visitors to share your content on their favorite platform. A share button for every platform can help you achieve this. The more platforms you sign your website up for, the better the chances that a visitor will find you on one of them.
How easy do you find the Better Click to Tweet plugin to use? Have you gained followers on Twitter since adding the tweet box?