
Redirects are incredibly useful in WordPress because they allow you to send users from one URL to another. There are a lot of reasons why you may have to set redirects. The most common occurs when you are switching web hosts. Or, perhaps if you choose to change the slug or URL of your content.
When a web host switch happens, links can be broken during the process. Redirects are the solution. Redirects can be permanent or temporary, it really depends on why you need to set one up.
Since leaving a broken link will have a serious impact on your SEO, it’s imperative that you set up redirects quickly. The good news is that while this may sound complicated, it’s incredibly simple with the right tool.
Today, I will demonstrate a variety of ways to create redirects in WordPress.
When Should You Use Redirects in WordPress?
There are plenty of uses for redirects besides switching web hosts. These include redirects to updated or revised content, new products or services, limited-time deals, holiday specials, 404 error pages, etc.
Any time you want a visitor who is accessing one page to go to another page, a redirect can be used.
Let’s say your website sells products that change every month. Each month has an exclusive rotating deals page. You can set up a redirect to bring visitors to the correct page for that particular month. Redirects can be useful in so many different situations.
However, what’s important to keep in mind is that there are a variety of different kinds of redirects in WordPress. Each one is denoted by its HTTPS status code.
While there is a long list of redirects, for SEO purposes, your site will primarily use two types. These include:
301: A 301 redirect is the most popular type of redirection because it is permanent. Using this type of redirect transfers all of the rankings from one page to another. It is ideal when a page becomes obsolete and needs to be replaced.
302: A 302 redirect is a temporary redirect that tells the search engine that the page has been moved temporarily. It is primarily used when you are in the midst of redesigning a page or performing maintenance.
How to Set Up Redirects in WordPress
Redirects are an essential part of any website, and as such, there are a variety of ways you can add them in WordPress. We are going to focus on the main three which include using a plugin, editing the .htaccess file, and using the cPanel.
Without a doubt, using a plugin is going to be the easiest option for beginners, but the other methods have their advantages.
Method 1: Use the Redirection Plugin
Redirection is a very popular WordPress plugin that allows you to easily manage 301 redirections and keep track of 404 errors. It also works as a good plugin to help clean up any loose ends you may have stemmed from the issues above.
If done properly, the plugin will also help reduce site errors and help your overall SEO ranking.
One of the best things about this plugin is that you can use it with small or large sites. Need to manage a few 301 redirects in WordPress? No problem. Have to manage thousands of redirects? This plugin has you covered.
The plugin is lightweight, yet very powerful. It is packed full of functionality and features, which is why it has over 2 million active installs.
Note: WordPress has a lot of redirection plugins. Thus, feel free to browse some of the other options. Just keep in mind this tutorial will only cover Redirection.
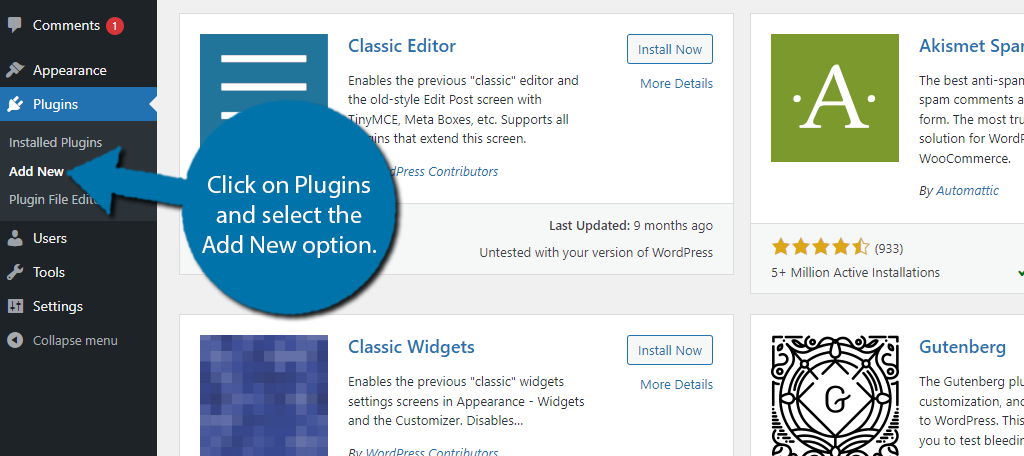
Step 1: Install Redirection
Click on Plugins and select the Add New option on the left-hand admin panel.
Search for Redirection in the available search box. This will pull up additional plugins that you may find helpful.
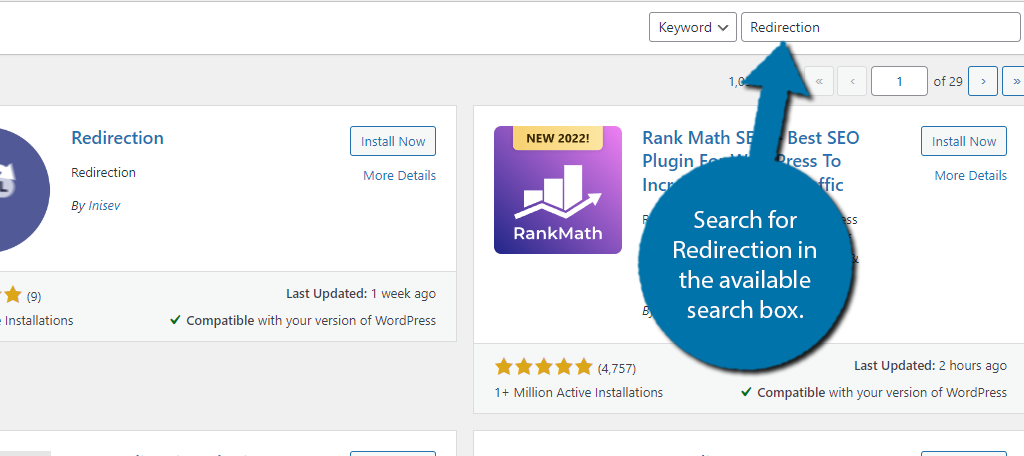
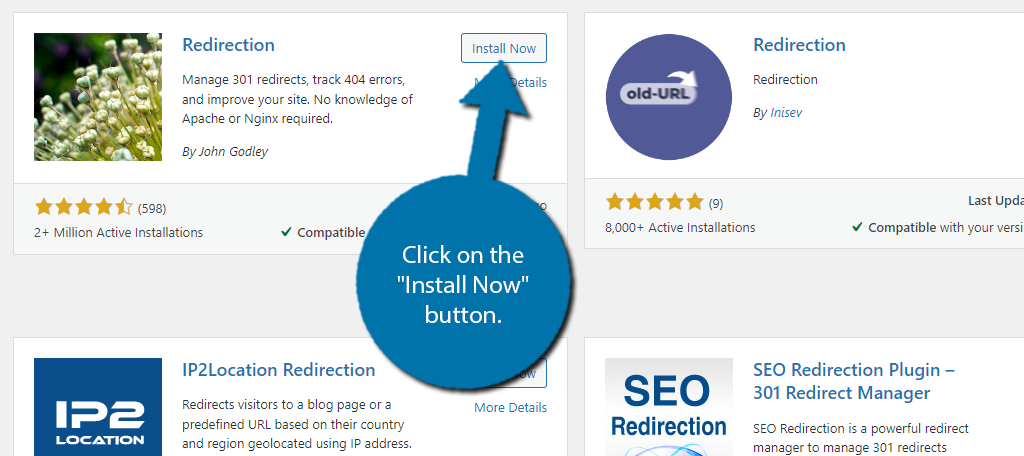
Scroll down until you find the Redirection plugin and click on the “Install Now” button and activate the plugin for use.
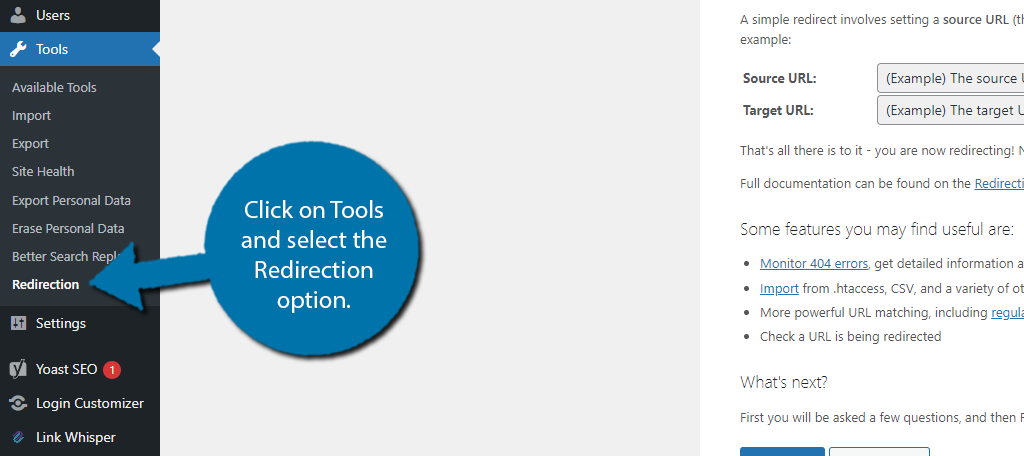
Step 2: Setting Up Redirection
The Redirection plugin is pretty easy to use and has a lot of versatility. But before you can really do anything, you need to take a moment and set it up. Luckily, this is also pretty simple.
Access the plugin’s settings by clicking on Tools and selecting the Redirection option.
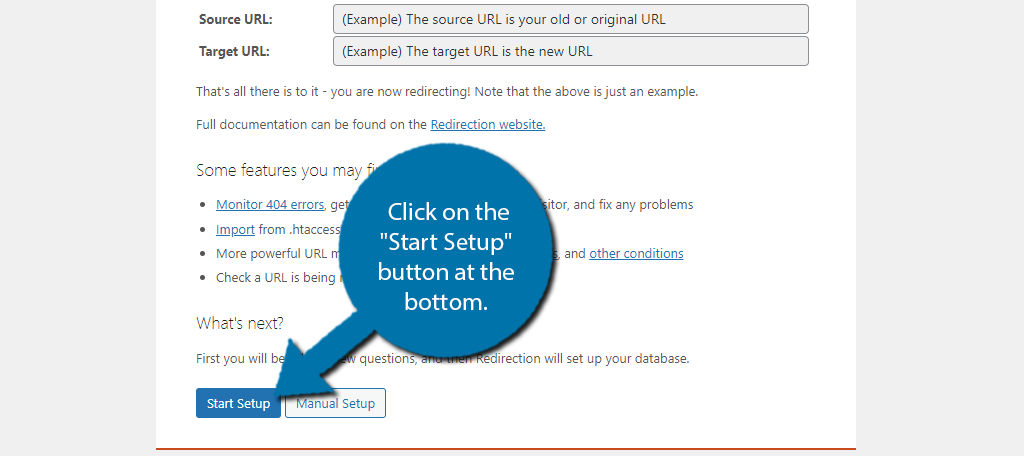
You will be greeted by a short explanation of how the plugin works, which I encourage you to read. Once you have done that, click on the “Start Setup” button at the bottom.
Note: There is a “Manual Setup” button as well, but that is intended for more advanced users.
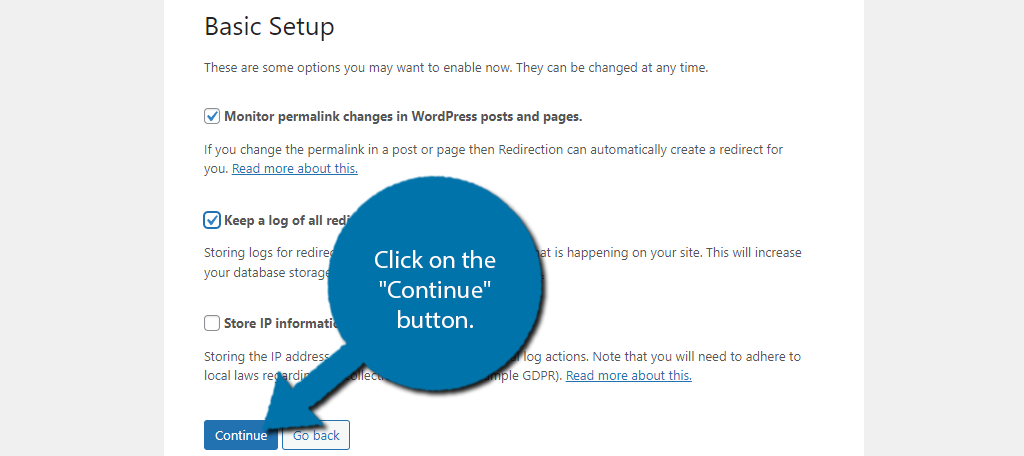
You’ll see the Basic Setup section that contains three options.
The first option is to monitor your website’s permalink structure. If it detects a change, the plugin will automatically set up redirects for your content. While the second will store error logs to help you troubleshoot problems.
The third option only becomes available if you checked the second option. It provides options to store additional data to further aid in troubleshooting.
Check the boxes if you are interested in those features and click on the “Continue” button.
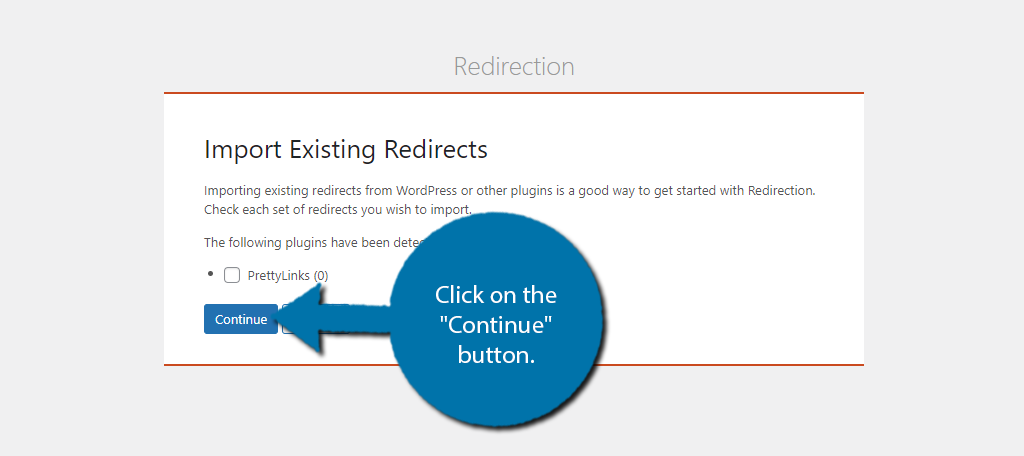
You’ll then see an option to import redirects from other plugins. You should only have one plugin handling your site’s redirects, so be sure to import any redirects and then delete the other plugin.
After this, click on the “Continue” button.
The last section will explain that the plugin uses the Rest API. There’s nothing for you to actually interact with here, so just click on the “Finish Setup” button to conclude the initial setup.
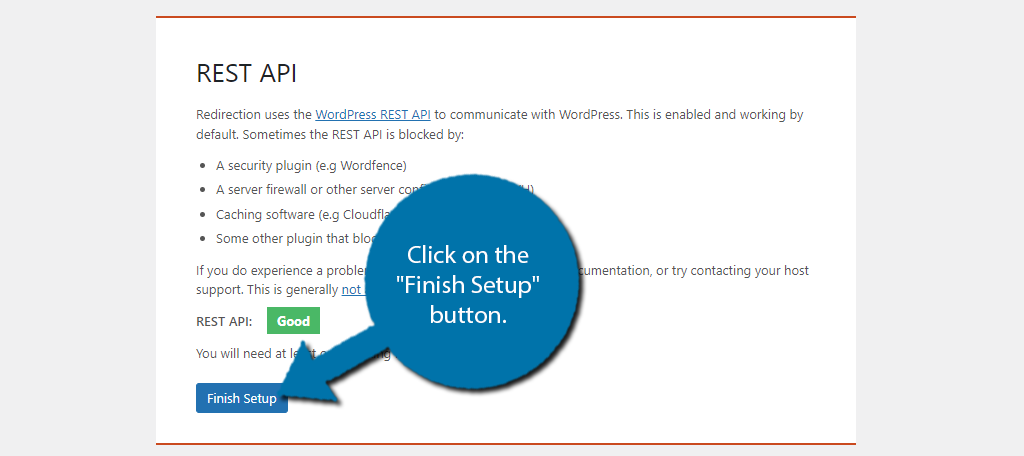
After that, the plugin will apply the settings and congratulate you. You are now ready to actually use the plugin.
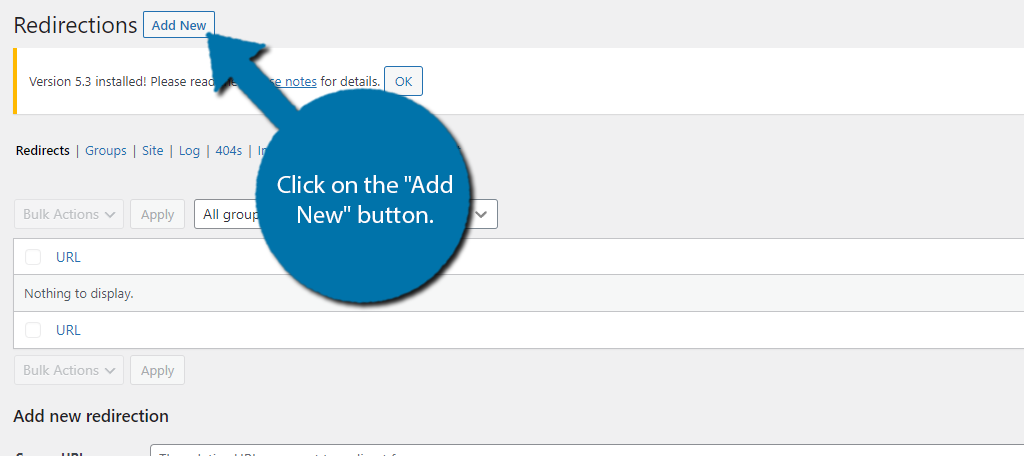
Step 3: Create Redirects
The plugin is pretty straightforward to use. It just consists of entering the old URL and the new URL, so you won’t have any problems.
In the Redirection section, click on the “Add New” button.
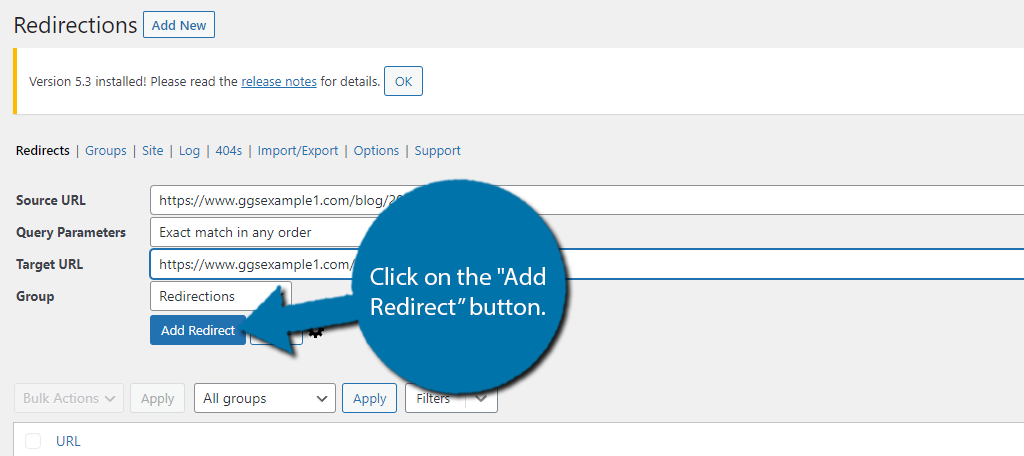
In the Source URL, enter the URL that you want to redirect the page from. For example, if you want the visitor’s access page A to see page B, then page A is the source URL.
Below this is the Query Parameters. The default option is for an exact match, and for the majority of users, that is the only option you need. There are other options, but those are for more advanced users.
Then you need to enter the Target URL, which is the URL you want to send visitors to.
Click on the “Add Redirect” button to finish.
A good way to remember this is:
- Source URL = “from”
- Target URL = “to”
And that’s it. Setting up redirects in WordPress is simple when using the Redirection plugin.
Method 2: Set Up Redirects in WordPress with the .htaccess File
The .htaccess file is one of the most useful files for any website and it can be used to set up redirects. However, there are no safeguards in place to prevent mistakes like when using a plugin.
Thus, you can potentially make a mistake and seriously impact your website. For this reason, you should have a basic understanding of editing files and create a backup to ensure you can revert the changes if you make a mistake.
With that said, using the .htaccess file to create redirects is pretty easy, so don’t worry too much.
Step 1: Locate the .htaccess File
Before you can edit the file, you need to locate it in your hosting account. This file is located in your website’s root directory, so it should be easy to find, assuming it exists.
It is possible that the file may be hidden or was never actually generated. In that case, you will need to do some extra work.
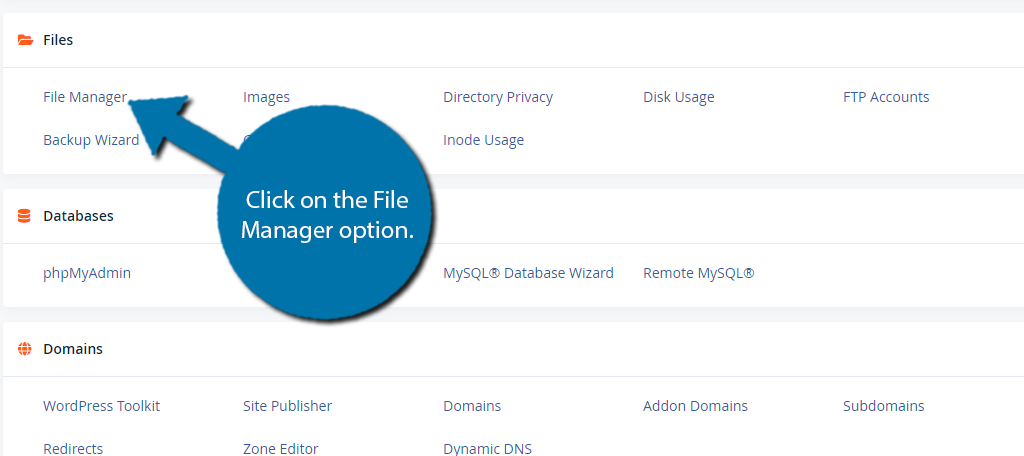
First, begin by logging into your web hosting account and accessing the cPanel.
Click on the File Manager option.
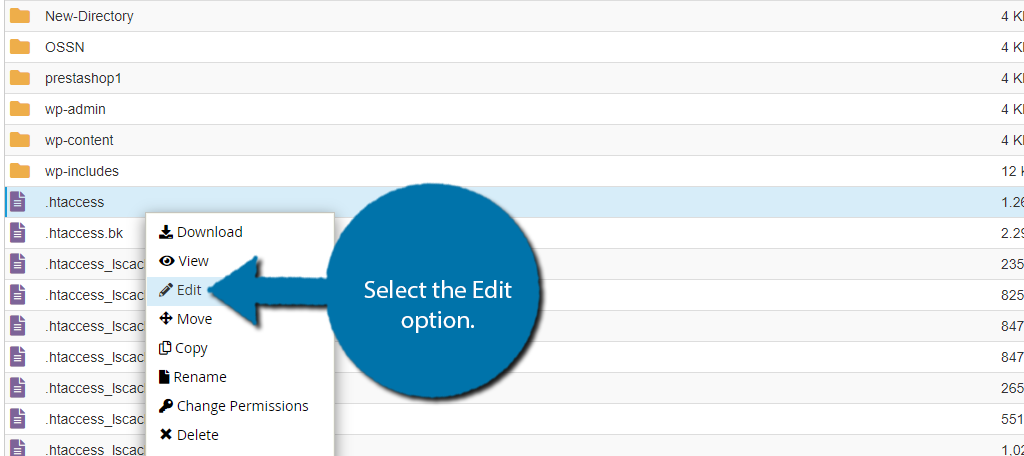
Go to your website’s root directory (typically called public_html) and search for the .htaccess file. When you find it, right-click on it and select the Edit option.
Mac users will use CMD+click to open these functions.
Of course, if the file is not there, you need to do an extra step.
Step 2: Generate the .htaccess File (Optional)
Now, it may sound like a lot of work to generate a file, but it’s actually quite simple in this case. All you need to do is save your permalink structure and the file should generate.
To do this, visit your WordPress site, click on Settings, and select the Permalinks option.
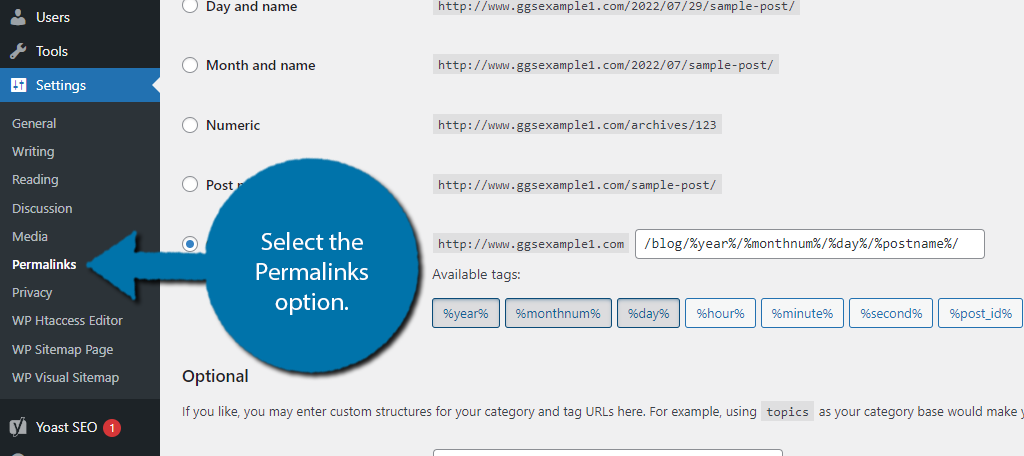
You don’t actually need to make any changes to this section. All you need to do is click on the “Save Changes” button and the .htaccess file should generate itself.
Note: If this doesn’t work, you may need to change visibility options for files as the .htaccess file may be hidden. You can also try to manually upload an .htaccess file.
Step 3: Create Redirects
Now that you are in the file, you can begin setting up redirects. There are two main ways to do this.
The first is if you want to redirect a single URL. All you need to do is add the following line to the .htaccess file:
Redirect 301 /old-url-slug https://YourWebsite.com/new-url-slug
Let’s unpack this. First, notice how it says “Redirect 301” at the beginning. This can actually be changed to accommodate other redirects. For instance, you could replace “301” with “302” if you want a temporary redirect.
You only need the slug of the old URL. As a reminder, the slug is everything after the “.com” part of the URL. So for www.YourWebsite.com/cats, only the “/cats” is needed.
However, for the new URL, you need to include the full URL.
So, for this example, the line in the file would look like:
Redirect 301 /cats https://YourWebsite.com/new-url
Redirect Entire Website
It is also possible to redirect an entire website by using the .htaccess file. If you want to redirect one URL to another, you just need to add the following:
RewriteEngine on
RewriteCond %{HTTP_HOST} ^oldURL.com [NC,OR]
RewriteCond %{HTTP_HOST} ^www.oldURL.com [NC]
RewriteRule ^(.*)$ https://newURL.com/$1 [L,R=301,NC]
This should only be used if you are changing your domain name. Simply save the changes and you are good to go.
Method 3: Using the cPanel
The cPanel itself actually contains a redirection tool for you to use. To be honest, it is one of the best ways to set up redirects. It’s just as easy as using a plugin and you will be able to access any domain name on your web hosting account.
The only downside is having to actually log into the cPanel itself, but that’s just an extra 15 seconds or so.
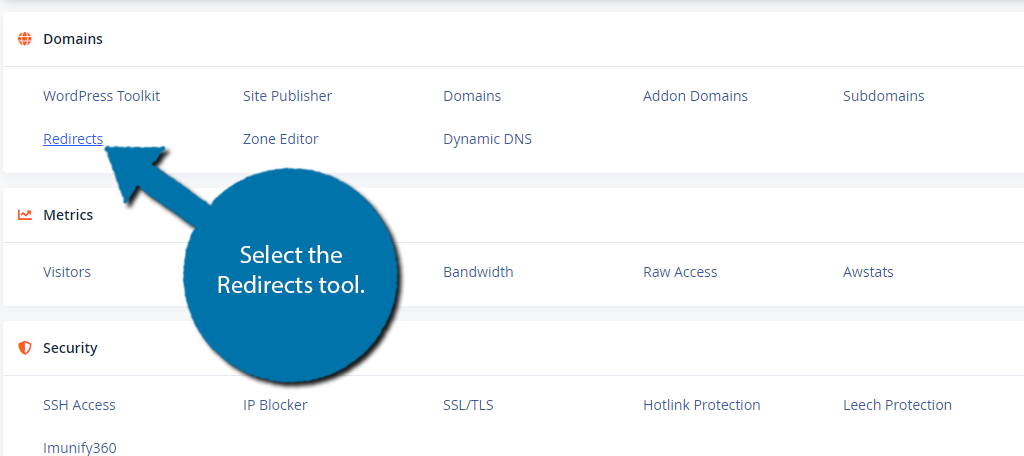
Step 1: Go to the Redirection Tool in cPanel
First, you need to log into your web hosting account and access the cPanel. Once you are there, you need to locate the redirection tool. It is located in the Domains section.
Step 2: Choose Redirect And A Domain
The first thing you need to do is choose what kind of redirect this is. The cPanel allows you to create 301 (Permanent) and 302 (Temporary) redirects.
Simply choose one from the drop-down box:
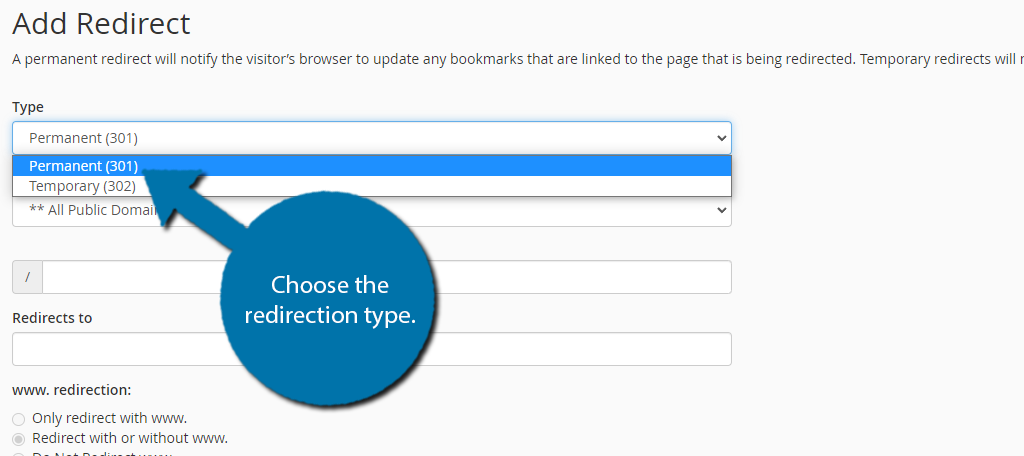
Now, if you just have one domain associated with your web hosting account, this step does not apply to you, as it will just default to the only option.
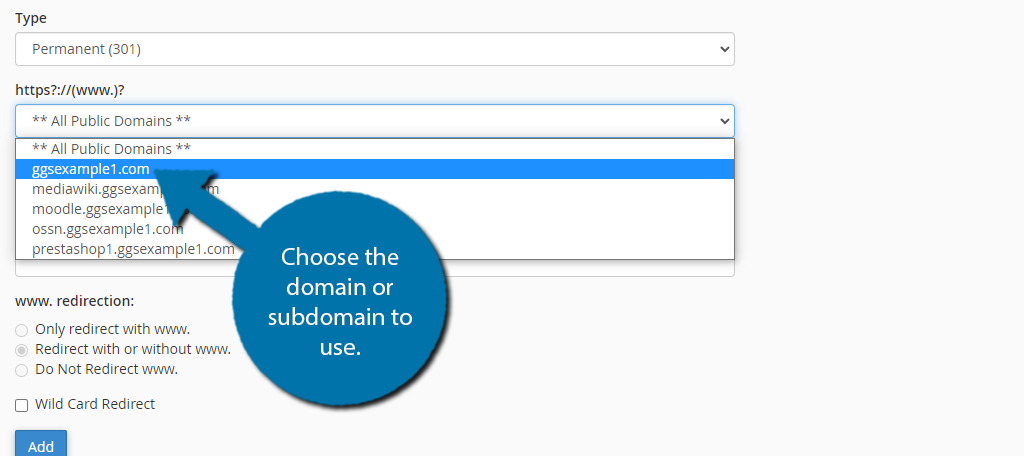
However, if you have another domain or subdomain, then you do need to specify which one to create a redirect for.
Luckily, you just need to select it in a drop-down box.
Step 3: Enter the URLs
Now you need to enter the URLs you want to redirect from and to. There are actually two ways to use this tool.
The first is for one domain to another and the second is for individual URLs.
If you want to redirect an entire domain, just enter the full domain name into the “Redirects to” box. This includes the “https://” and leave the other field with the “/” blank as it is not necessary for domain-to-domain redirects.
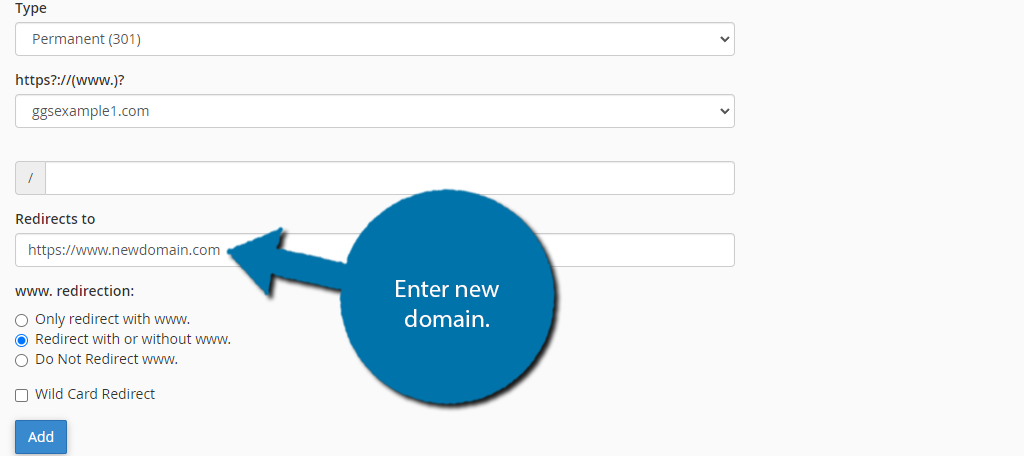
Then, just click on the “Add” button, and you are done.
If you want to use this tool for individual page redirections, it’s just as easy. Remember how you chose which domain to use? All you need to do is enter the slug for the page you want to redirect from.
Then enter the full URL for the page you want to redirect to.
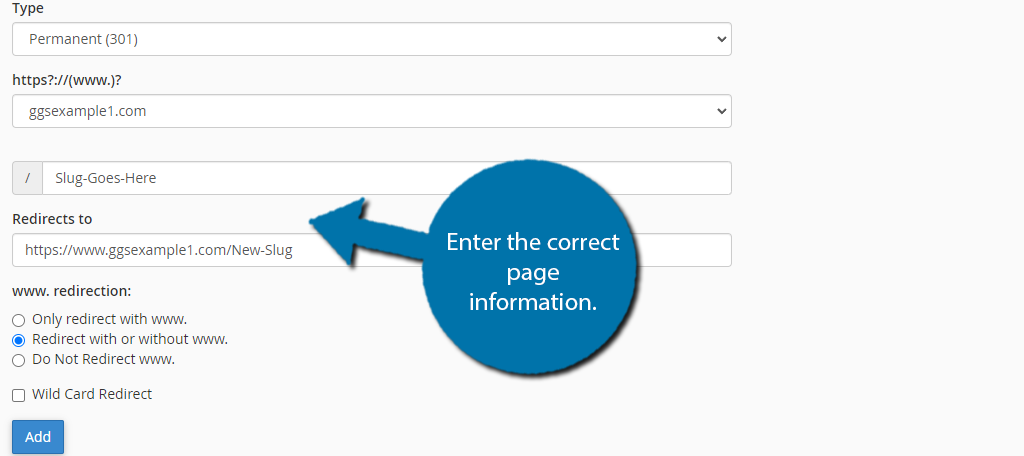
Note: There are some additional checkboxes you can toggle. The default choice is to redirect with or without the www. part of the URL and this should be the option you use. Thus, you do not ever need to change this.
Just click on the “Add” button and you are done.
Whenever a redirect is created, it will be added to the bottom of the page. You can edit or delete the redirect at any time by using the appropriate options.
Set Up Redirects in WordPress Today
As you can see, not only are there a variety of ways to set up redirects in WordPress, but none of them are very difficult. Thus, you don’t have a good excuse to not do it.
They are an integral part of your website’s SEO efforts. Leaving a broken page or similar content up can negatively impact your content. That’s why you want to redirect older posts to newer posts that contain the same info.
As you know, or will know, managing a website is a full-time job, so start setting up redirects today.
Which method do you use to set up redirects? Do you think it is more convenient to use a plugin to set up redirects?