Are you looking to give your website’s SEO a boost by adding a sitemap? If so, then using the Google XML Sitemaps plugin is by far the best way to do it. Everything is done automatically, but it gives you the option to change the settings if you desire.
Don’t let the name fool you either, this plugin can create sitemaps for other search engines like Bing as well. I’d strongly recommend identifying the top five search engines your audience uses to help you plan appropriately.
Today, I am going to demonstrate how to set up an XML sitemap on your WordPress website with this plugin.
Why Add a WordPress XML Sitemap?
A sitemap is a file that provides all of the information about your website. This includes pages, videos, and any other types of files your website uses. And it’s one easy-to-read file, at least if you are a bot.
As a result, search engines, like Google, can quickly identify the key information they will use to determine your website’s ranking.
The easier it is to obtain this information, the better your website will rank. If a website has been poorly constructed, is difficult to navigate, and does not contain a sitemap, the search engine bots that scan and index your website could miss crucial information that can result in lower rankings.
Adding an XML sitemap to WordPress is a surefire way to avoid this.
Not Just For Search Engines
A big misconception is that sitemaps are only for search engines, but that is simply untrue. A site map can not only help your visitors find what they are looking for but help you make your own website easier to navigate.
Since a sitemap is the collection of all of your website’s pages and files, it’s easier to see everything your website has. This is extremely useful for larger websites that have hundreds or even thousands of pages.
A great analogy is to think of the sitemap as the map of a department mall. Its a big place and easy to get lost. But if you take a look at the map, you can see where to go. The sitemap works like this for not only visitors but for developers.
You can use it to ensure that every part of your website is easy to reach.
Installing Google XML Sitemaps
Google XML Sitemaps is the best WordPress sitemap plugin available with over 2 million active installs. It has been regularly maintained for over 9 years, so you have nothing to fear by relying on it for your sitemap needs.
The plugin works perfectly for most websites without ever touching a setting. However, some website owners may prefer to customize the settings. But, this is optional and only recommended if you know what you are doing.
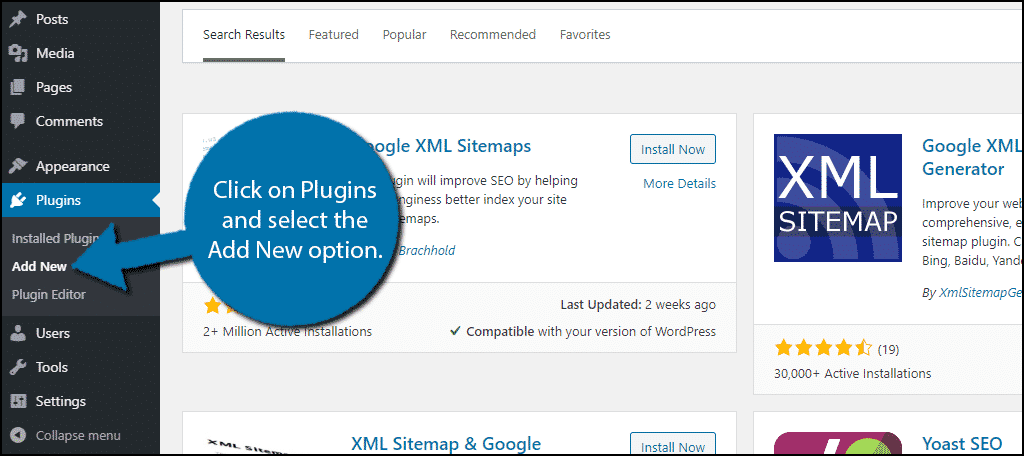
Let’s start by clicking on Plugins and selecting the Add New option on the left-hand admin panel.
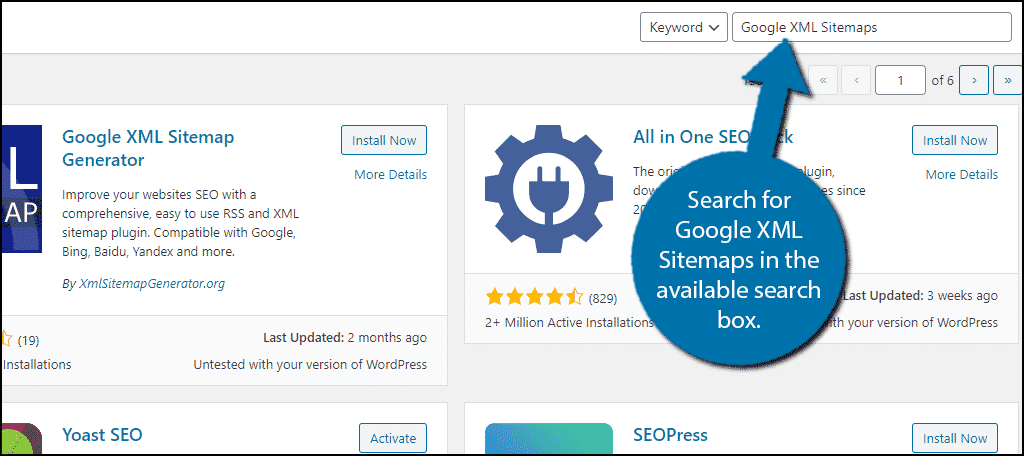
Search for Google XML Sitemaps in the available search box. This will pull up additional plugins that you may find helpful.
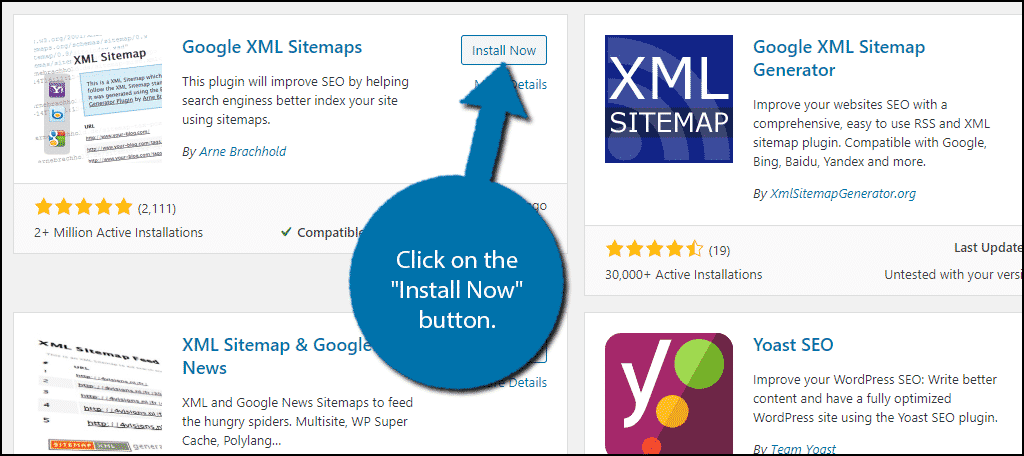
Scroll down until you find the Google XML Sitemaps plugin, click on the “Install Now” button, and activate the plugin for use.
Using Google XML Sitemaps
Upon activation, the plugin will automatically create a sitemap for your website, but search engines will not be aware of it. As I said before, the default settings will work for most websites, but you can change them.
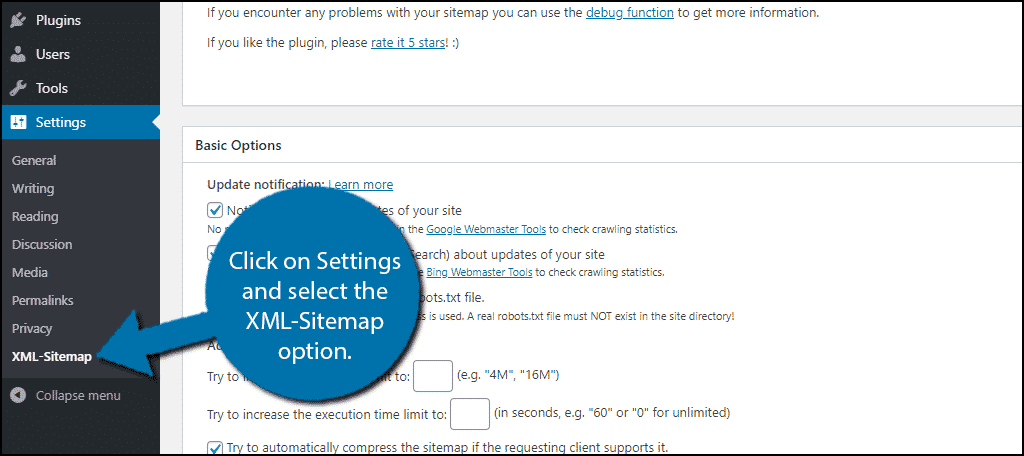
On the left-hand admin panel, click on Settings and select the XML-Sitemap option.
The settings of the plugin are very straightforward. They are broken down into multiple sections, but the default settings will work for the vast majority of websites. Thus, you can actually choose to ignore them completely.
I do recommend going through the settings to become familiar with them, but everything should be fine as-is.
Telling Search Engines About Your Sitemap
At the top, you should see a section labeled “Search engines haven’t been notified yet.” In it, you will find a link to the sitemap the plugin generated, which I recommend reviewing. But more importantly, it will tell you to notify the search engine.
Google has a great page that goes over everything you need to know about sitemaps and its search engine. Keep in mind that each search engine is unique so you will have to follow each one you want to inform.
Note: If you plan to customize the settings, make sure to do so before alerting the search engine about the sitemap.
I will explain how to do so for Google, but make sure to consider other search engines like Bing.
1. Ping Method
The ping method is by far the easiest and quickest method since it just requires you to copy and paste a link.
In your browser’s URL box, enter:[ht_message mstyle=”info” title=”” show_icon=”” id=”” class=”” style=”” ]https://www.google.com/ping?sitemap=
You need to replace the “
Note: Make sure to remove the chevrons (< and >) from the URL.
Thus, the URL should look like this:[ht_message mstyle=”info” title=”” show_icon=”” id=”” class=”” style=”” ]https://www.google.com/ping?sitemap=https://www.ggsexample1.com/sitemap.xml.[/ht_message]
You should see this page if it was entered correctly:

Google will add your sitemap to its list for its bots to crawl through.
2. Robots.txt File Method
The second method only requires you to add one line of code to the robots.txt file.
Luckily, the code can be copied and pasted and you just need to add your website’s URL, so don’t worry if you are not a coding expert.
Locate your robots.txt file and add the following line of code to it:[ht_message mstyle=”info” title=”” show_icon=”” id=”” class=”” style=”” ]Sitemap: https://example.com/sitemap_location.xml[/ht_message]
Make sure to replace the example URL with your website’s actual sitemap URL.
This code will notify the search engine bots of the exact address of the file. Thus, it ensures they will find it without issue.
3. Submit A SiteMap Through the Search Console
The last way to submit your sitemap to Google is directly through Search Console.
To do this, you will need to verify your ownership of the website, which Google explains how to when you enter the search panel. This just involves downloading an HTML file and uploading it on your website.
Once everything is good to go, click on Sitemaps on the search console.
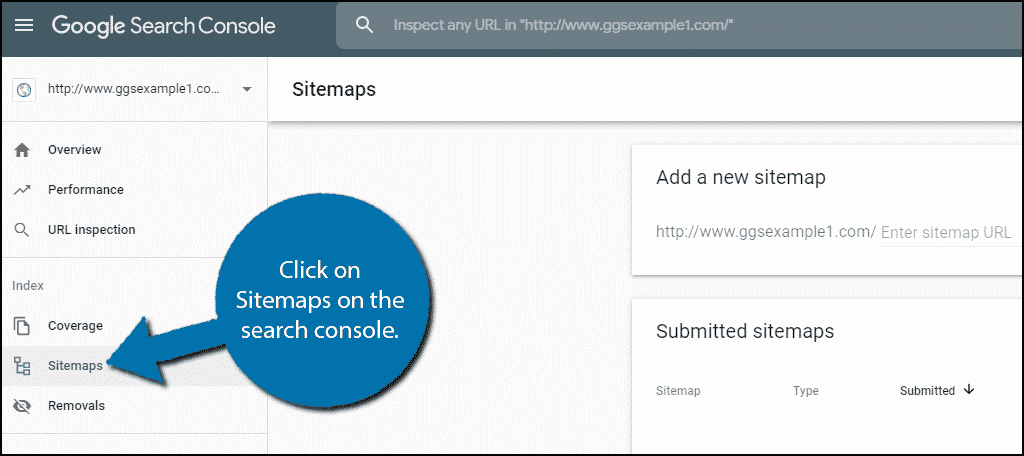
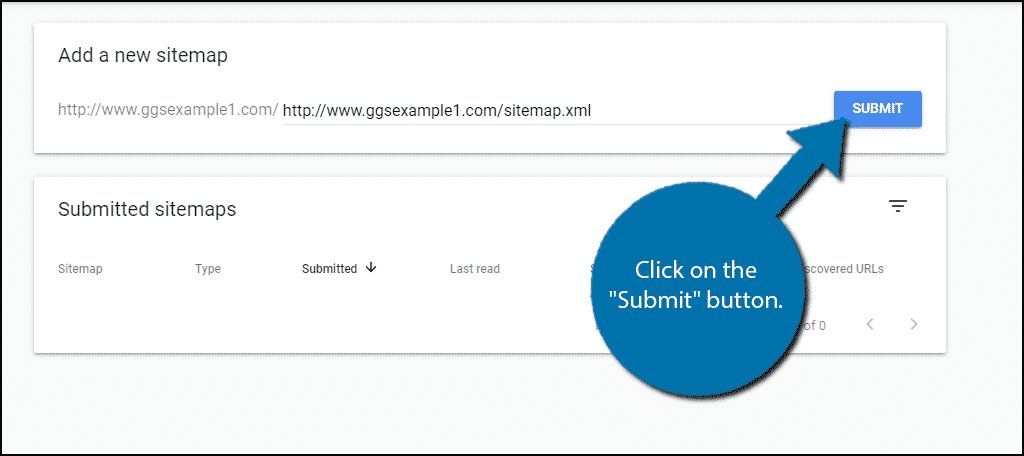
You will see an “Add New Sitemap” section. Simply paste your website’s sitemap URL in the box and click on the “Submit” button.
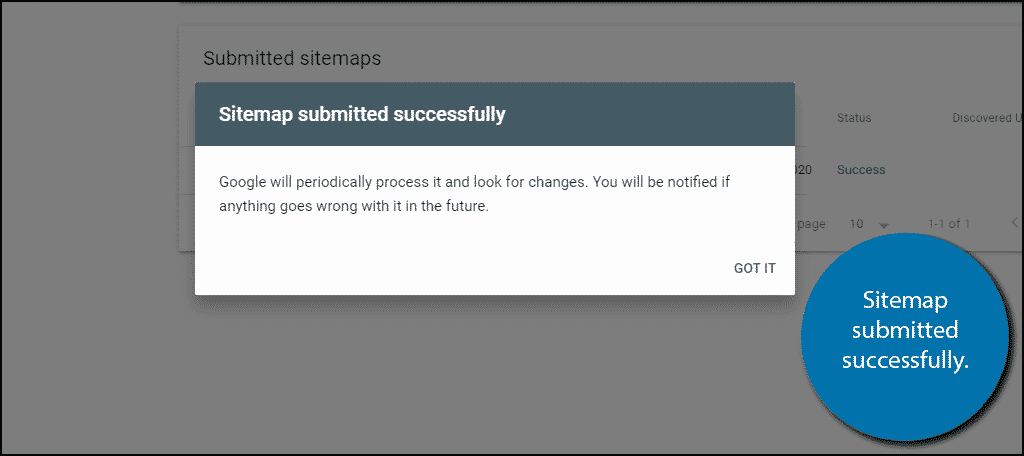
You will now see a “Sitemap submitted successfully” notification.
Congratulations, on using the Google XML Sitemaps plugin. Remember the sitemap is useless if search engines are not aware of its presence, so make sure they are.
Take Advantage of Your Sitemap
The most common mistake when adding a sitemap is forgetting to use it. I strongly recommend going down the sitemap and clicking on every page. Check to make sure each one is still functional (a much bigger issue on larger websites) and that the pages can be easily found by visitors.
Improving the visitor’s experience isn’t difficult. But, one thing that is universally hated is difficult websites to navigate. Avoid this by testing that you can easily navigate through all of your pages. And then ask a friend or family member to do the same.
After all, skill levels vary.
How easy did you find the Google XML Sitemaps plugin to use? Did you need to change any of the settings after activation?