Do you want to add descriptions to your WordPress menus? This seems like a basic feature that WordPress would support and it does, but it is quite tricky to enable. For starters, you will see this feature available on the menu page, but enabling it does not work.
This is because the feature is off by default, which doesn’t make much sense.
But don’t worry, you can turn it on. However, it may prove difficult depending on the method you choose. You can either use a plugin or write some code to achieve the same results. The coding method requires a bit more work than the plugin, but it does save you from installing another plugin.
Today, I will demonstrate how to add menu descriptions for any theme using two methods.
What are Menu Descriptions and Why Should I Use One
Menu descriptions are descriptions for your menu as the name implies, but you still may be scratching your head. After all, not many websites utilize them.
The menu is in place to help your visitors navigate your website. As a result, visitors can navigate your website easier and find what they are looking for. However, sometimes the menu items are not very clear.
In these, cases, these can confuse the visitor, which undermines the point of a menu. Luckily this can be avoided by adding menu descriptions.
However, some webistes purposely use confusing names in their menus to make them more unique.
People are full of curiosity and if they see a catchy name or something they don’t know anything about, they will likely click on it. Of course, the opposite is also true, and if someone doesn’t know something they tend to avoid it.
Understanding your audience is very important and menu descriptions are not necessary for every item. For example, many business websites will have a menu item called Services, but this might not be clear to everyone. Adding a short description will likely make it very clear.
Method 1: Max Mega Menu
The first method I will outline will involve using the Max Mega Menu plugin. I strongly recommend this approach if you are not comfortable with coding. This plugin allows you to add descriptions onto any menu on your website.
Note: Keep in mind that if you have not set up a menu already, this tutorial will do nothing for you.
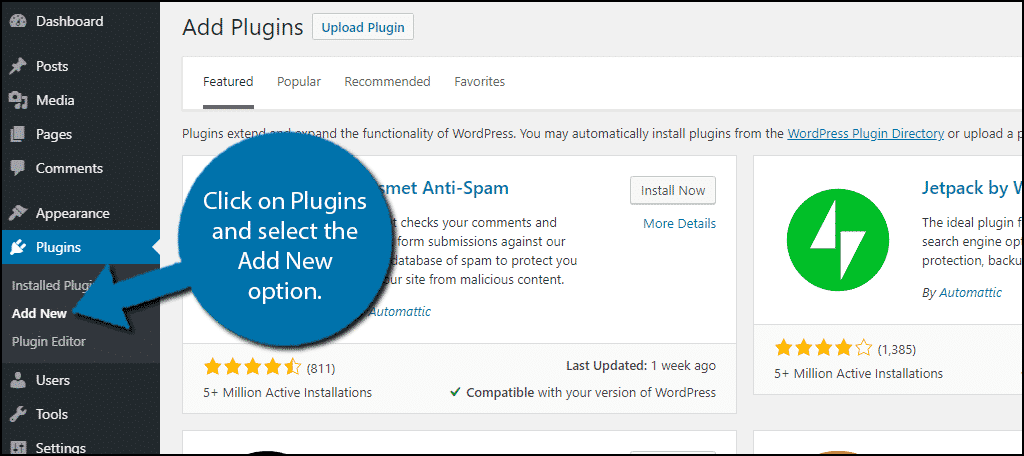
Let’s start off by clicking on Plugins and selecting the Add New option on the left-hand admin panel.
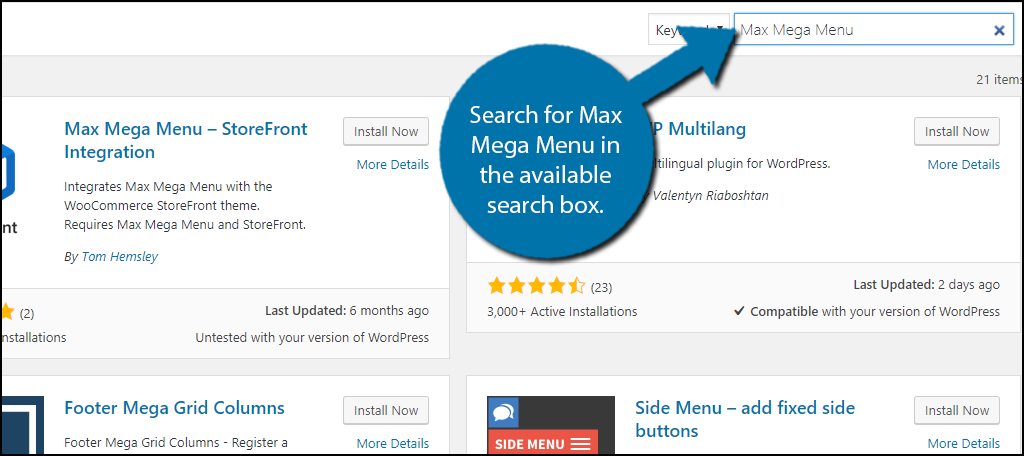
Search for Max Mega Menu in the available search box. This will pull up additional plugins that you may find helpful.
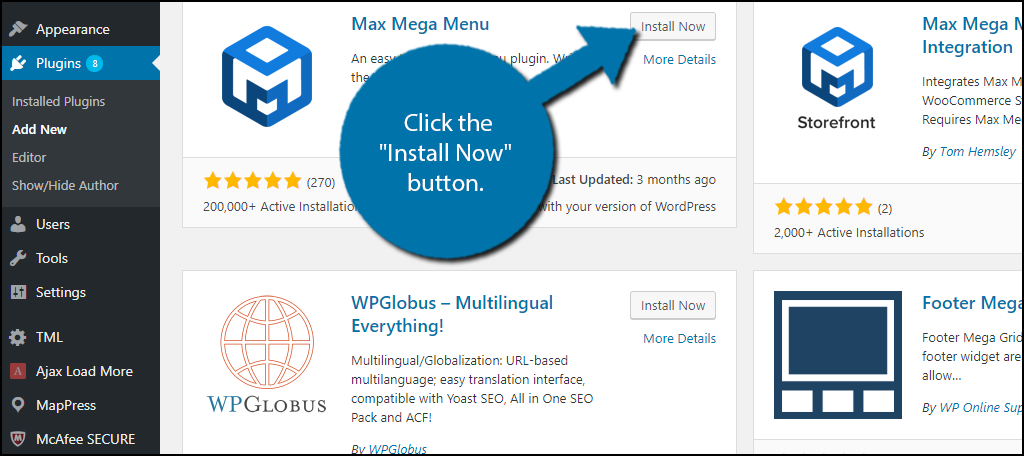
Scroll down until you find the Max Mega Menu plugin and click the “Install Now” button and activate the plugin for use.
Adding Menu Descriptions
With the installation out of the way, you are ready to begin. Luckily, this plugin is pretty easy to set up.
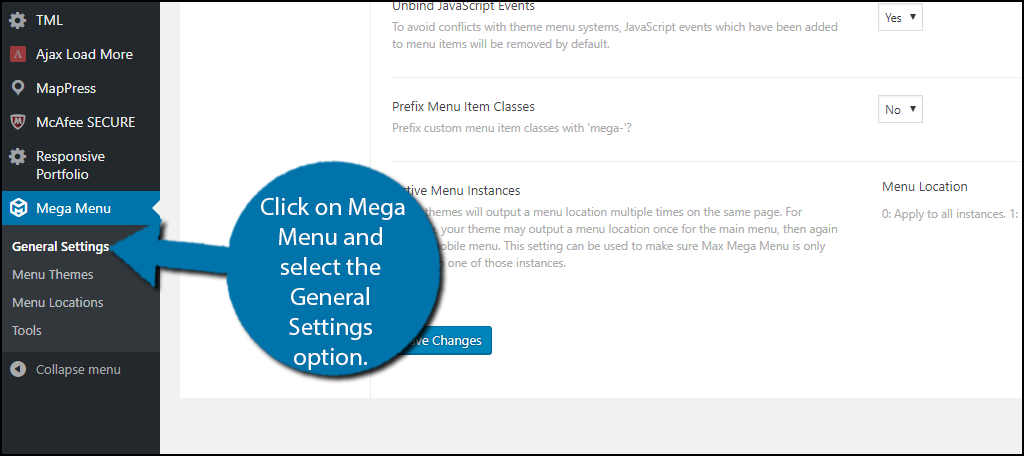
On the left-hand admin panel, click on Mega Menu and select the General Settings option. This will pull up the main settings page of the plugin.
Examine all of the items on the page and find the “Menu Item Descriptions” option. Here you can enable or disable the descriptions. Make sure the “Enabled” option is selected and click on the “Save Changes” button.

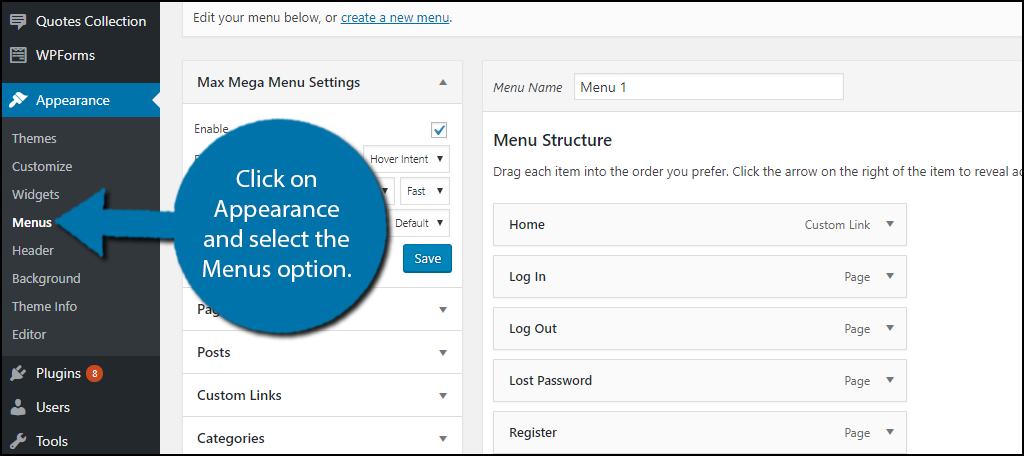
This will fully enable the menu descriptions on your website, but keep in mind you will have very limited formatting options. You now need to actually add in menu descriptions. On the left-hand admin panel, click on Appearance and select the Menus option.
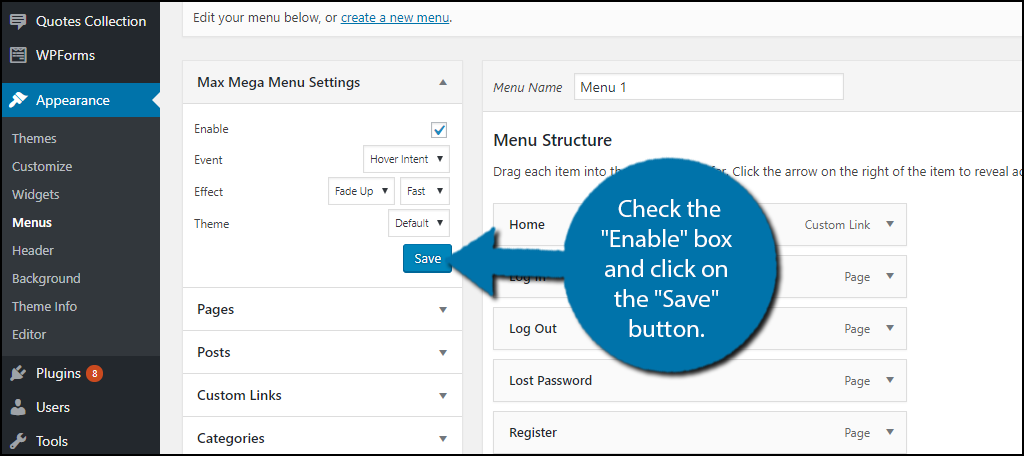
This is where all of the menu settings are located. On the left-hand side of the page, you should see a Max Mega Menu Settings box or option. Check the “Enable” box and click on the “Save” button. This will enable the plugin to run.
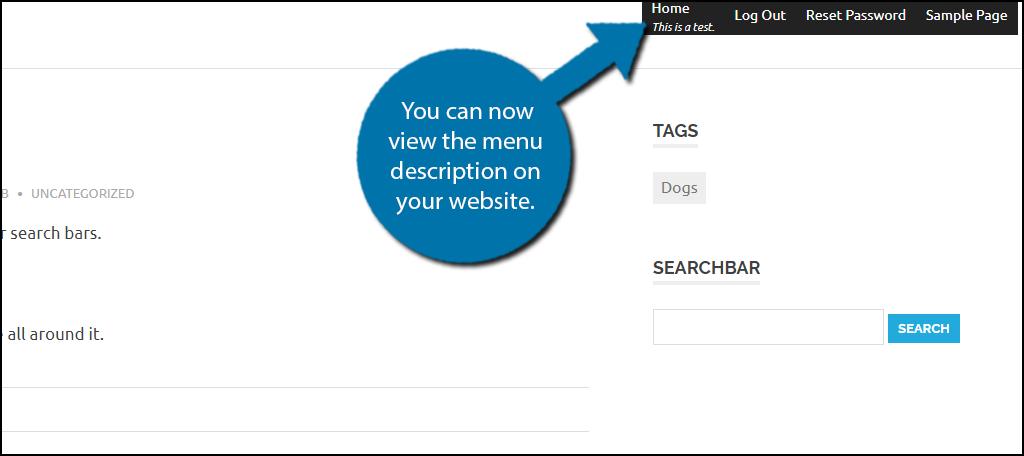
All that’s left to do is to add the menu description. At the top of the screen, you should see a Screen Options drop-down. Click on it and check the descriptions box. If you do not do this, you will not see an option to actually type the description in. Now click on the menu item you would like to add a description to and type in the description box. Click on the “Save Menu” button to save your work. You can now view the menu description on your website.
Congratulations, you can now add a description to every menu item on your website. Keep in mind that the description should be as short as possible. A few words at most.
Method 2: Coding
This method will require editing multiple files, but it is not overly complicated. Before beginning make sure you create a backup of your website and have access to your cPanel. Access is given to you with your web hosting when you make an account.
Finding Functions.php
Let’s start by logging into the cPanel and clicking on the File Manager option. The File Manager will allow you to access all of the files related to your website.
![]()
You need to locate your themes functions.php file. Click on the public_html directory, then click on the wp-content folder. Inside this folder, you will find all of the content related to your website. Click on the themes folder and enter the folder of the theme you are currently using. Finally, right-click on the functions.php file and select the Edit option.
![]()
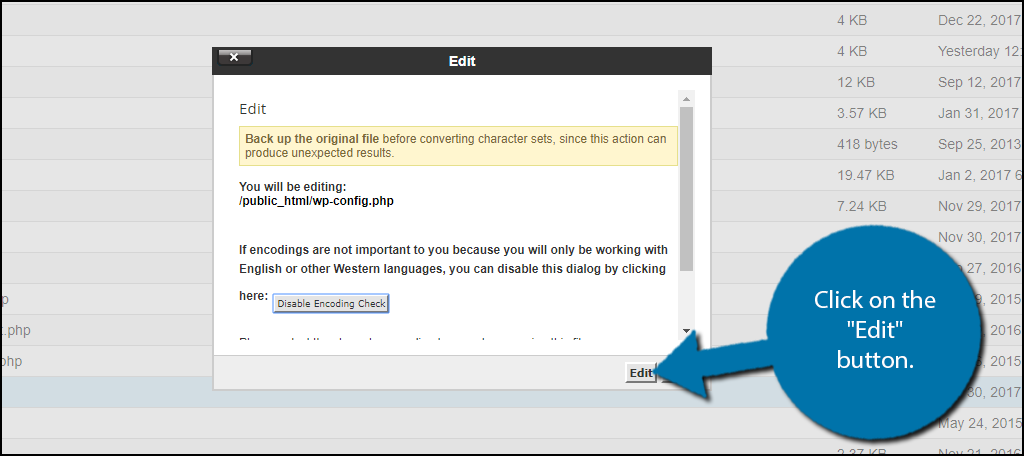
A pop-up window will show up. This box will warn you to create a backup of your files before editing anything. This will ensure that you can revert your website back to when it was working if something goes wrong. Click on the “Edit” button. A new tab will open containing all of the code from the file.
Adding Menu Descriptions with Code
You need to paste the following code into the functions.php file:
[ht_message mstyle=”info” title=”” show_icon=”” id=”” class=”” style=”” ]class Menu_With_Description extends Walker_Nav_Menu {
function start_el(&$output, $item, $depth, $args) {
global $wp_query;
$indent = ( $depth ) ? str_repeat( “\t”, $depth ) : ”;
$class_names = $value = ”;
$classes = empty( $item->classes ) ? array() : (array) $item->classes;
$class_names = join( ‘ ‘, apply_filters( ‘nav_menu_css_class’, array_filter( $classes ), $item ) );
$class_names = ‘ class=”‘ . esc_attr( $class_names ) . ‘”‘;
$output .= $indent . ‘
$attributes = ! empty( $item->attr_title ) ? ‘ title=”‘ . esc_attr( $item->attr_title ) .'”‘ : ”;
$attributes .= ! empty( $item->target ) ? ‘ target=”‘ . esc_attr( $item->target ) .'”‘ : ”;
$attributes .= ! empty( $item->xfn ) ? ‘ rel=”‘ . esc_attr( $item->xfn ) .'”‘ : ”;
$attributes .= ! empty( $item->url ) ? ‘ href=”‘ . esc_attr( $item->url ) .'”‘ : ”;
$item_output = $args->before;
$item_output .= ‘’;
$item_output .= $args->link_before . apply_filters( ‘the_title’, $item->title, $item->ID ) . $args->link_after;
$item_output .= ‘
’ . $item->description . ‘’;
$item_output .= ‘’;
$item_output .= $args->after;
$output .= apply_filters( ‘walker_nav_menu_start_el’, $item_output, $item, $depth, $args );
}
}
[/ht_message]
The Walker Nav code will add the functionality to display menu descriptions to your theme.
Once you have inserted the code into the functions.php file, click on the “Save Changes” button to finish.
![]()
With the functionality added, it is time to enable it. This part is theme dependent. You need to locate the wp_nav_menu() function. This is typically located in your header.php file, but can be located elsewhere on different themes. Edit the function to look like the following:[ht_message mstyle=”info” title=”” show_icon=”” id=”” class=”” style=”” ]
‘primary’, ‘menu_class’ => ‘nav-menu’, ‘walker’ => $walker ) ); ?>
[/ht_message]
Save your work.
Now comes the tricky part of styling.
Once the above line is added you are ready to start adding descriptions. Here is an example of what a description looks like in code form:[ht_message mstyle=”info” title=”” show_icon=”” id=”” class=”” style=”” ]
This is a test.
[/ht_message]
Congratulations, you have successfully added menu descriptions to your website. If anything confuses you in this method, I would recommend using the plugin method.
Make Your Website Easy to Navigate
Menus are in place to help visitors navigate your website. A few extra words as a description will help make all of your menu items easier to understand. This is important for visitors that might not be aware of what your website is about or if your website is different from others. Let people know what is different and how it impacts them.
Which method have you chosen to use? How often do you choose a plugin method over a coding method?