
Image sizes have been one of the most difficult aspects to master for many website developers. Images that are too large and full of detail take too long to render. Pictures that are too small lose quality when making them bigger. So, what are you to do when you need a graphic to be a specific size?
In this tutorial, we’re going to teach you how to enlarge a picture without losing quality. The best part is that you don’t need to be a graphic designer in order to benefit from these techniques.
Although the tools below may be able to help you, it’s important to note that you will still have to upload the images to WordPress.
How Images Lose Their Quality
Virtually any image used on the Internet is rendered using very small pixels. These ultra-small squares are what provide the color and contrast for any given picture. In fact, you can see these micro boxes when you zoom in to see the details of a graphic.
When an image is enlarged, these pixels become more apparent as they do not adapt to the changing size. They remain the same color regardless if they are microscopic or three inches across. These bitmap elements are set and viewed in a specific way for display.
When a graphic is rendered on your screen, each pixel is mapped and placed in a specific location. They never alter in texture and will remain the same color whether you are zoomed in all the way or shrink the image down
Replacing some of the quality when blowing an image up is done through a process called fractal interpolation. This means that each pixel essentially takes on some of the properties of nearby pixels in order to smooth out the graphic. In essence, it removes the box distortion effect when making the picture larger.
It is possible to do some minor image editing within WordPress itself. However, the system doesn’t have the ability for interpolation.
How to Enlarge a Picture without Losing Quality
There will be times when you need a smaller graphic to be more visible. Instead of making the picture larger and distorted from the larger pixels, you can use editing software to clear it up.
Here are some of the best tools to use when you need to make those kinds of alterations.
Using Pixlr Editor
Pixlr is an incredible tool that is similar to some of the most popular graphic design programs on the market. It’s completely web-based and free to use. In fact, you don’t even need to sign in or create an account to use the application. To resize your image:
Step 1: Go to the website, Pixlr.com/editor.
Step 2: Go to “File” on the top left and click on “Open image.

Step 3: Find the image you want to modify and click “Open.” This will load it into Pixlr.
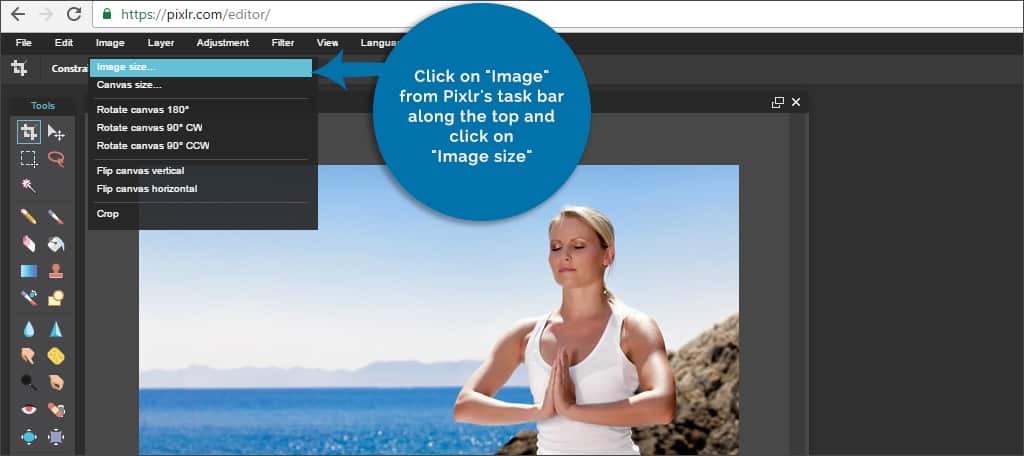
Step 4: Click on “Image” from Pixlr’s task bar along the top and click on “Image size.”
Step 5: A small window will appear where you can change the width and height of the image. Make the necessary adjustments of how you want the graphic to look. Note: Keeping the “Constrain proportions” box checked will make sure the image stays the same relative dimensions. This means it won’t become squished when making the adjustments.

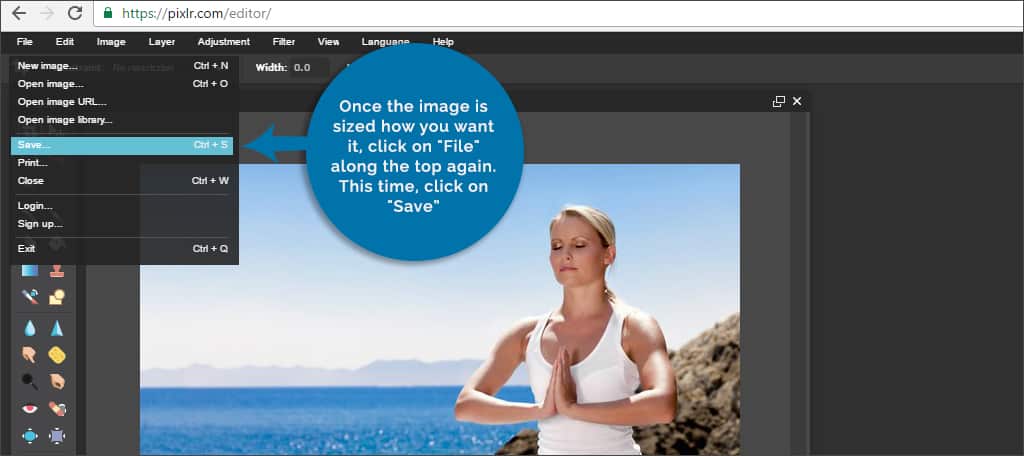
Step 6: Once the image is sized how you want it, click on “File” along the top again. This time, click on “Save.”
Pixlr will automatically interpolate the image when you modify its size. It may also be important to point out that you can import images from a website URL or remote image library.
Using InfranView
For those who use Windows operating systems only, InfranView is a free editing system that can help resize your graphics. It’s a very small, but effective editor that is compact and easy to use. It supports most Microsoft operating systems ranging from Windows 95 on up to Windows 10. To use InfranView to edit your picture:
Step 1: Visit the InfranView.com website.
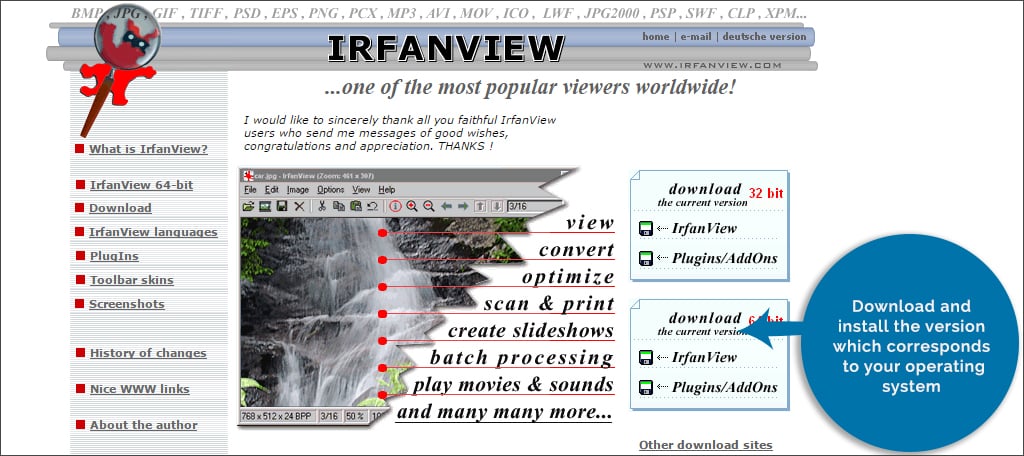
Step 2: Download and install the version which corresponds to your operating system.
Step 3: When InfranView loads, got to “File” and open your picture.

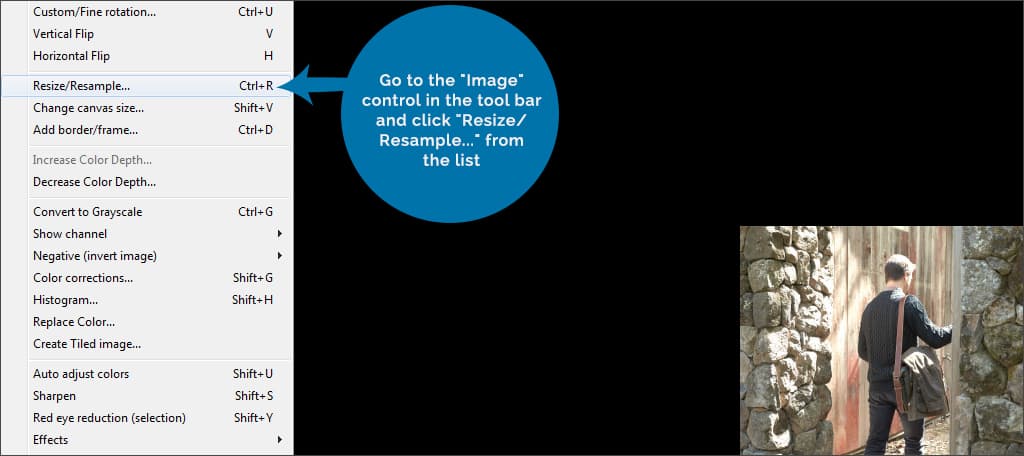
Step 4: Go to the “Image” control in the tool bar and click “Resize/Resample…” from the list.
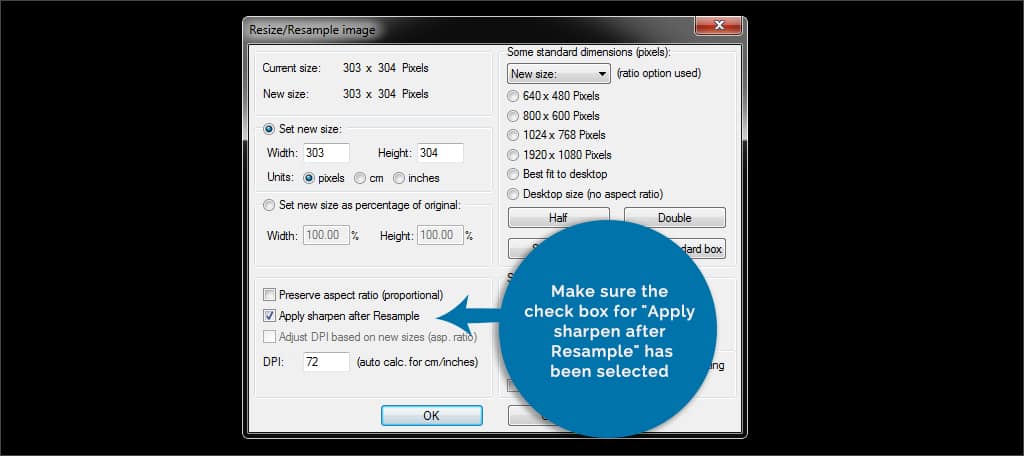
Step 5: This will bring up a new window with settings for resizing. Set the new size to your preferred width and height.
Step 6: Make sure the check box for “Apply sharpen after Resample” has been selected.
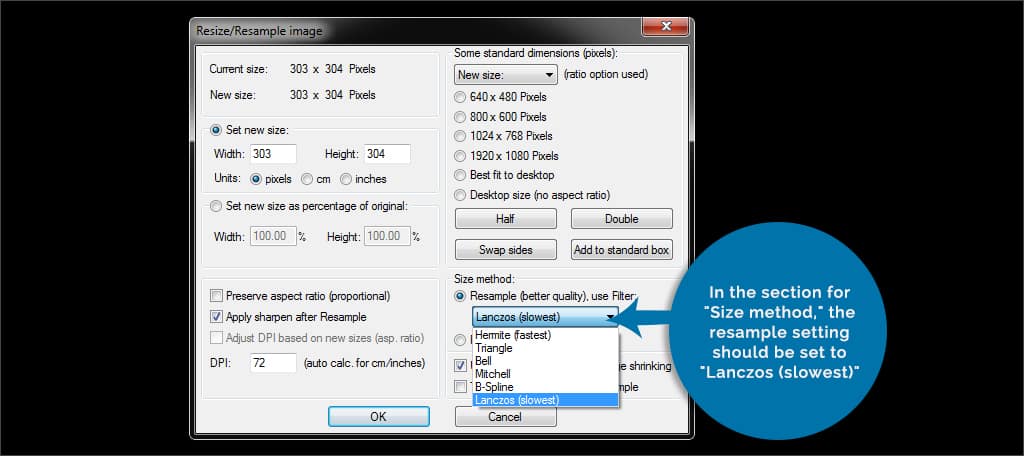
Step 7: In the section for “Size method,” the resample setting should be set to “Lanczos (slowest).”
Step 8: Click “OK” and the image will be resized with interpolation.
Step 9: You can then go to the file area and save your work.
Using Gimp
Gimp is a free, open source image editor. Although it may not have the elaborate tools that programs like Photoshop may have, it will help resize your images without losing quality. To use this software to edit your image:
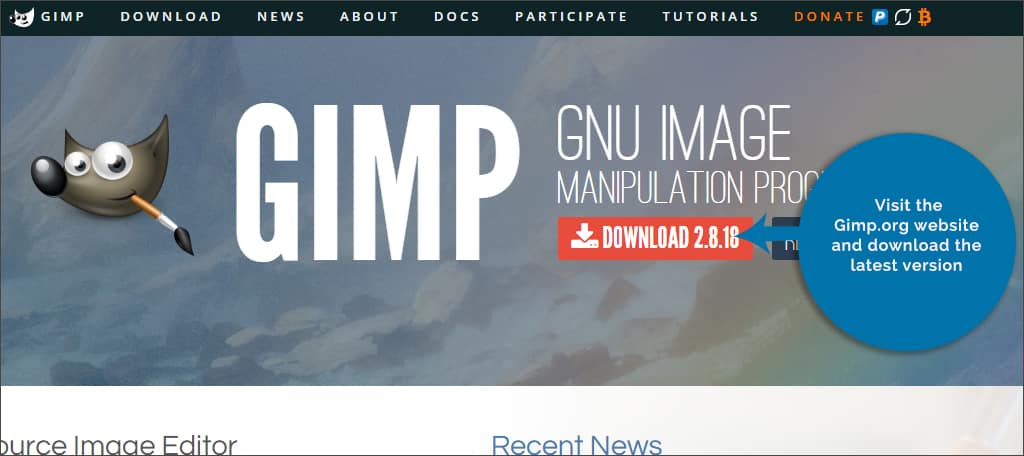
Step 1: Visit the Gimp.org website and download the latest version. Note: The website will attempt to automatically detect your operating system. However, you can select downloads for most major computer setups.
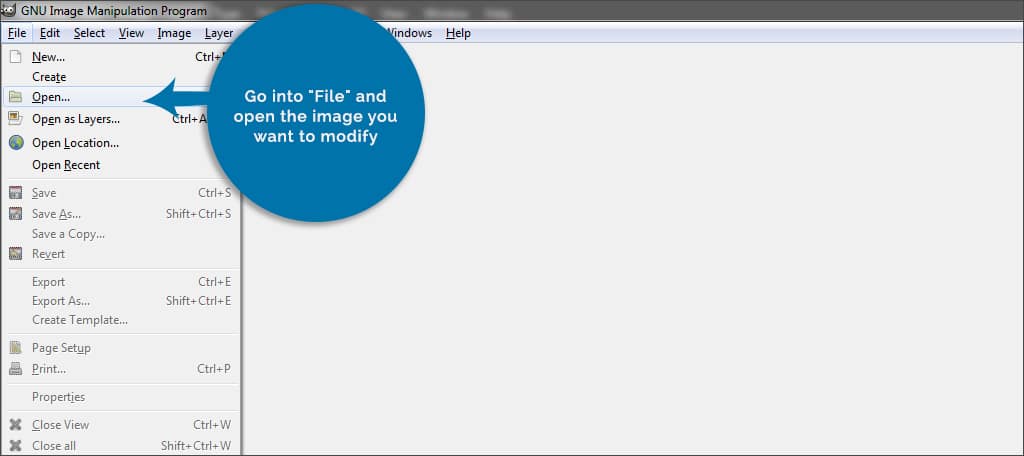
Step 2: Go into “File” and open the image you want to modify.
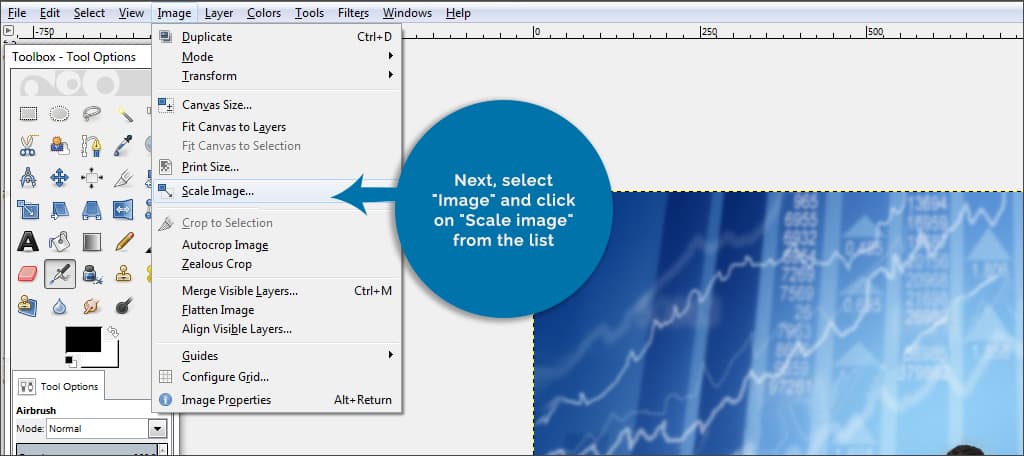
Step 3: Next, select “Image” and click on “Scale image” from the list.
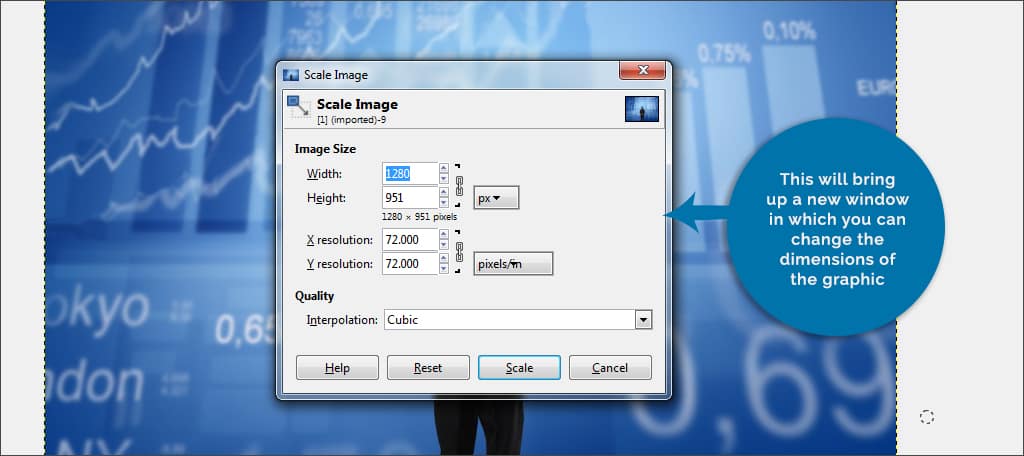
Step 4: This will bring up a new window in which you can change the dimensions of the graphic. Change the height and width to the size you need. Keep in mind that graphics will default to a resolution of 72 pixels. This should not be changed if you’re creating something to be seen on the web.
Step 5: Under “Quality,” you will see a drop down window for changing the interpolation. Select “Sinc (Lanczos3)” and click “Scale.”

Step 6: Once you are done, click the file command on the tool bar and click to “Save” or “Save as” in order to store your project.
Why can’t you use larger images and set the website to shrink them when people visit?
Images are rendered in their original size while they are displayed. This means that it will slow down the website if you were to use extra large images. Even if you set a 2000×2000 pixel image to show as a 150×150 thumbnail, the entire picture will still be downloaded at 2000.
Why does the image look a little fuzzy when making it bigger using these tools?
Interpolation allows the pixels to essentially merge with each other. This blending causes the sharpness of the graphic to decrease. Unfortunately, there is no way to make a large picture as crisp as its smaller version. The level of this “fuzziness” will depend on how big you make the graphic.
Will this work on any kind of image file?
The kinds of graphics you can edit will depend on the program you are using. For instance, file types ending with “.PSD” are normally reserved for Photoshop. However, some programs like InfranView can access those file types. Otherwise, you can resize any image your software supports.
Interpolation can help you add a beautiful look to your website. Instead of trying to enlarge pictures, you can resize them with these kinds of tools to give your graphics a more sleek and smooth appearance. The quality of your content shouldn’t be spoiled by the quality of your pictures.
What kind of tools do you use for your WordPress graphics? How much time do you spend making images for your posts and pages?
This is a great article and it is helpful. But I think you have missed some powerful AI photo enlargers. I recommend some tools for you to review:
For Win: Gigapixel AI 4
For Mac: Pixelmator Pro
Online: Imglarger
Our graphics in wordpress for our website look great at 75% zoom on a laptop but when you zoom in to 100% or view on a tablet or mobile device the graphics are large and do not show up right. Is there a way to fix this?