The Gravatar image is the graphic that is displayed in an author bio or used in the comment section of WordPress. This is a default system that is added which links a person’s image to other sites around the world.
It’s like having one login to display your bio image whether you’re leaving a comment or added as a contributor to a blog. If you add a new user to WordPress and use his or her email address associated with Gravatar, it will automatically pull the image.
Although this image is stationary when it comes to size, it can be altered to fit virtually any design scheme. All it takes is a slight bit of coding.
In this tutorial, I’m going to show you how to make the minor adjustments to the Gravatar image for the author bio box and the comment section. Don’t worry, the coding isn’t too complex. In fact, it’s as simple as changing a number.
What does the Gravatar image do and why is it used?
A Gravatar is essentially a worldwide method of being recognized. Your image, or “avatar,” is saved and then distributed anytime you interact with a site supporting the function. By default, WordPress uses Gravatar to access those user images.
This means that your one avatar image will be recognized on any website you comment or write for that uses WordPress.
Some people use the image to market a brand or themselves. As the same graphic is used when authoring or commenting, it becomes more of a recognized symbol among other users.
Since Gravatar will allow users to save websites in the profile, it offers potential for marketing. If another user is curious about the author or commenter, he or she can see the added website.
When someone signs up with WordPress.com or through Gravatar.com, his or her email address is added to the system. Anytime that address is used to create a profile on WordPress as an author, the gravatar image is accessed immediately.
The process of accessing the image is similar when WordPress users leave a comment.
Changing the Image Size in the Comment Section
To access the file for changing the comment image size, you’ll need access to a good FTP program. I would suggest downloading FileZilla. It’s a free system that is easy to use and is available for Windows, Mac and Linux computers.
To alter the Gravatar image in comments:
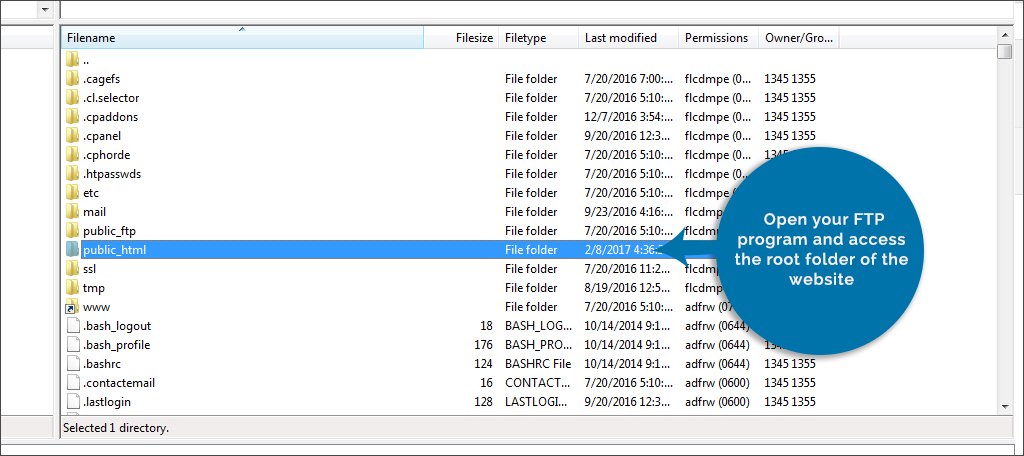
Open your FTP program and access the root folder of the website.
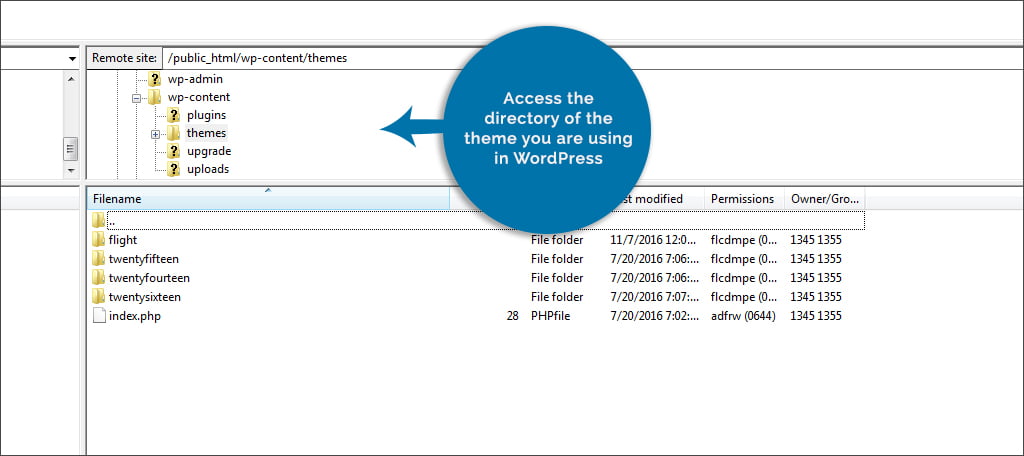
Access the directory of the theme you are using in WordPress. It is located in:
/wp-content/themes/
NOTE: If you’re not sure what theme you’re using, open the “Appearance” area in the WordPress admin panel. The first screen will show you which one you have currently active.
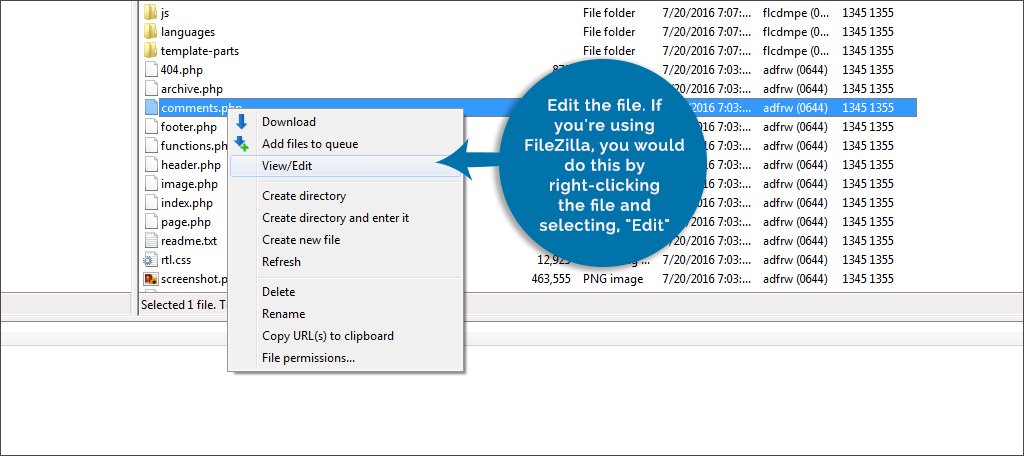
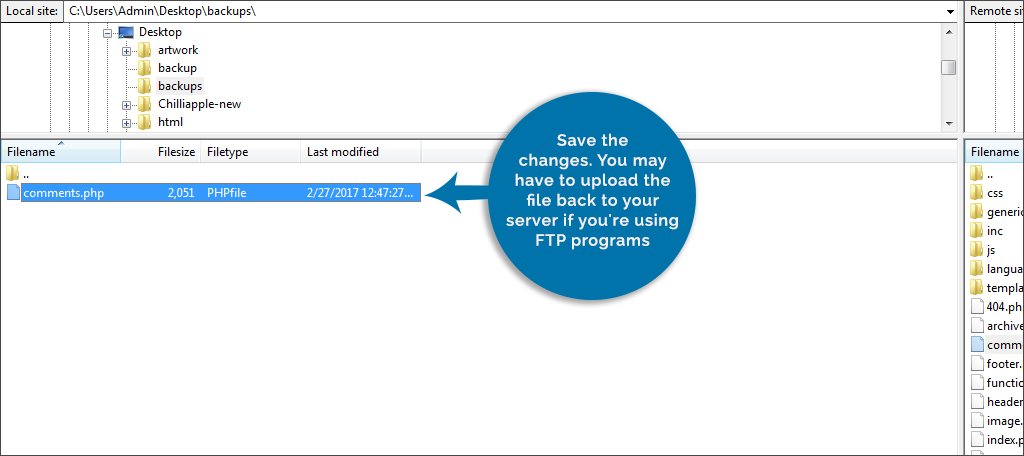
Look for the comments.php file.

Create a copy of the file and save it somewhere safe. I’d suggest placing it on your desktop so that it’s easy to find if you need it. It’s always a good idea to create a backup copy of any file you plan to edit.
Edit the file. If you’re using FileZilla, you would do this by right-clicking the file and selecting, “Edit.”
NOTE: If prompted by your FTP software to choose a program, select your text editor. For example, Windows computer users may want to use Notepad.
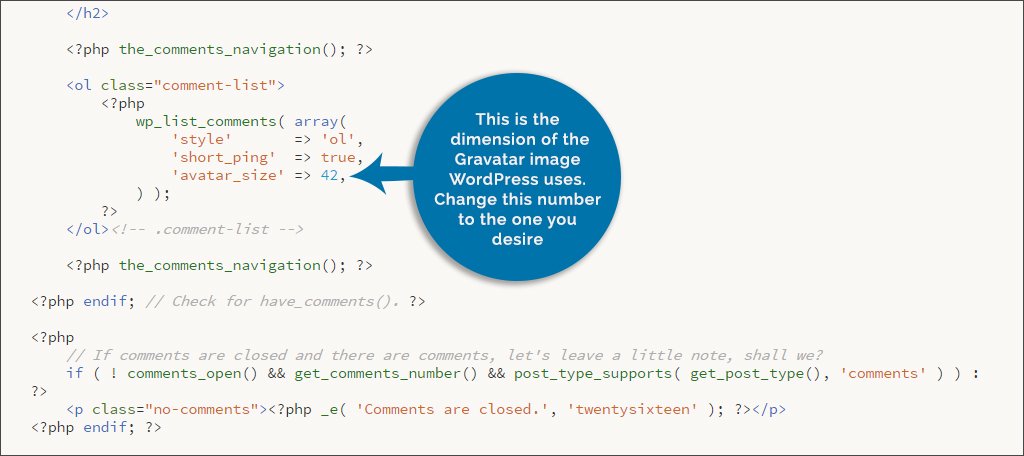
In the code of the file, you will look for: avatar_size. To the right of this, there will be a number. This is the dimension of the Gravatar image WordPress uses. Change this number to the one you desire. For instance, you would change this to “45” if you want the image to be 45 by 45 pixels. The code will then look similar to this:
[ht_message mstyle=”info” title=”” ” show_icon=”” id=”” class=”” style=”” ]’short_ping’ => true,
‘avatar_size’ => 45,
) );
?>[/ht_message]
Save the changes. You may have to upload the file back to your server if you’re using FTP programs.
If the image doesn’t change after making the above adjustments, it means your CSS file is probably preventing it from taking place. Some CSS files of themes take control over many parts of WordPress.
If this is the case, you would:
Edit the style.css file in the theme’s folder. This can be accessed in the same way you opened the comments file.
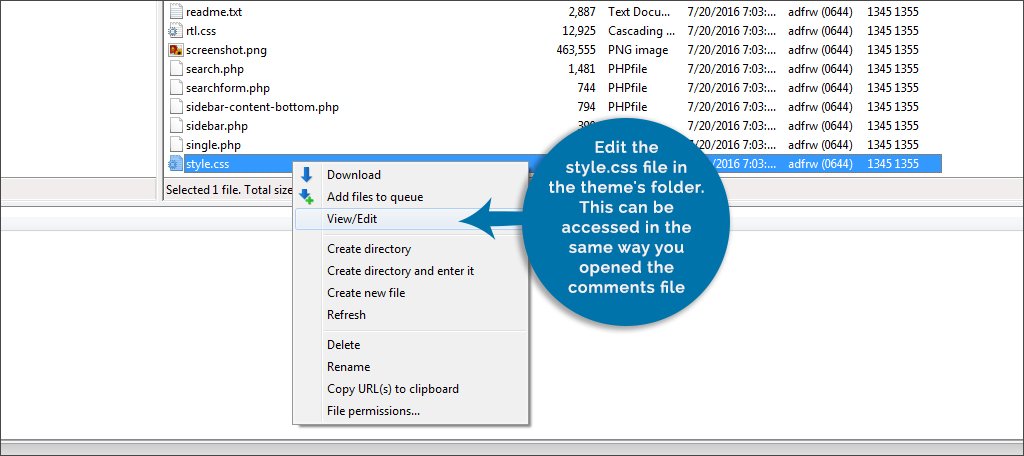
NOTE: Don’t forget to create a backup copy. It’s better to be safe than sorry.
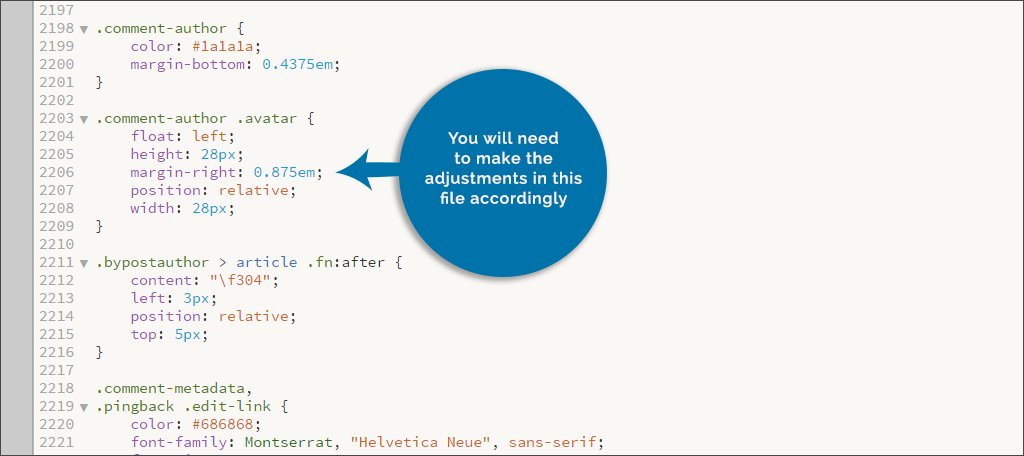
Look for a section of code containing .avatar.
If your theme is controlling the image, it will have height, width or even both. You will need to make the adjustments in this file accordingly. So, the coding would look similar to:
[ht_message mstyle=”info” title=”” ” show_icon=”” id=”” class=”” style=”” ].comment-author .avatar {
height: 45px;
width: 45px;
}[/ht_message]
Save your changes and reload your website. The Gravatar image should now be displayed correctly.
Remember, the only part of the coding in either of the two examples above is the size number. This is displayed in pixels, and can be larger or smaller depending on your needs. There will be no other adjustments in code you will need to make.
Also keep in mind that images that are increased in size will start to become distorted and pixelated. This is because of how images like JPGs are handled on the Internet. You will begin to lose detail the larger these graphics become.
Changing the Gravatar in the Author Bio Box
Making changes to the image of an author bio is a bit more time consuming, only because you have to find the code. This bit of information isn’t always in the same place. Some themes will place it in various files depending on the person creating the template. You may want to start looking in single.php or functions.php.
For example, the WordPress theme TwentySixteen will use a separate file called, “biography.php.”
In the file, you’re looking for coding that contains get_avatar. This can be a bit tricky because every theme programmer does things differently. However, all themes will have a number accompanying the code for the size of the image. For example, the code in the TwentySixteen theme will look like:
[ht_message mstyle=”info” title=”” ” show_icon=”” id=”” class=”” style=”” ]$author_bio_avatar_size = apply_filters( ‘twentysixteen_author_bio_avatar_size’, 32 );
echo get_avatar( get_the_author_meta( ‘user_email’ ), $author_bio_avatar_size );[/ht_message]
![]()
Notice the “32” in the above string. That is the size you want to change.
A quick way to skim through a file is to use the “find” command. For instance, most applications will let you press CTRL+F to search for text on Windows computers. Macs would use Command+F to search. In either case, type in avatar and the system will show you all instances of the word throughout the file.
Using the WordPress Editor
Some of the above changes can be done directly from WordPress. If you don’t have access to FTP or you can’t otherwise get to the root folder of the website, you can open the Editor tool in the admin panel.
The only reason why I didn’t open with this feature in the beginning is because it’s more difficult to make a backup copy of the file. If something went wrong, it’s more difficult for beginners to fix.
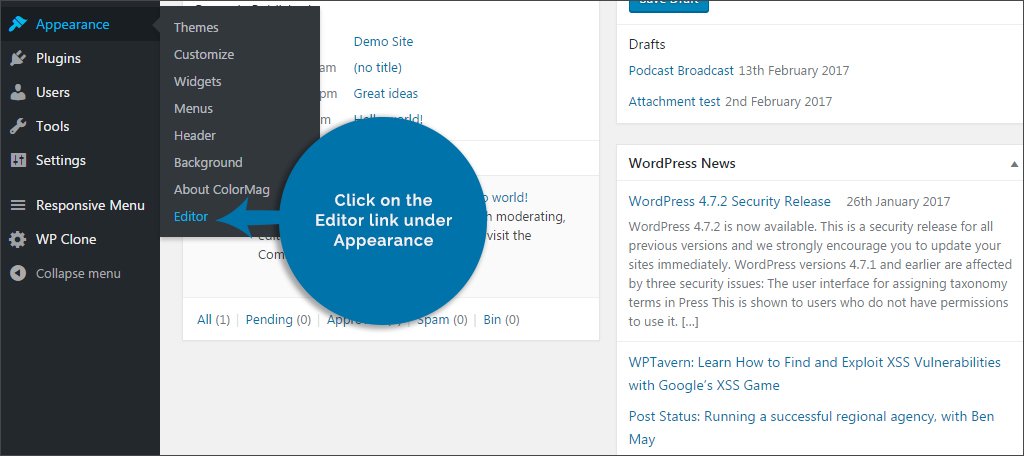
To open the editor tool:
Go to the Appearance area of WordPress.
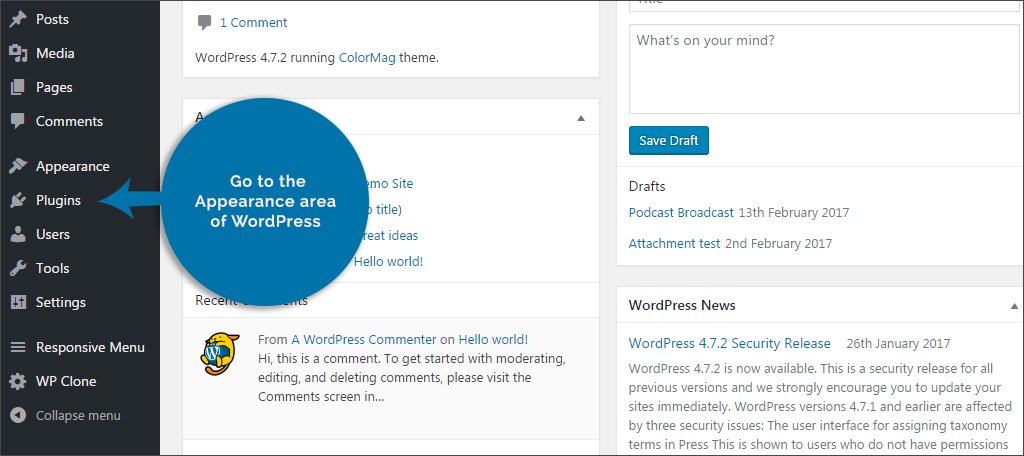
Click on the Editor link under Appearance.
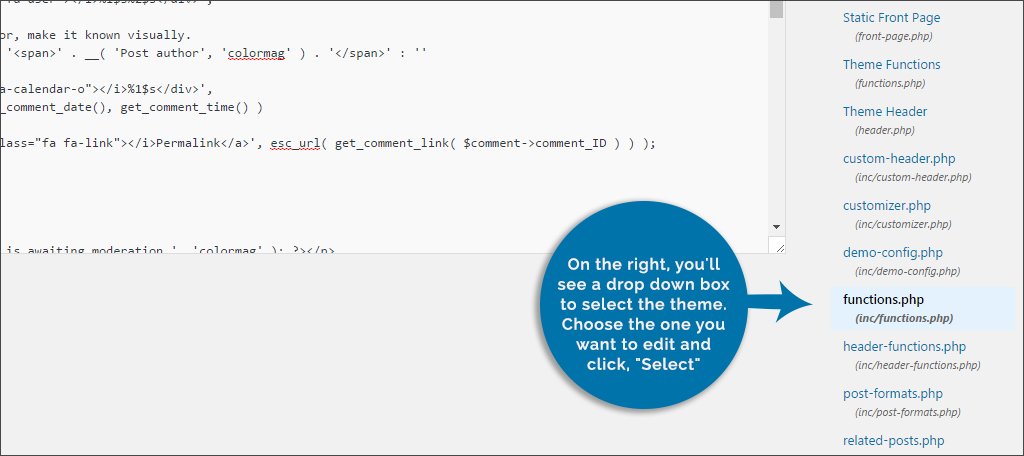
On the right, you’ll see a drop down box to select the theme. Choose the one you want to edit and click, “Select.”
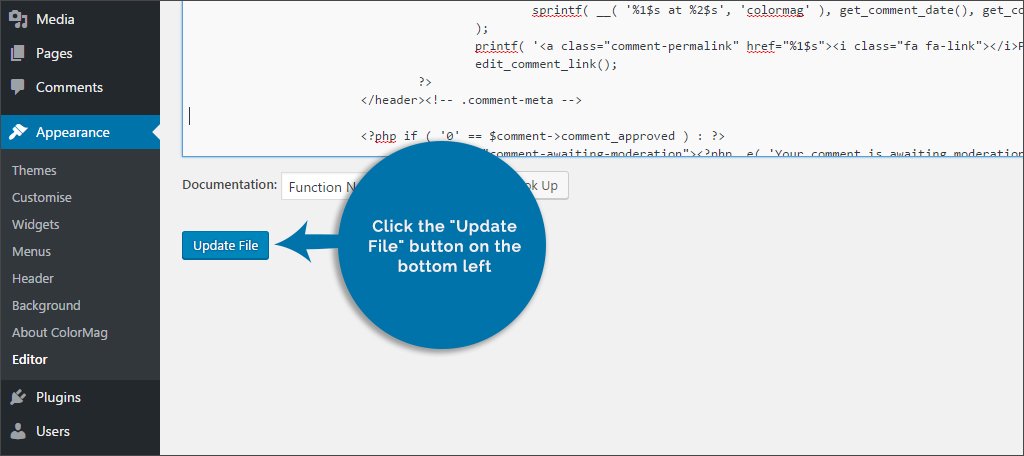
You’ll see you have access to a variety of files such as comments.php and others. Once you select a file and edit the coding, click the “Update File” button on the bottom left.
Using File Manager to Change the Gravatar
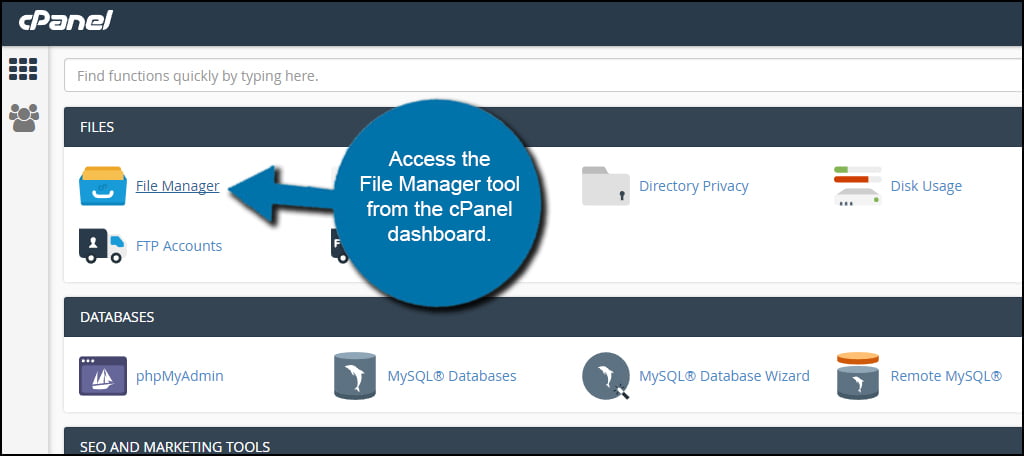
FileZilla and the WordPress Editor are fine ways to change the gravatar, but what about File Manager? If you have cPanel, the File Manager tool is an excellent alternative if you don’t want to install another program or need to look further into the WordPress files outside of the editor.
File Manager gives you access to all of the site’s resources through your web browser. It’s quite flexible and is one of my preferred methods for making site edits.
Changing the Author Bio Box
Some plugins will let you install custom bio boxes for post authors. Many will have the ability to change the gravatar directly. However, I am going to show you how to do it without a plugin.
For this example, I am using the TwentySixteen theme that comes with WordPress. If you don’t have it, you can always install it for free by going into your Appearance area of the admin panel.
NOTE: Not all themes are structured the same way. This tutorial simply gives you an idea of where to look and how to make changes.
Access the File Manager tool from the cPanel dashboard. Alternatively, you can use FTP programs like FileZilla.
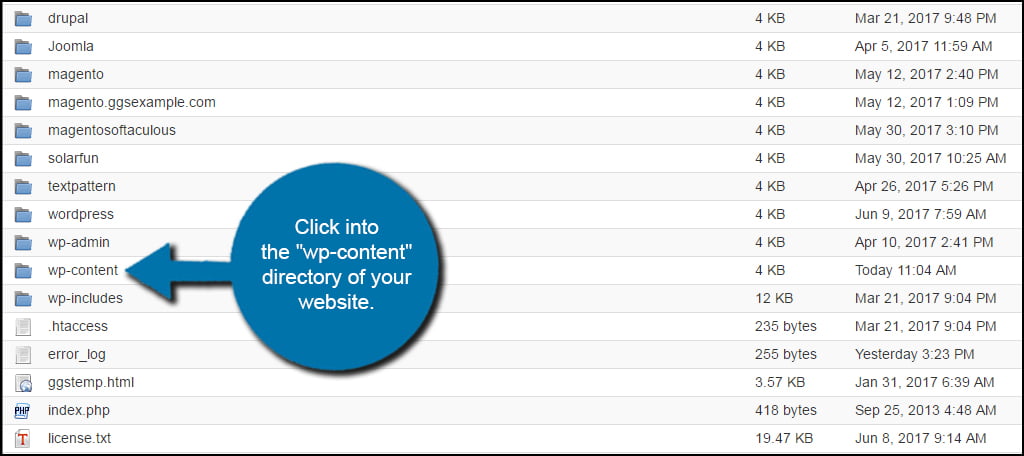
Access your WordPress directory by clicking the “public_html” folder. This is the root of your website. If you have WordPress installed elsewhere, you will need to access that particular directory. However, most of you will simply need to access public_html.

Click into the “wp-content” directory of your website.
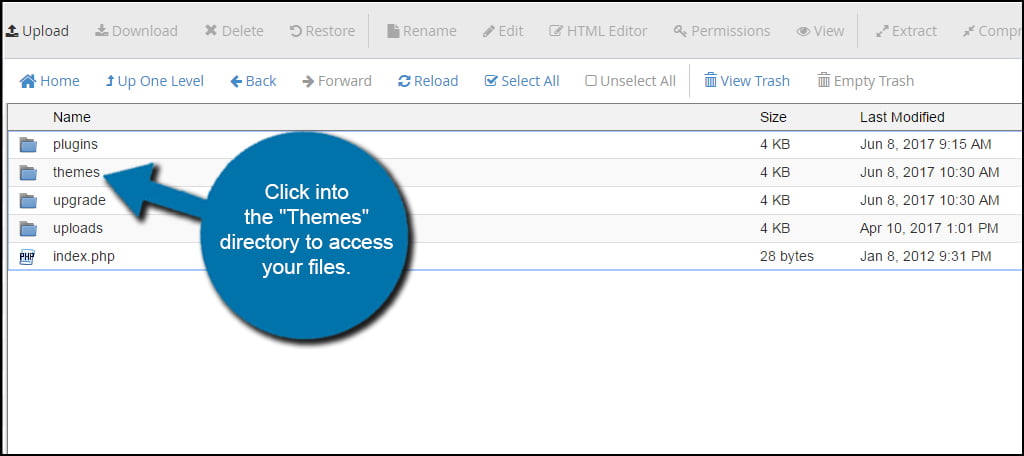
Click into the “Themes” directory to access your files. This is where all of your themes are stored. Even those you do not have activated are accessible from this area.
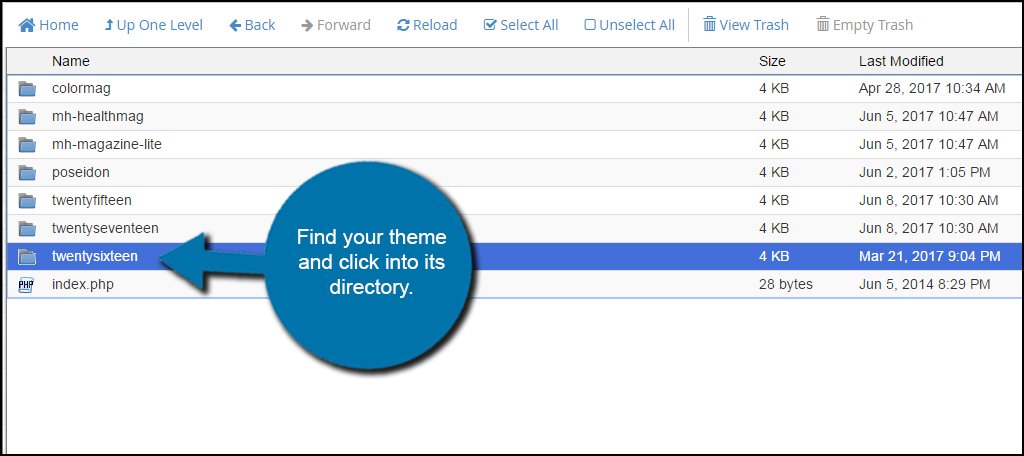
Find your theme and click into its directory. For this tutorial, I am accessing TwentySixteen.
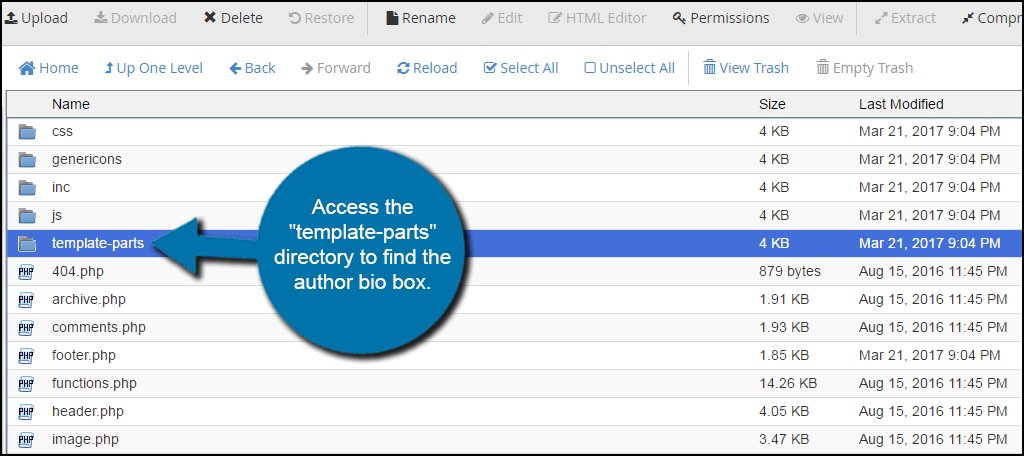
Here is where it gets tricky. Not all themes are going to have this next step. This is because every developer has a different way of coding layouts for WordPress. In this tutorial, I am using TwentySixteen, so I will access the “template-parts” directory to find the author bio box.
Highlight the “biography.php” file by clicking it once and click the Edit button.
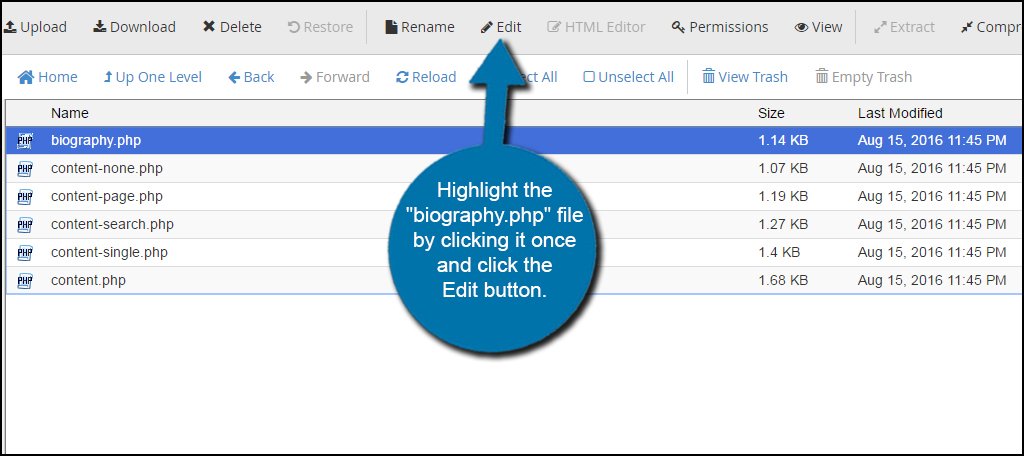
In the edit screen, you will see the actual php coding for the author bio. Look for the “avatar_size” command within the code. Once you find it, there will be a number to the right. This is the squared dimensions in pixels.
In this example, you can see that my version of TwentySixteen uses “42.” This means the gravatar in the author bio box is 42-by-42 pixels, square. Change this number to the size you want. For this tutorial, I’m going to make it a bit smaller and set it to “32.”
![]()
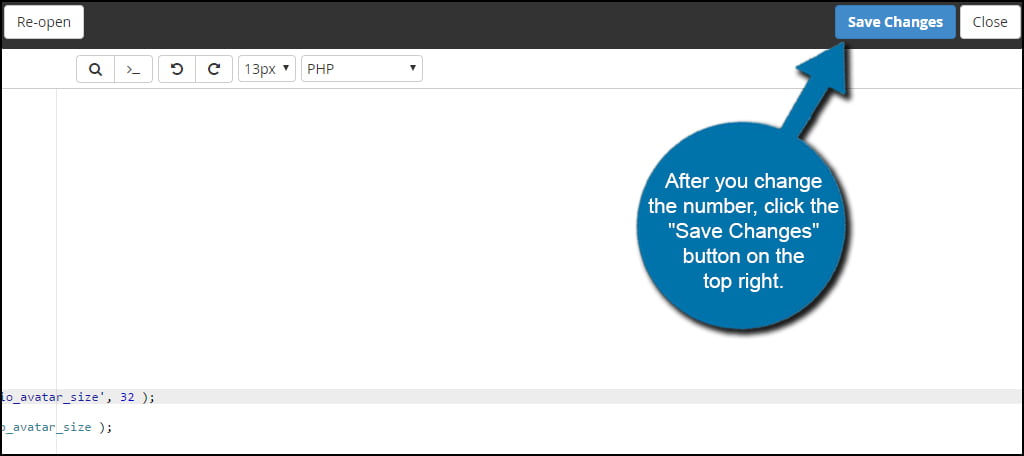
After you change the number, click the “Save Changes” button on the top right. Now, you’re theme is set to use the new gravatar size in the bio box.
If the gravatar still doesn’t change on the site, you may need to edit the size in the “style.css” file within the theme. In the case of TwentySixteen, I’ll need to edit this css file.
Edit the style.css file from your theme’s main directory.
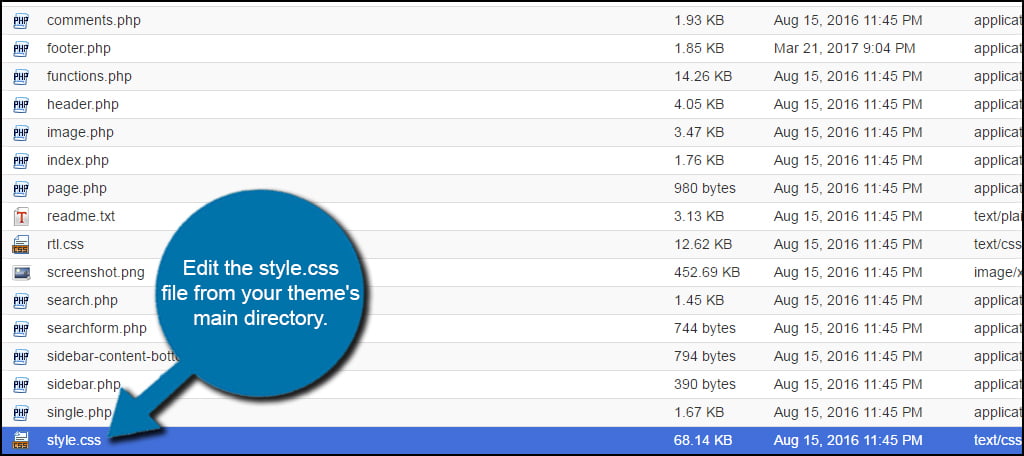
Look for the coding related to “.author-avatar” in the CSS file. In this area, you’ll find “height” and “width” with the same number in pixels. As you can see, my version of TwentySixteen uses “42px” in both fields. This means it’s 42 pixels.
Change both of these numbers to reflect the size you want. This number has to match what you used earlier in the biography.php file if you want to avoid distortions in your graphics. Since I used “32” earlier, I need to make both of these 32px as well.
![]()
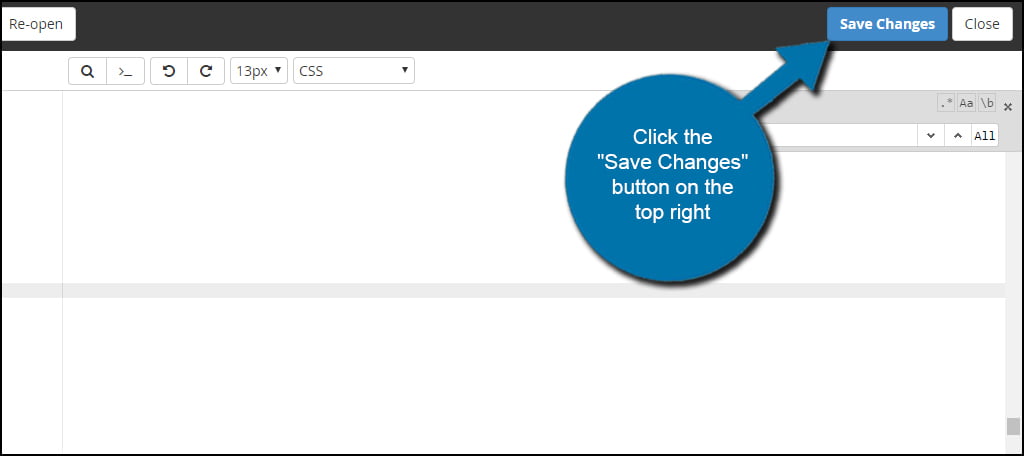
Once your done editing the code, click the “Save Changes” button on the top right like you did before.
Changing the Comment Section Gravatar
Next, let’s take a look at changing the gravatar for the comment section. This is done in a similar fashion to the author bio box above.
In your theme’s main directory, edit the “comments.php” file.
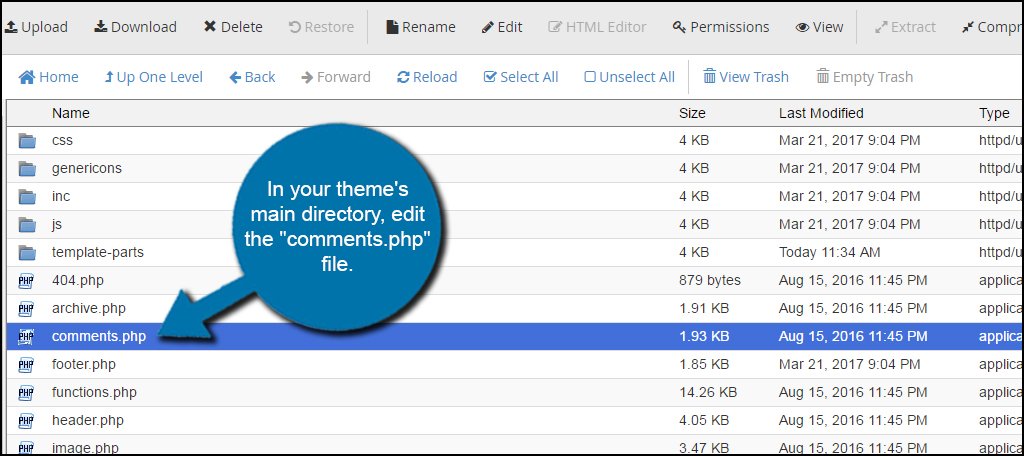
Look for the code related to “avatar_size.” Change the number next to this command to alter the gravatar size. As before, I am changing mine to 32 for this tutorial.
![]()
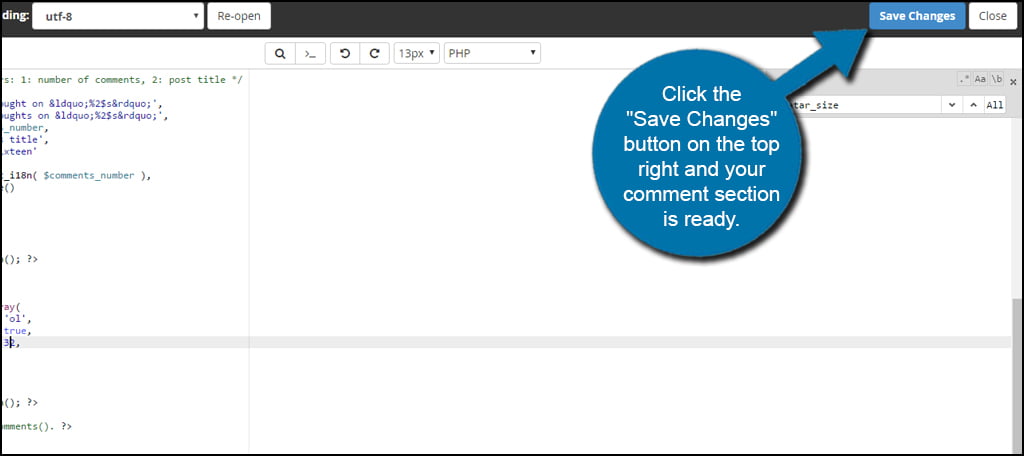
Click the “Save Changes” button on the top right and your comment section is ready.
After a Theme Update…
What happens if your theme is updated? Sadly, the coding may be overwritten when a new version of the theme comes out. This is why many people will use child themes in WordPress. It gives you the option to save your modifications in code. However, a child theme will not have the benefit of getting the updated adjustments from the developer.
I would suggest saving the files separately on your computer as a form of backup. For example, you can copy and paste the entire code from the comments.php file into Notepad and save it as a .txt file. When an update to the theme comes out, you can past the contents of the .txt file back into your theme.
Just make sure you compare your copy to the update. There may be adjustments you’ll need to include in the new version.
Editing the Gravatar gives you the ability to make the image fit perfectly in your ideas for design. Just by changing a number or two, you can make the graphic as large or as small as you’d like. After all, customization is just one of the biggest reasons why so many people love using WordPress.
What kind of custom add-ons have you made to your website? How many of your authors are known worldwide by their Gravatar?
thank you for this tutorial, very helpful!
wpbeginner all old stuff, very disappointed and I found your guide, so lucky.
Btw, another thing I want to know is how to enlarge the author info box text block? The default can only let you input several characters, I’d love to expand the number allowed to more.