Do you want to create borders for all of your images in WordPress? Images help enhance your content and can even be the content by themselves. Unfortunately, sometimes images can be hard to see if they blend into the background color. For this reason, borders are the best way to separate the image from the background on all websites.
There are multiple ways to add borders to your images in WordPress. For starters, you can add a border before you even import an image into WordPress. If you create your images with Photoshop or a similar photo editing software, you can simply add the border while creating it. This way you won’t have to download a new plugin or edit code. Today, I will demonstrate how to create a border for your images in WordPress using two methods.
Why Add Image Borders in WordPress?
Borders are the best way to make it easier for your visitor to separate an image from the background. Websites customize their backgrounds to stand out from the competition. On one website, you may see a solid colored background, while on another you see a striped line pattern. On top of changing colors, some web developers also use images for the background.
This can make it extremely hard to see certain images depending on how well they blend in. This may not be a problem for younger audiences with better vision, but if your audience’s age is a bit on the older side, you may lose visitors. Understanding your audience’s age is very important when you are running a website. This helps you pick what is important to them.
As stated above, I will show you two methods for adding image borders to WordPress. The first method will involve using a plugin, while the second method will involve using custom code.
Let’s take a look at the plugin we are going to use today and see all that it has to offer.
Border Image Plugin

Border Image Plugin is an image generator in the form of a plugin. It allows programmers and developers to draw an image on the borders of an element. There is a ton of room for design in the plugin. While it offers a lot of great functionality, the plugin will not slow your site down.
This plugin is very useful because it is actually fairly tricky to do this on your own using custom code, as I will show you below.
The Border Image Plugin comes with some great features. Some of the main ones include:
- Very easy to use
- Use the image generator to create a shortcode that you can use to wrap the content you want to be bordered with an image
- The generator will allow you to upload any image to be used to make your content border fantastic
- Use the shortcode anywhere on your site
- Compatible with Gutenberg editor
All-in-all, the plugin gives you a simple and easy way to add image borders in WordPress.
Let’s take a look at both methods we are using today.
How to Add Image Borders in WordPress
Today, we’re going to look at two different methods for adding a border. The first is through the use of a plugin. The second will require a bit of CSS coding.
Add Image Borders in WordPress Plugin Method
Step 1: Install and Activate the Plugin
Before you can start adding borders to images in WordPress, you first need to install and activate the plugin. You can do this by heading over to the Plugins page in the WordPress admin dashboard.
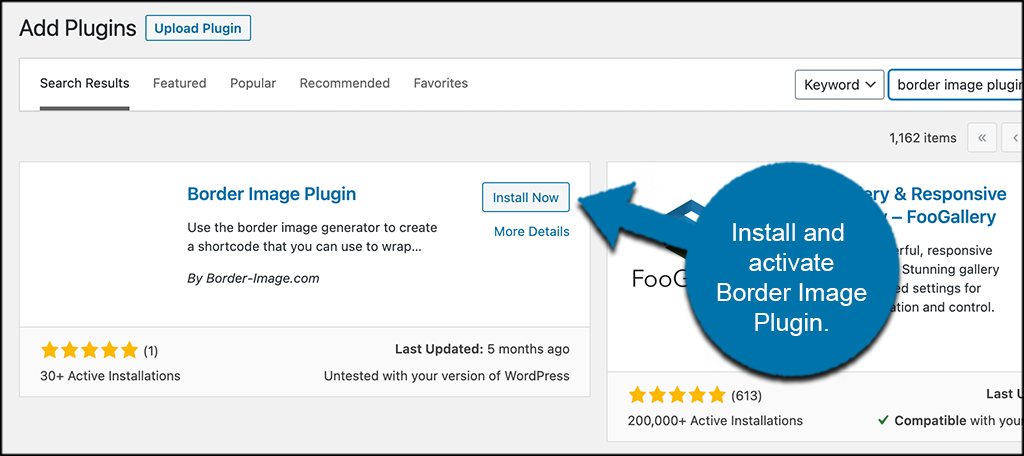
Simply use the search field that is available to search for the plugin by name. Once it pops up, install and activate it right from there.
Step 2: Go to the Border Images Page
Now that the plugin is activated, you need to access the Border Images Plugin main page so that you can upload an image and create a border on it.
To do this, click on the “Border Images” tab, located on the left menu area of the dashboard. You will see this is now an available option because the plugin has been activated.
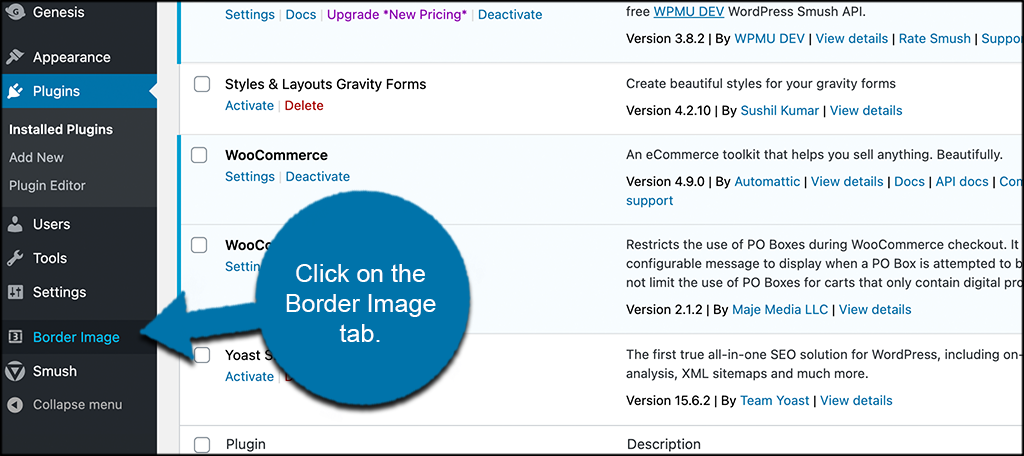
This takes you to the main plugin page where you will be able to immediately start adding image borders in WordPress.
Step 3: Select an Image to Add a Border
Now you are on the page where you can select an image to add a border to. Go ahead and click on the “Select Image” button to select the image you want.
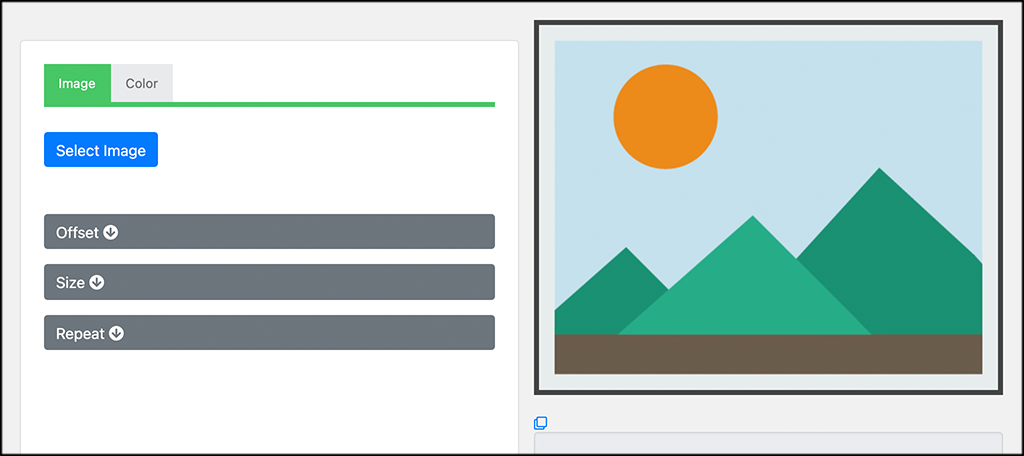
Add the image from your media folder.
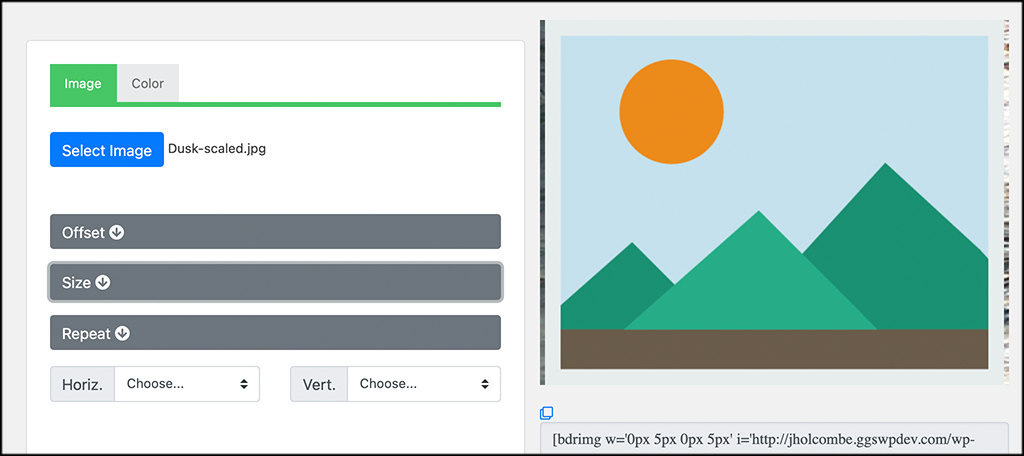
Step 4: Use the Plugin Editor Tools to Create a Border
Now that the image you want is in the editor, start building the border using the available tools. You can see that the first dropdown section is called “Offest.” Go ahead and use those tools to create the offset effects you desire.
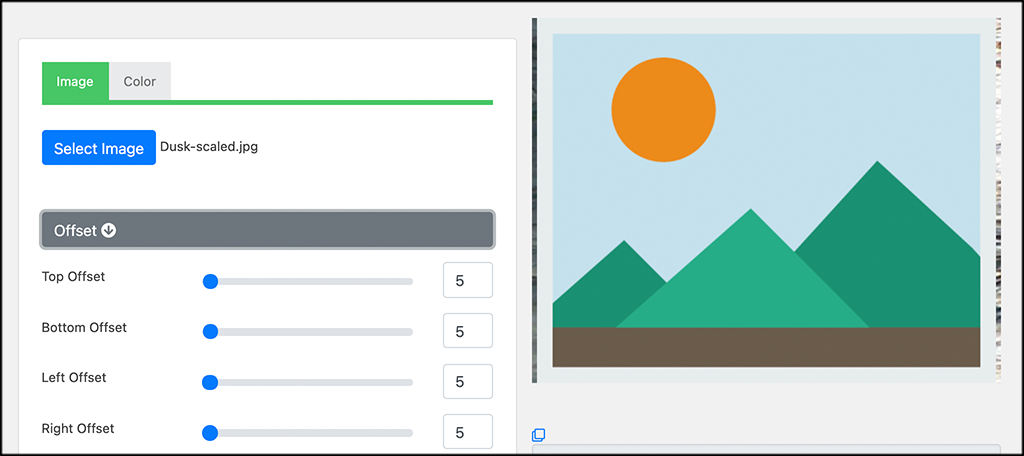
Now, click on the “Size” dropdown and configure those options how you want as well.
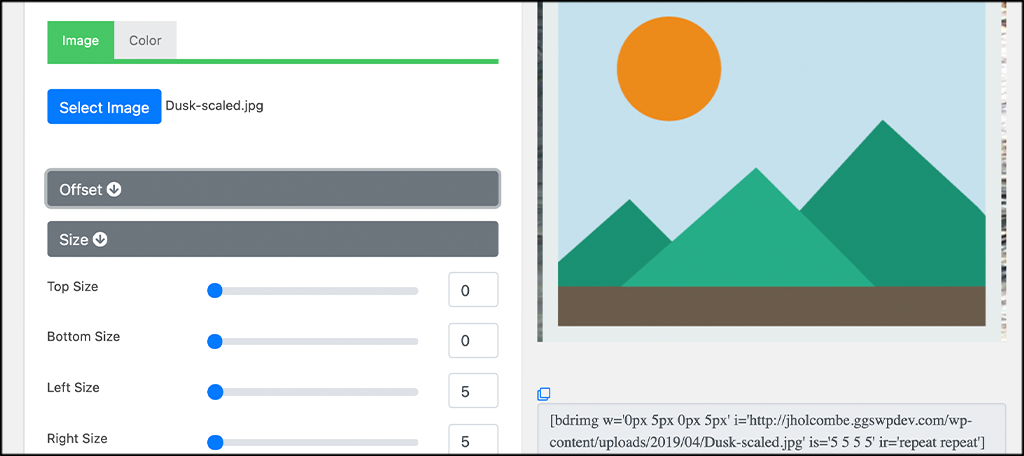
Finally, use the third dropdown called “Repeat” to select those settings to display.
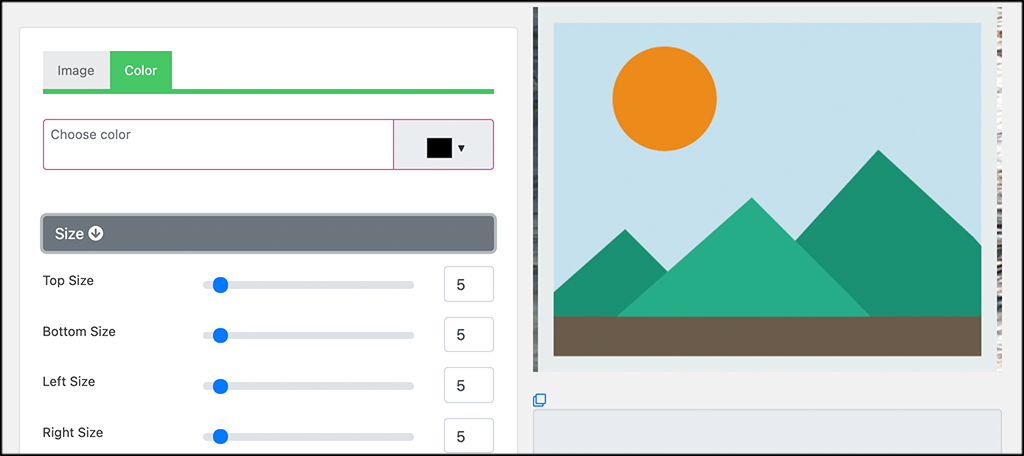
Last but not least, click on the “Color” tab located next to the image tab. Select colors (if applicable) and then finalize everything with image sizing.
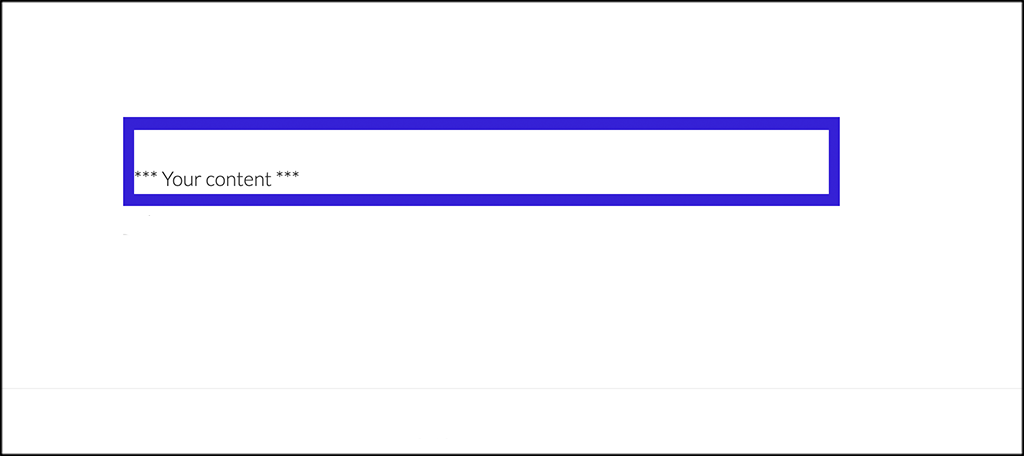
Step 5: View Your Border Live
At this point, you can take the code that is generated and place it anywhere on a post, page, or widget. The border you created will show around the content you used. You can see the demo I did is bare, but the border is there.
The borders you create will have more complexity and a different range of colors. That’s it! You have successfully added image borders in WordPress using the plugin.
Add Image Borders in WordPress Custom Code Method
The second method is preferred by most web developers because you will not need to add a plugin to your website. Adding custom code is very easy in WordPress and is what makes the platform accessible to beginners.
Apply Image Borders to All Images
The first coding method will apply the border to all of your images. If you want individual borders skip this part. On the left-hand admin panel, click on Appearances and select the Customize option. Click on the Additional CSS box. Insert the following code into the text box: [ht_message mstyle=”info” title=”” show_icon=”” id=”” class=”” style=”” ]img.alignright {
float:right;
margin:0 0 1em 1em;
border:3px solid #2992c1;
}
img.alignleft {
float:left;
margin:0 1em 1em 0;
border:3px solid #2992c1;
}
img.aligncenter {
display: block;
margin-left: auto;
margin-right: auto;
border:3px solid #2992c1;
}
img.alignnone {
border:3px solid #2992c1;
}[/ht_message]
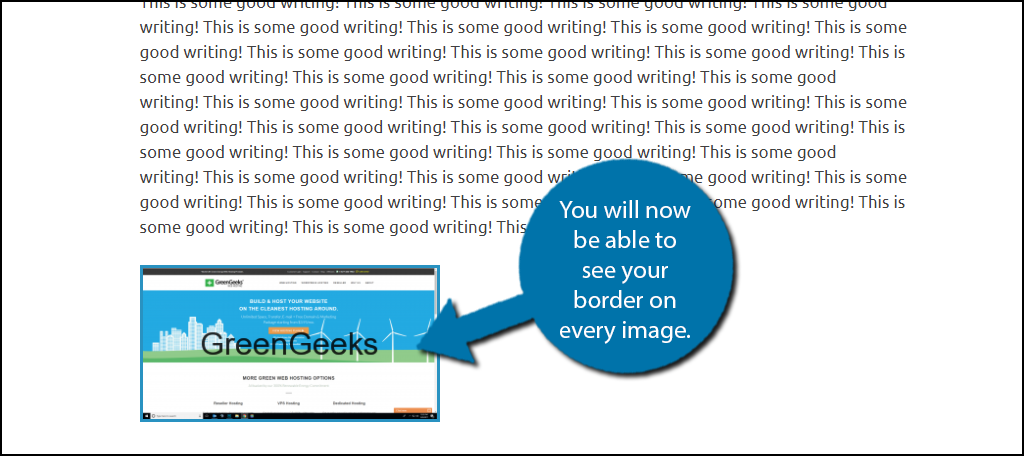
The #2992c1 is a specific shade of blue. Feel free to change this color to fit your needs. You can also adjust how thick the border is. You can now view the changes on your website.
Apply Image Borders to Single Images
Adding individual borders to your images is very easy, but can be very tedious. Every image you add in the visual editor has an HTML code created in the text editor. You can edit the text editor code to add a border.
Here is a standard image code: [ht_message mstyle=”info” title=”” show_icon=”” id=”” class=”” style=”” ] [/ht_message]
Simply add the following line into the HTML code: [ht_message mstyle=”info” title=”” show_icon=”” id=”” class=”” style=”” ]style=”border:3px solid #2992c1; padding:3px; margin:3px;”[/ht_message]
This is what the final result should look like:
Congratulations, you have succesfully added borders to your WordPress images. You can edit how the border looks at anytime, regardless of the method you used. If you did choose to use the plugin, once you become more comfortable with code editing, I would reccomend using the second method because it is more efficient.
Make Sure the Border Makes a Difference
Even if the border is in place it may not actually be helping. For example, if you have a black background color and choose to use a black border, nothing will change. You need to use a color that stands out on your website. In that example, a white border color would be a good choice. It is also a good idea to use colors that may match your theme, but stand out. As long as the border clearly separates the image from the background color, you will be fine.
Conclusion
Adding image borders in WordPress does not have to be overly difficult. There are two ways to do it. You can use a plugin, which is considered by most to be the easiest way, or you can add custom code and do it that way instead if you prefer.
What color have you chosen for your border? Which method have you used to add the border? Do you feel uncomfortable using older plugins that have not been updated in a while?
Thank you, this worked for me.
This plugin is 5 years old. Do you know about a replacement? I am no coder. Thanks