
Using a before and after photo comparison can be extremely handy in a variety of situations. However, it can be difficult to display them side by side with the default tools. Luckily, with the Twenty20 Image Before-After plugin, it is easy to do.
It adds a unique block that allows the users to add two images. The images will be split within a slider that visitors can interact with to see more or less of one of the images. Due to the low difficulty, it is perfect for beginners.
Today, I will demonstrate how to display a before and after photo with the Twenty20 plugin.
Why Use A Before And After Photo?
The before and after effect is a powerful comparison tool that allows you to highlight the differences between the two images. And there is almost an endless number of reasons why a website would want to use this tool.
For websites that focus on entertainment like movies, television shows, or video games, before and after images are extremely useful. You can compare areas before a major event took place, characters from the beginning versus the end of a series, use them to highlight easter eggs, and more.
Some fitness gurus may want to show before and after photos of fitness successes for themselves or people they’ve helped on their website.
Websites that may focus on covering news stories can use before and after images to great effect. For instance, it is common to see what a city looked like before and after a major storm or to highlight the effects of climate change over a period of time.
It’s also great for showing off what a product is capable of. For instance, if you are selling a cleaning product, it can be very effective in showing an area before the cleaning and after. In fact, this is extremely common in cleaning ads.
As you can see, and probably imagine, the versatility of before and after photo editing is almost limitless.
How to Create A Before and After Photo
Step 1: Install Twenty 20 Image Before-After
The Twenty20 Image Before-After plugin is a great addition to any website that wants to show off image comparisons. And it isn’t just for before and after images, you can compare two unique images to great effect with the slider, which is typically referred to as a sliding photo.
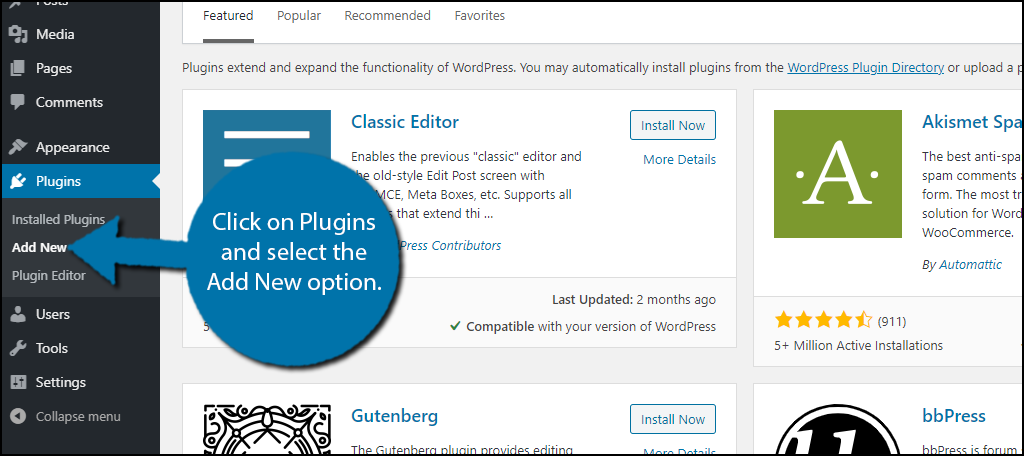
Let’s start by clicking on Plugins and selecting the Add New option on the left-hand admin panel.
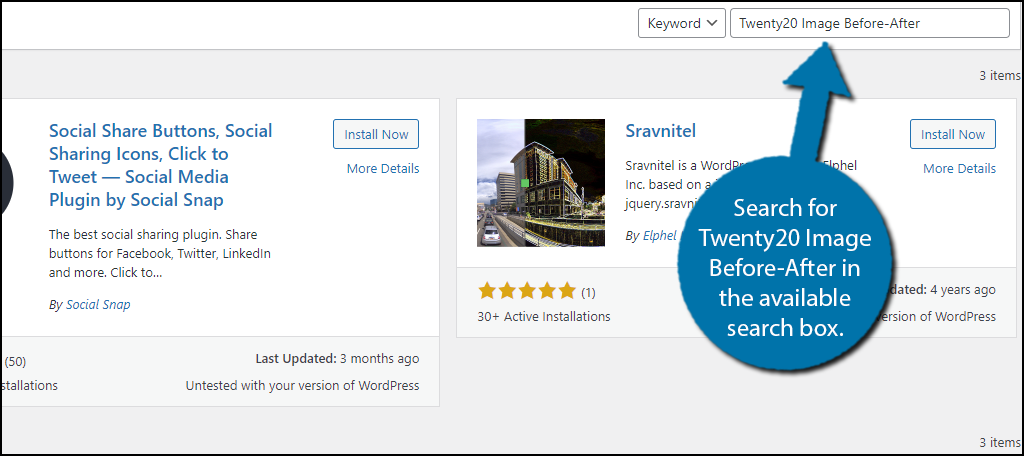
Search for Twenty20 Image Before-After in the available search box. This will pull up additional plugins that you may find helpful.
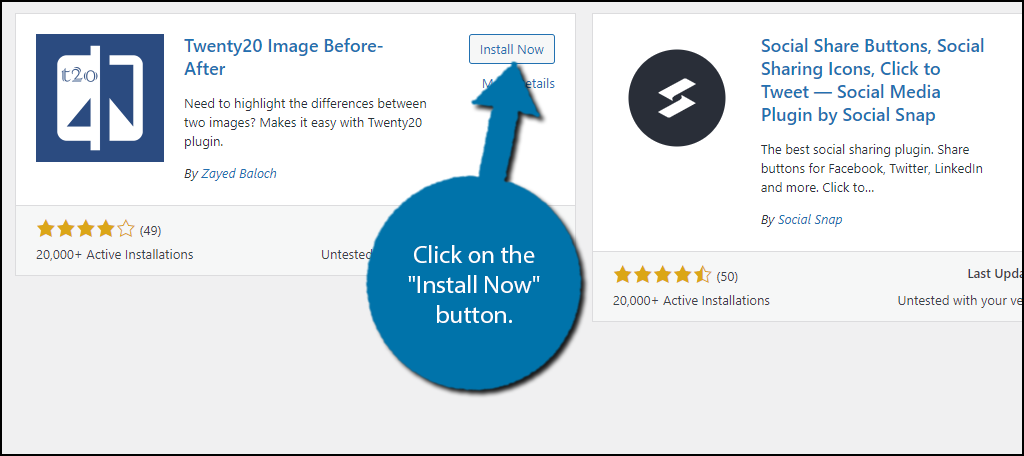
Scroll down until you find the Twenty20 Image Before-After plugin and click on the “Install Now” button and activate the plugin for use.
Step 2: Add A Shortcode Block
Unlike most plugins, there is no settings page for Twenty20. Instead, you can begin using the tool immediately after activation. There are two ways to use this plugin, with an editor or using the before and after slider widget.
I will cover both, but first, we will examine how to use it in an editor.
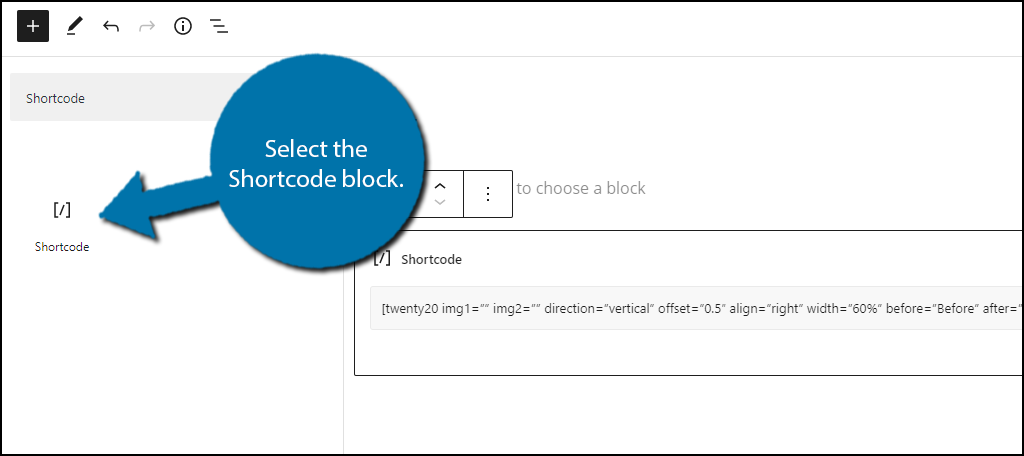
Go to any existing post or page on your website and add a shortcode block. Alternatively, you can create a new one for testing purposes.
Click on the “+” button, search for, and select the Shortcode block.
Note: If you are still using the Classic editor, there is an actual button that you can click on in the editor. In fact, it’s slightly easier than using the shortcode.
Step 3: Using the Shortcode
The plugin allows you to define various aspects of the before and after slider in WordPress by editing the shortcode. Here is the standard shortcode the plugin uses:
[twenty20 img1=”” img2=”” direction=”vertical” offset=”0.5″ align=”right” width=”60%” before=”Before” after=”After” hover=”true”]
This shortcode will not produce any results by default, instead, you need to enter a small amount of information into each piece. In total, there are 9 pieces of information to enter:
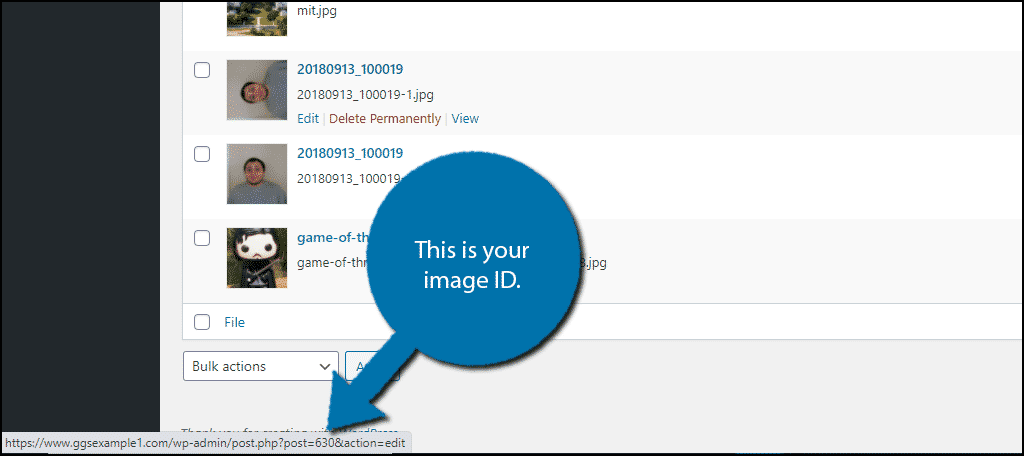
Img1 & img2: This is where you can add the image IDs. Img1 will appear first (top in vertical view or left in horizontal view).
Note: To find the Image ID, go to your media library and hover over the image, and look at the URL that appears at the bottom.
Direction: This is the orientation of your image. You can either type vertical or horizontal.
Offset: This should be a value between 0.1 and 1.
Align: You can either use none, left, or right. This works the same way as text alignment.
Width: This is the width of the image. You can either use a percentage or pixels. Pixels give you more control because they are more exact than a percentage.
Before & After: This is a caption that appears at the bottom corners. By default, it says “before” and “after” respectively. However, you are free to change it.
Hover: This decides if the slider is moved by mouse movement and it only accepts “True” or “False” and if set to true, a visitor can control the slider without clicking on it.
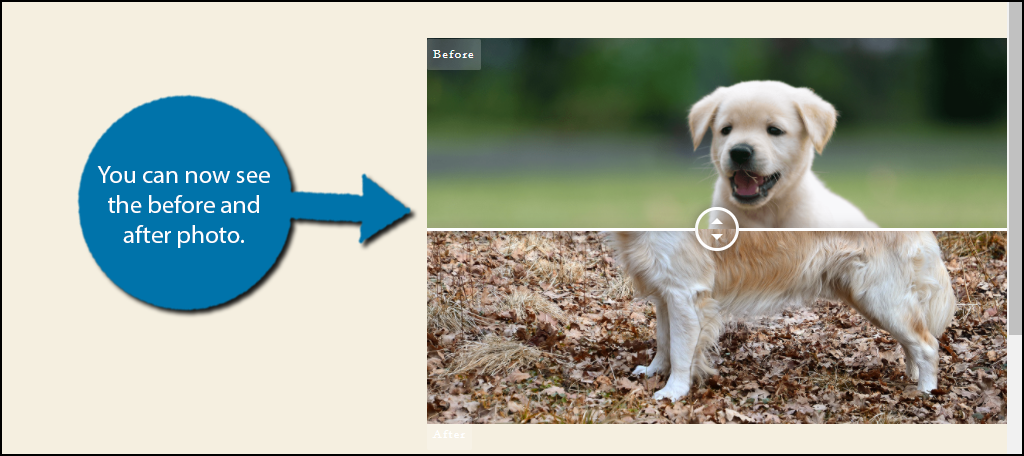
Once you fill out the shortcode and save the changes, you can view the before & after slider on your live page or use the WordPress preview option.
You can use this method to add a before and after photo to any post or page, but if you want to create one for your sidebar, checkout the next step.
Step 4: Add the Widget
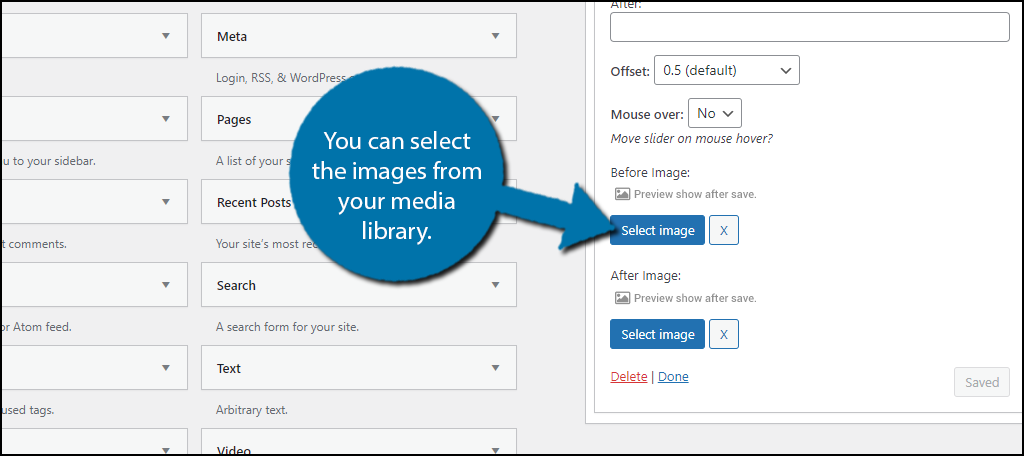
Another way to use the plugin is to use its widget. It generates the same result as the previous step but is designed for the sidebar or footer area of your website.
Click on Appearance and select the Widgets option.
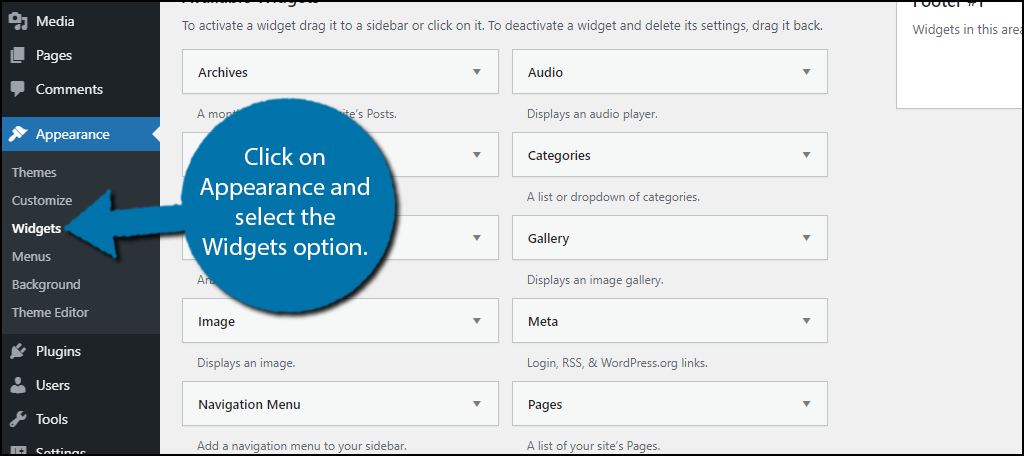
Locate the Twenty20 Slider widget and add it to the desired widget area.
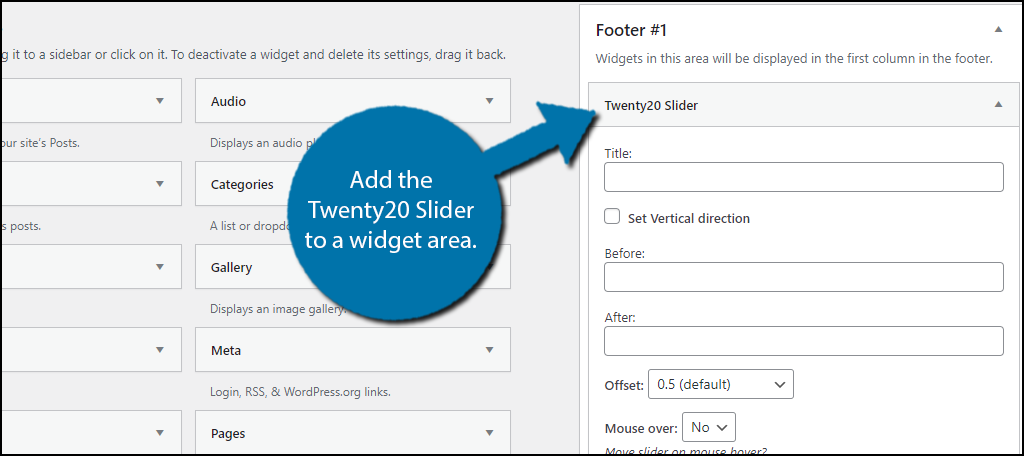
Using the widget is much easier than the shortcode. You can enter all of the same information in a much simpler format. The biggest difference is that you can select the images from your media library instead of using the Image ID.
The end result will look identical to the editor slider we saw previously but will be resized to fit into the widget area.
Congratulations on setting up the Twenty20 before and after photo plugin. Remember that you can set visibility options for widgets so the slider isn’t visible on every post or page.
You Don’t Actually Need A Plugin
It is important to realize that a plugin is actually unnecessary. In reality, you can make your own before and after image by using photo editing software like Photoshop.
It’s actually pretty easy to do and just requires resizing or cropping images and placing them adjacent to each other. and if you’re already familiar with the software, it would only take a few minutes to put together.
Another option that many do not consider is using a before and after photo app on your smartphone. If you often take pictures for your blog or social media accounts on your smartphone, you can use an app to combine them.
And in most cases, the before and after app is free to use! However, I would argue the Twenty20 plugin is the superior option for websites.
Not only does it add the images, but it also lets visitors interact with them. The slider can be controlled by the visitor and that adds a lot of value to any page. It makes the visitor feel like they are in control of the content.
Not to mention it will take up less of the page as the images from Twenty20 are essentially stacked in the same location.
Tips To Make Your Own Before & After Photo
If you are committed to creating a before and after photo with photo editing software, here are a few tips to help you out.
First, and I cannot stress this enough, make sure both images are the same size. Odds are you have actually seen this happen before and not only is it unpleasant to look at, but it also makes it hard to actually compare the images.
Not only is the size important, but so is the angle. For example, let’s say you were growing a tree and you took a picture of it at the beginning of the year and at the end to show how much it grew.
If you take the photo at different angles, it doesn’t highlight the difference.
If you plan on doing this often in something like Photoshop, I recommend making a before and after template. This way, you can quickly place the before and after photos in the template and get them into position quicker.
It also helps ensure all of these images are the same size, which is a good policy to follow.
Support Your Before and After Photo with Text
In many cases, a before and after image speaks for itself. However, in some cases, there are very subtle differences that the average person will not catch. In these cases, you should highlight the differences in text.
This can be as part of a paragraph or even just an image caption. So make sure it’s on all of your Twenty20 photos.
In either case, the text should complement your image. The good news is that just about any before & after plugin in WordPress supports captions and Twenty20 is no exception. Be sure to add useful information like dates and the focus of the comparison.
Have you considered using a before and after photo app on your phone? Do you think there should be a default block in WordPress for before & after photos?