How many times has this problem happened? You have a great looking image, whether you found it or created it, you go to upload that image into your WordPress image gallery and you see that the image has lost saturation and color.
Image saturation and color loss is definitely something you have to deal with when working with WordPress images. You want colors of your images to pop, just like you want the overall colors of your website to pop and be perfect.
The question is; what is the difference and how do you fix image saturation and color loss in WordPress?
Why Do Some Images Lose Saturation and Color in WordPress?
The answer to this question is pretty simple. Most, if not all, professional photographers take pictures using Adobe sRGB color space model. This model has more colors and offers crisper and cleaner results to the final image.
However, WordPress uses the RGB color model. When you upload an image to your WordPress gallery, several image sizes are created. These images use RGB color model, and this model has less colors available than the Adobe sRGB color model format.
When photos are taken with Adobe sRGB model, they are cleaner and show crisp, stand out colors. When those same photos are uploaded to WordPress, the pop of the color can lose a little luster and not show as crisp.
However, there are a few ways you can adjust WordPress images. Let’s take a look at how to fix image saturation and color in WordPress.
Fix Image Saturation and Color in WordPress
To fix color and saturation in WordPress images, you can use a few different techniques. Aside from using a WordPress plugin, the quickest and easiest way to fix image saturation and color is to do it before you upload the images to WordPress.
To do this you will need to have something like Adobe Photoshop. If you don’t have Photoshop, I have also linked you to a free alternative called GIMP, below. I will go over a bit about GIMP in a moment.
Fix Image Saturation and Color in WordPress Using Photoshop
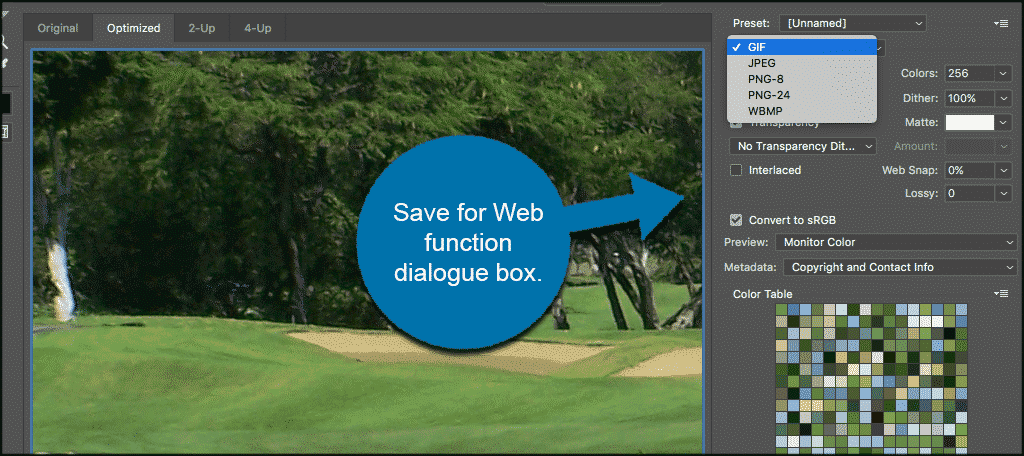
Launch Adobe Photoshop and open the image you want to fix. Once the image is in your Photoshop program select File > Save for Web, in the menu located at the top of your screen.
Note: Minor changes were made to Adobe Photoshop in the last couple of years. This includes the “Save for Web” function. Save for Web is built on the former ImageReady product, which is now discontinued.
That being said, “Save for Web” has not been removed, but it has been moved a little in the menu and the term “Legacy” has been added. To access this you select File > Export > Save For Web (Legacy).
You can also skip the menu entirely by using the existing Photoshop keyboard shortcut: ctrl + alt + shift + s (for Windows) or cmd + opt + shift + s (for Mac).
You can also customize the shortcut by selecting Keyboard Shortcuts from the Edit menu.

Clicking on the Save for Web (Legacy) tab will show you the Save for Web function popup setting’s box. This section will allow you to convert the image in RGB and then save it.
The box will also give you the option to embed a color profile with your image. However, doing this will not make much of a difference on how various browsers will read your WordPress image.
If the above method does not satisfy you, try using the alternative method described below.This alternative Photoshop method will also fix image saturation and color in WordPress.
Fix Image Saturation and Color in Photoshop Method 2
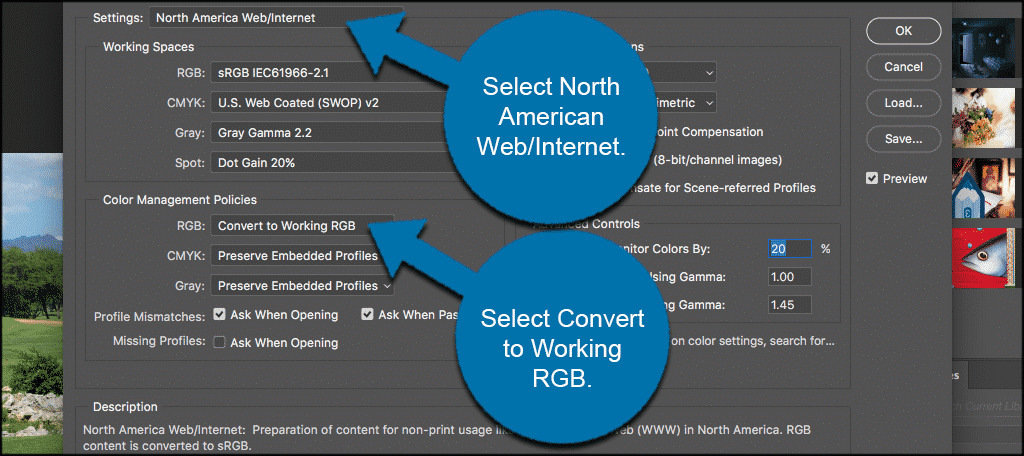
In your Adobe Photoshop menu at the top of the screen, select Edit and click Color Settings. This will bring up the Color Setting’s popup box.
There are two main things you want to change in this setting’s popup box.
- Select “North America Web/Internet” from the settings dropdown menu.
- Under the “Color Management Policies,” select the RGB to “Convert to Working RGB.”
When you have changed those two options, hover over and click on the”OK” button to save your settings.
Now that you have completed this step, open the image you want to work on and get it into Photoshop.
If by chance the working space profile does not match, Photoshop will automatically show a popup warning box that will ask you what you want to do.
Select the “Convert document’s color to working space” option and then click the “OK” button to save settings. This tells Photoshop to more accurately convert your color profile.
Save the image to make sure all your setting choices are preserved.

Repeat this process for every image that you want to upload to your WordPress website gallery. You can now upload all converted images you have done. For all intents and purposes, you have now successfully fixed image saturation and color in WordPress.
Fix Image Saturation and Color in WordPress Using GIMP
Now, if you do not have Photoshop, you can do this process using GIMP. This is a free and open source image editing software. Basically, GIMP detects each image you try to open to see if it has a color profile already embedded.
If your image is in Adobe sRGB color model, GIMP will automatically show you a popup setting’s box to convert it.
Note: GIMP does not have the Adobe sRGB profile built-in. You will have to download Adobe’s RGB ICC Profile to your machine.
Fix Image Saturation and Color in WordPress Using a Plugin
You can also fix image color and saturation in WordPress using a plugin. This method applies to all the images you already have on the website or those you wish to add.
This free method will definitely help fix image saturation and color.
Note: There are a couple of plugins that may help but neither are updated and may not work on the latest version of WordPress. If you still want to give them a try, they are called WP Resized Image Quality and ImageMagick Sharpen Resized Images.
You simply install and activate the plugin from your WordPress admin dashboard and give it a try.
You will have a lot of compression and optimization success for WordPress images if you use any of the 10 best WordPress image sizing and compression tools available today.
Image Terminology to Remember
When you are trying to fix image saturation and color in WordPress, it helps if you know and understand image terminology. Some of the methods above may require you to work with a certain file type.
- JPEG, PNG, SVG: These are the most popular image file types on the web. We are going to focus on JPEGs and PNGs, as they are the file types that benefit most from compression and optimization.
- JPEG: The JPEG file type is usually better for high-definition images like photos and web graphics that are not in need of a transparent background.
- PNG: The PNG file type is best for things like icons and logos, It uses a transparent background which makes it versatile regardless of background colors or images. PNGs can also be optimized significantly after you edit them with any great design tools available.
I hope this article was helpful in showing you a few easy ways to fix image saturation and color in WordPress.
Photoshop is the very best option available, but if you don’t have that program there are other avenues you can pursue. You can also show before and after photo results in WordPress as well.
Have you used any of the methods above to fix image saturation and color in WordPress? Have you stumbled on a new plugin that does this automatically right from the dashboard?