Do you want to properly display code on your WordPress website? Custom code is what makes your website run the way it does. Sometimes you may need to share this information with your visitors. For example, if you want to create coding tutorials, it doesn’t work that well if you don’t actually display the code.
For these cases, you want to display your code directly in the page or post and you have a few options to choose from. The most obvious method is to simply paste the code and highlight it, which works perfectly, but some websites may not like the look of it. Today, I will demonstrate how to properly display code in WordPress using two methods.
Why Display Code in WordPress
Displaying code is not necessary for many websites and only a few will need it. The best part about sharing code is being able to copy and paste it. You may see images of code and it is very tedious to try and copy the code line by line. To avoid that, websites should share code directly on the page or post it is mentioned in.
Unfortunately, code lines do not look that great in the middle of a post or page, but this might be different on a code-sharing website. Regardless, there are plenty of times that displaying code is necessary for the topic and can help share great ideas on a website.
How to Properly Display Code In WordPress
Today, I will demonstrate how to properly display code in WordPress using two methods. The first method is to paste the code directly into WordPress, but I will also show you some simple style options. The second method is to use the SyntaxHighlighter Evolved plugin. Whichever method you choose does not matter, but use the same method throughout your website.
Method 1: No Plugin
Using plugins may be easier and look better, but it is definitely different for everyone. Plugins are widely used, but they also slow down your website.
Go to any page or post you would like to insert the code into. Paste the code onto the page. In my example, I will be using a small Custom CSS snippet:
.site-header .search-form {
position: absolute;
right: 200px;
top: 200px;
}
The issue is that longer code segments will blend in with the content of the page. Another way to handle it is to use theme specific formatting options. For example, the KnowAll theme, has the Heroic Shortcodes plugin built in. It will highlight all of the text with a specific color. Here is an example: [ht_message mstyle=”info” title=”” show_icon=”” id=”” class=”” style=”” ].site-header .search-form {
position: absolute;
right: 200px;
top: 200px;
}[/ht_message]
Since this is theme specific, it is not for everyone. Alternatively, you can use a highlighting approach.
.site-header .search-form {
position: absolute;
right: 200px;
top: 200px;
}
This highlighting effect can be created by using the following line in the text editor :[ht_message mstyle=”info” title=”” show_icon=”” id=”” class=”” style=”” ] Insert Text Here[/ht_message]
Replace “Insert Text Here” with your code. It helps the code stand out from the rest of your content on the page. You can also change the highlight color. Simply change “Yellow” to the color of your choosing.
Another formatting option is the numbered approach. Highlight the text and click on the “Numbered list” button to add numbers.

You can use every number as one line of code. When a visitor highlights the code to copy it, they will not copy the line numbering.
- .site-header .search-form {
- position: absolute;
- right: 200px;
- top: 200px;
- }
If you like the numbering scheme, you will like the second method a lot.
Alternatively, you can use a bullet point approach as well. Highlight the text and click on the “Bulleted list” button to add bullet points.

The numbered approach is better because code lines are numbered, so it seems more natural.
- .site-header .search-form {
- position: absolute;
- right: 200px;
- top: 200px;
- }
Method 2: Plugin
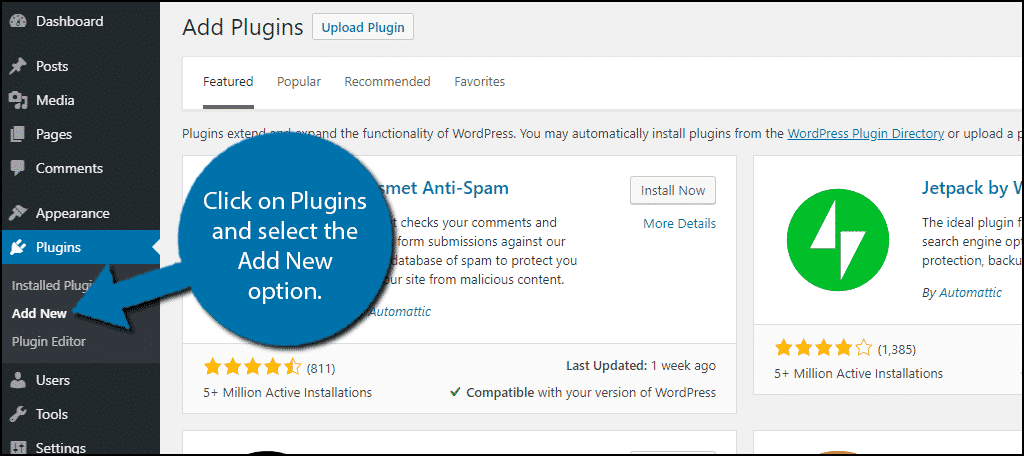
Start off by clicking on Plugins and selecting the Add New option on the left-hand admin panel.
Search for SyntaxHighlighter Evolved in the available search box. This will pull up additional plugins that you may find helpful.
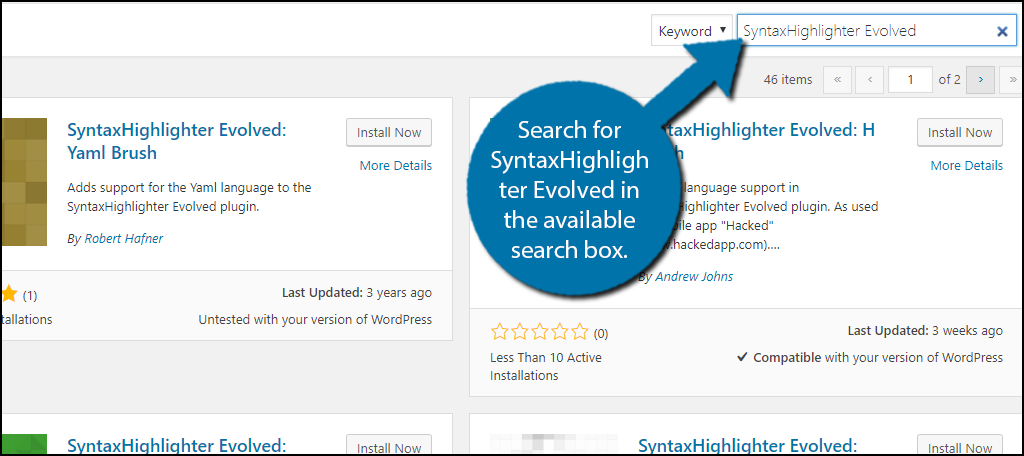
Scroll down until you find the SyntaxHighlighter Evolved plugin and click the “Install Now” button and activate the plugin for use.

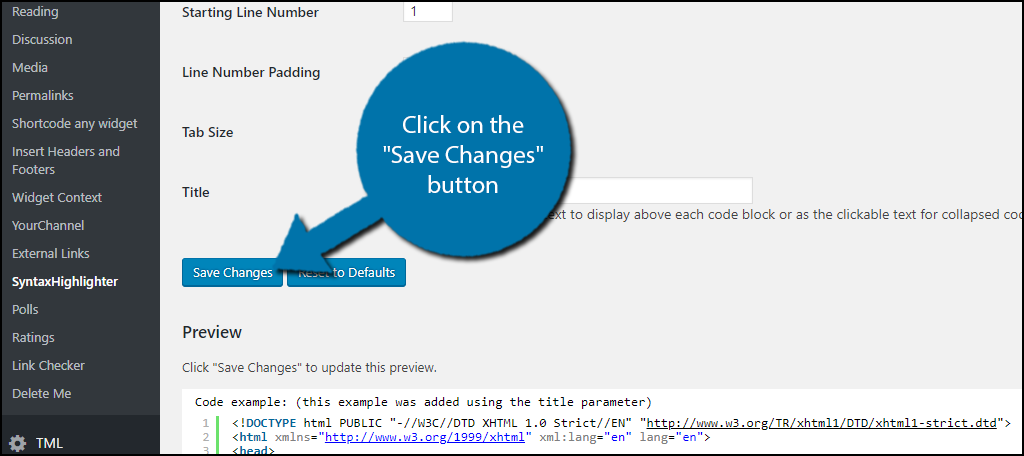
On the left-hand admin panel click on Settings and select the SyntaxHighlighter option. This will pull up the main settings page.

You should be fine with the default settings, but feel free to change any of them. The plugin provides a detailed description of every setting. You can view a preview of it at the bottom of the page. Click on the “Save Changes” button to finish.
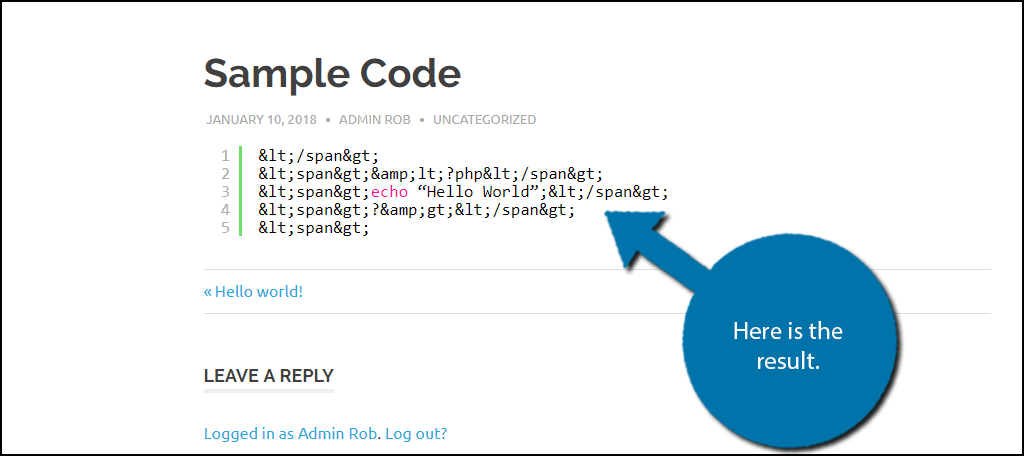
The plugin works by using shortcodes. The two most used languages on WordPress are PHP and CSS. Each of them has a special shortcode command.
For PHP, use: [ht_message mstyle=”info” title=”” show_icon=”” id=”” class=”” style=”” ]
Insert PHP Here
[/ht_message]
For CSS, use:[ht_message mstyle=”info” title=”” show_icon=”” id=”” class=”” style=”” ]
Insert CSS Here
[/ht_message]
Each of them will look like the same, but with a different language.
Congratulations, you have successfully learned how to display code in WordPress.
Be Consistent
All websites should be consistent. If you choose the highlight method, use it all of the time. Do not mix and match methods because visitors will start looking for highlighted text. For example, if all of your articles use the highlighted text method, but one uses the numbering approach, a visitor may scroll down a page looking for highlighted text without finding what they are looking for.
If you do decide to change methods, take the time to go back and make your website consistent. The last thing you want are confused visitors because confusion turns into anger. Angry visitors are more likely to share feedback and bad feedback is not a good thing.
Which method have you chosen? Have you picked a method that is not listed?