Hover animation can be not only a cool effect but also a visual indicator that a page element is clickable. Most often used for navigation and menus, it can also increase click-through rates for images or call to action buttons.
You don’t want to animate everything a visitor can hover their pointer over, but used sparingly, it’s a nice effect.
There are a number of ways to achieve hover animation, but the most widely-compatible method is via CSS. It also typically uses the least amount of bandwidth and browser resources. And using fewer resources is the key to maintaining good site loading speed.
The Best Way to Achieve Hover Animation on a WordPress Site
Like most WordPress enhancements, the best way to add hover animation is with a plugin. Not only is it the best way, but it’s also the easiest. Any time I can do the best thing easily and score a win/win, I’m on board.
We’re going to use the Animate It! plugin for hover animation. It does just about everything we could ask, and none of the features are hidden behind a paywall. And free hover effects in WordPress are also a win.
Whatever the Question, Animation Is Not Always the Answer
When an effect is easy to achieve it’s easy to overuse it. A little animation usually goes a long way, and it’s not appropriate for every site. I don’t necessarily want to see hover animation on a news site or my bank site. It can seem a bit frivolous in a more serious context.
It’s also worth remembering that hover effects are lost on mobile users. So if the bulk of your traffic is mobile devices, it may not make sense to spend time on hover animation. But it’s alive and well on the desktop, so if you have a place for it, use it!
Okay, are you ready to see it in action? The first stop is plugin installation.
Note: normally I use the Gutenberg editor for tutorials, but the plugin only works in the “classic” WordPress editor. If you’re a Gutenberg user and don’t want to switch between editors, this plugin isn’t going to work for you.
Installing the Animate It! Plugin
Log in to your WordPress admin panel.
In the left column navigation, mouse over the “Plugins” link and click the “Add New” link.

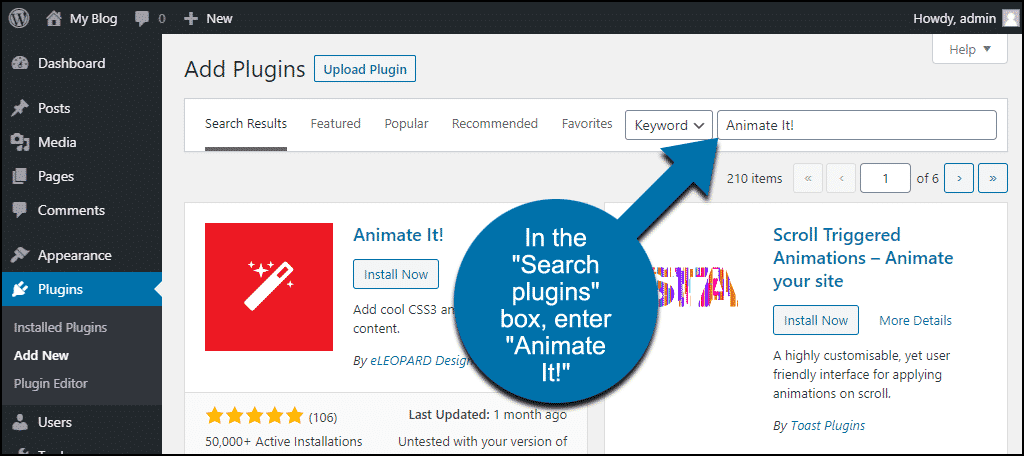
In the “Search plugins…” box, enter, “Animate It!”
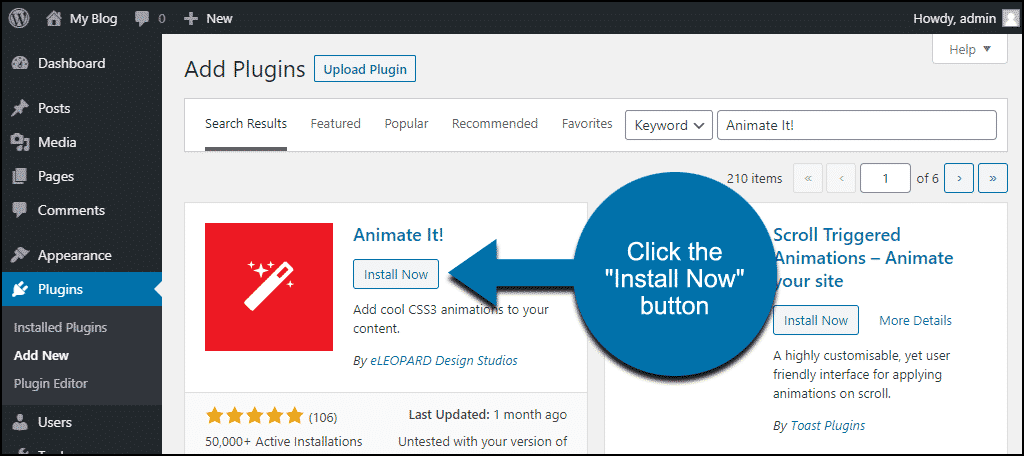
When you find the plugin, click the “Install Now” button.
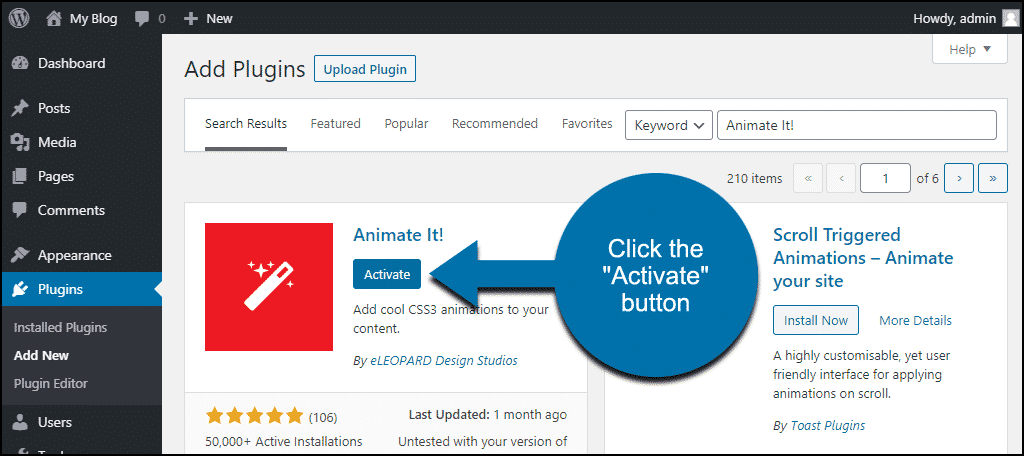
Now the plugin is installed, but it has to be activated before you can use it.
Click the “Activate” button.
That’s all there is to it. Now let’s put the plugin to work.
Using Animate It!
There’s no configuration necessary. Once the plugin is installed it’s working and ready to use.
You access the animation features in the page and post editor. It’s available on all of your existing posts and pages, but I’m going to create a page from scratch.
In the editor, you’ll see a new Animate It! icon.
![]()
When you click it, a popup window opens. That’s where you configure the hover animation.
Animating Text
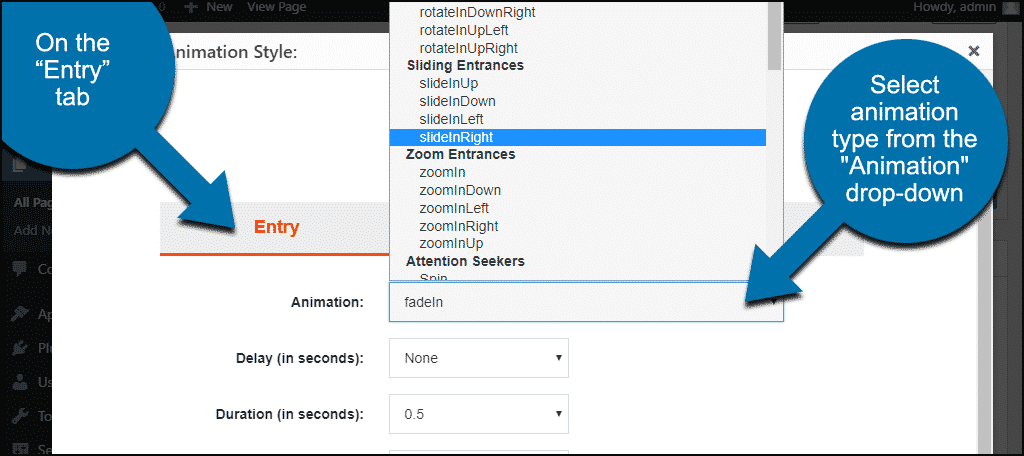
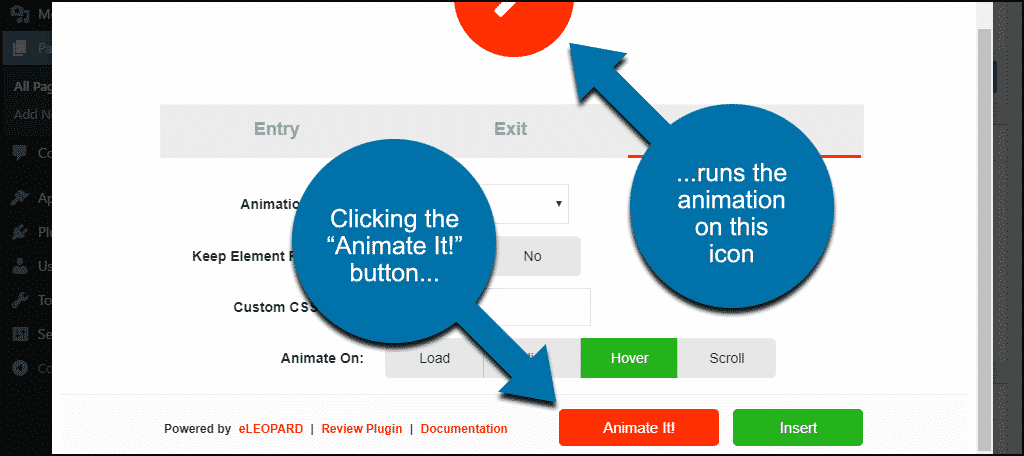
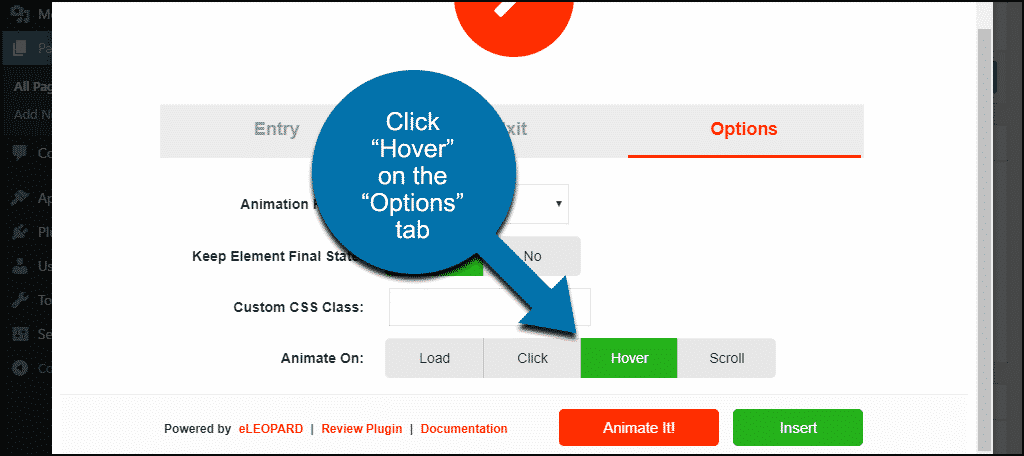
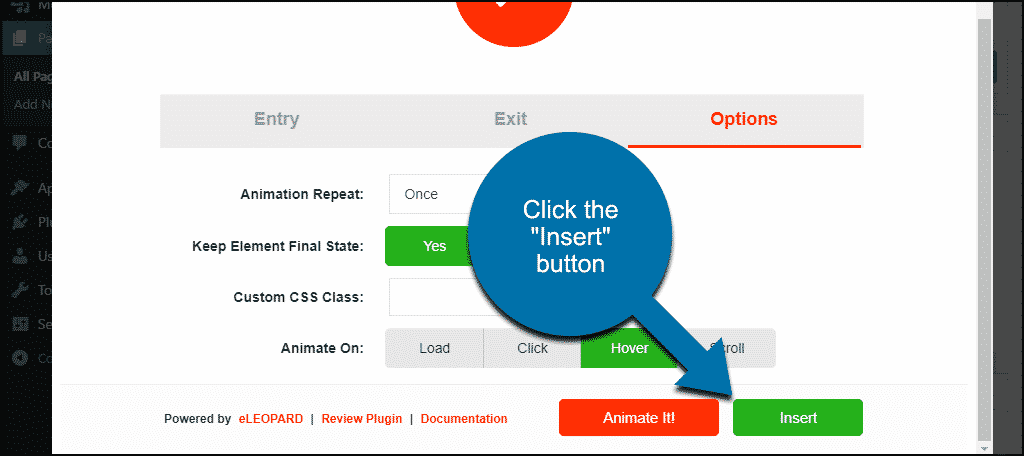
Animate It! place animations into a First, we’ll animate the text in an The “Select your Animation Style” popup window will open. There are three tabs or sections, “Entry,” “Exit,” and “Options.” Since we’re doing hover animation, we’ll use “Entry.” That means the effect begins when the hover begins. Whereas choosing “Exit” would make the effect begin when the hover leaves. That wouldn’t make much sense. The first step is to choose what kind of animation you’d like from the “Animation” drop-down menu. As you can see, there are dozens of options. The only way to see what they all do is to try them. Luckily the plugin will demonstrate the animations for you. Select the animation type from the drop-down and click the orange “Animate It!” button. The icon at the top of the popup window will run the animation. I can’t show you the effect in a static image, but if you’re playing along at home, you can see it. In order to make the animation activate on hover, we go to the “Options” tab. In the “Animate on” section, click the “Hover” button. Finally, click the “Insert” button to add the code to your page or post. Go to your page and mouse over the text and you’ll see the effect. Use the same method to do hover animation on an image. The only difference is instead of selecting the text in the editor, select the image. Using the plugin you can also add animations to widgets. You have to use a CSS class generator on the plugin website to do it. Since you have to go to their site anyway to generate the class, I’ll just point you to their documentation for adding animation to a widget. It’s pretty easy to implement once you know how to configure animation for a post or page. Animating a widget is a weird effect since the entire widget area is animated. So if you animate, say, the “Recent posts” area in your footer or sidebar, the whole section of the page, the widget area, moves about. You’d have to try it to see the effect, but as I said, it’s weird. But kind of cool weird, depending on the animation. There may be some off the wall uses for it, that’s up to you. If you uninstall the plugin, the animations will stop working on the pages and posts where they were used. That’s because, as you may have noticed, the plugin generates shortcodes to do the animation. Once the plugin data is gone, the shortcodes stop working. The shortcodes themselves will be displayed anywhere they were used, so you’ll have to manually remove them. The ease with which we can animate a mouse over now is impressive when you think back to the early web. Javascript “rollover” animations were bulky and complicated, usually making it necessary to use images to get a hover effect. Then when you did implement them, some visitor’s browsers refused to display them properly. Ah, the good old days. Modern CSS transitions make the old ways look and feel like an episode of The Flintstones. Not that there’s anything wrong with the ‘Stones, mind you. But I don’t want to use a bee in a seashell to shave my face as Fred and Barney did. And I don’t want to use jQuery to do an animation that CSS can do in a few lines. What are you going to do with it? There are a lot of possibilities at your fingertips, show us how you use them. The plugin also does animations that aren’t hover-related, such as fire on page load or exit. Be sure to take some of them for a spin. Have you ever implemented old school animations on a website? Can you think of any uses for hover animation that we didn’t discuss? Let me know in the comments. tag. Select the header text and click the Animate It! icon.
![]()
Animating Images
Adding Animation to Widgets
What Happens if You Uninstall the Animate It! Plugin
Living in the Present and Walking in the Future
Now You Have the Best Hover Effect Plugin for WordPress