
Online reviews are one of the most powerful signals of the trustworthiness of your business or service. And that’s true whether your business is online-only or a traditional brick-and-mortar storefront. That’s why many will add Facebook reviews to their WordPress websites.
In fact, local consumer review surveys show that 86% of consumers read reviews for local businesses, and a whopping 91% of 18-34-year-olds trust online reviews as much as personal recommendations.
If you have put time and effort into getting reviews for your business on Facebook, you may be happy to learn that you can display those reviews on your WordPress website.
In this tutorial we’re going to show you how to incorporate your Facebook reviews feed into WordPress in a few easy steps using the WP Review Slider plugin.
Get Customers to Write Facebook Reviews
Before we get into the tutorial, it’s worth mentioning that if customers have not written any reviews on Facebook, nothing will appear. Thus, you need to encourage customers to leave reviews in the first place.
One of the most popular and successful ways to do this is to ask them to.
And yes, it really is that easy. Whenever a customer purchases a product or service from you, remind them to write a review on your Facebook page. Many customers are eager to share their experience with a product with their friends and Facebook is the perfect place to do it.
Of course, if you’re looking for a more aggressive approach, you can add an incentive for leaving a review. For example, offering customers a discount code on their next purchase or transaction if they leave a review. It’s simple, yet effective.
Eventually, you’ll be swimming in Facebook testimonials, but just remember, the plugin will not work if you don’t have any.
How to Share Facebook Reviews in WordPress
Step 1: Install WP Review Slider
WP Review Slider is a Facebook review plugin for WordPress that allows you to integrate Facebook and Twitter reviews directly into your website. The plugin is customizable so you can make it fit into any website and even use your own custom CSS.
Most importantly, the plugin is extremely easy to use, so it will only take a few minutes to set up.
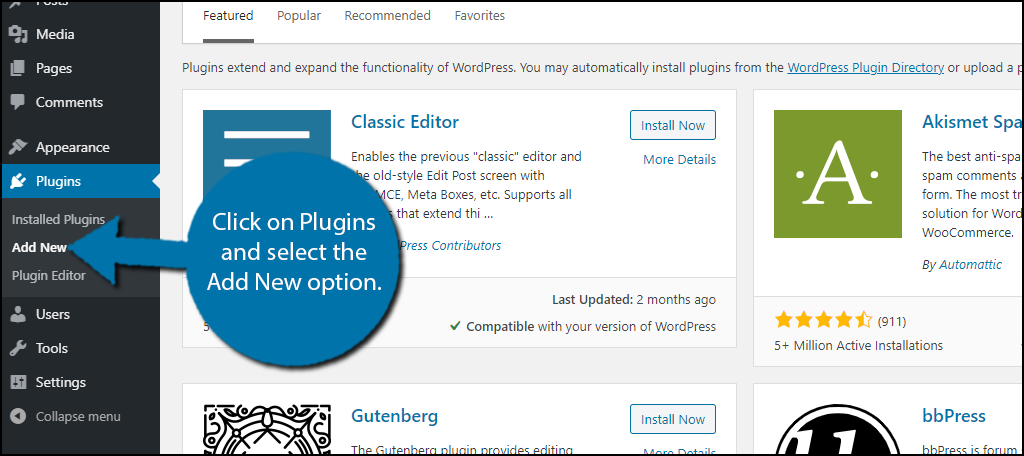
Let’s start by clicking on Plugins and selecting the Add New option on the left-hand admin panel.
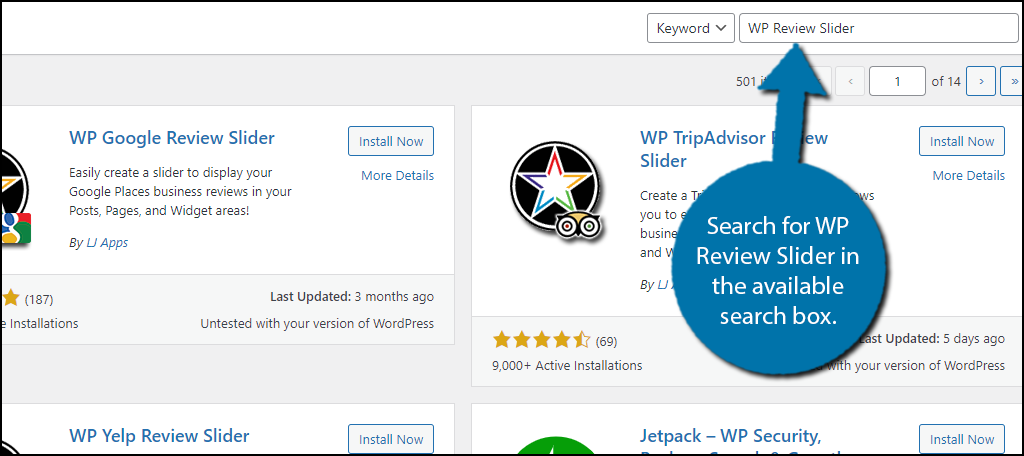
Search for WP Review Slider in the available search box. This will pull up additional plugins that you may find helpful.
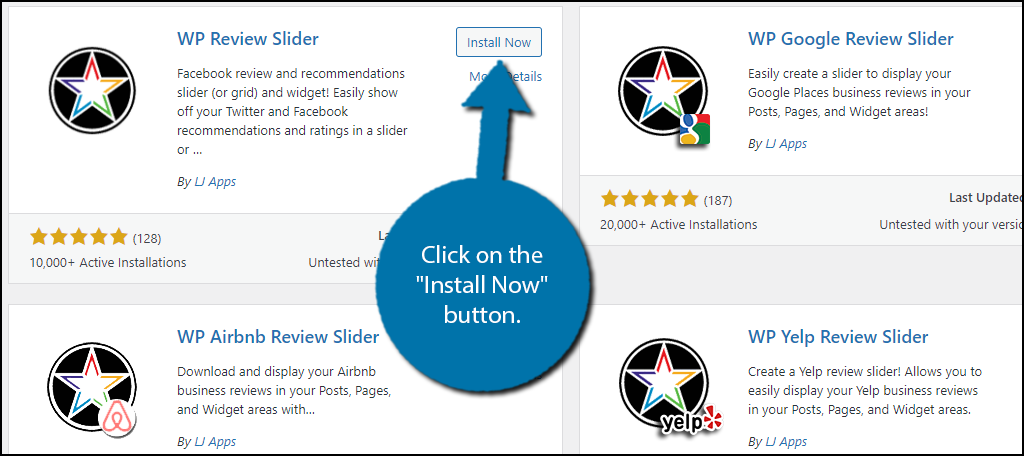
Scroll down until you find the WP Review Slider plugin and click on the “Install Now” button and activate the plugin for use.
Step 2: Connect With Facebook
The first thing you need to do is connect with a social media platform. The plugin supports both Facebook and Twitter, but this tutorial will only cover Facebook. However, the process is very similar with the connect step being the main difference.
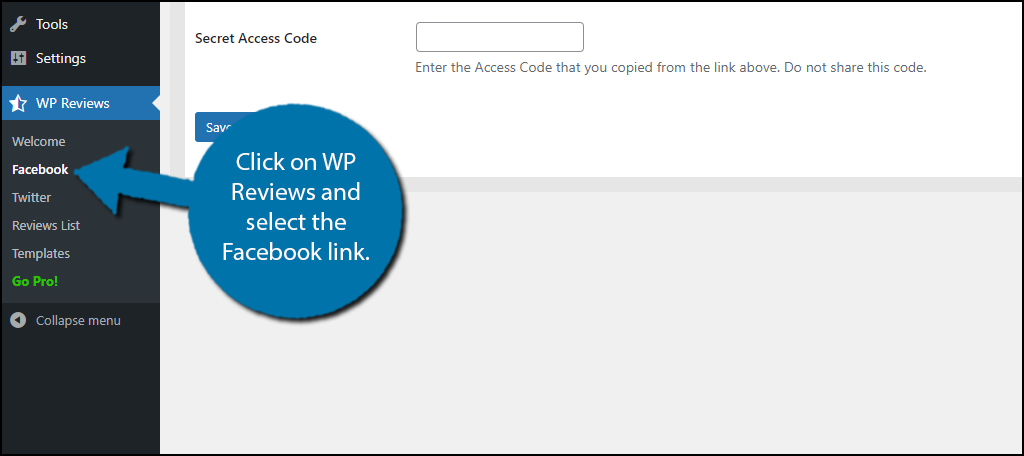
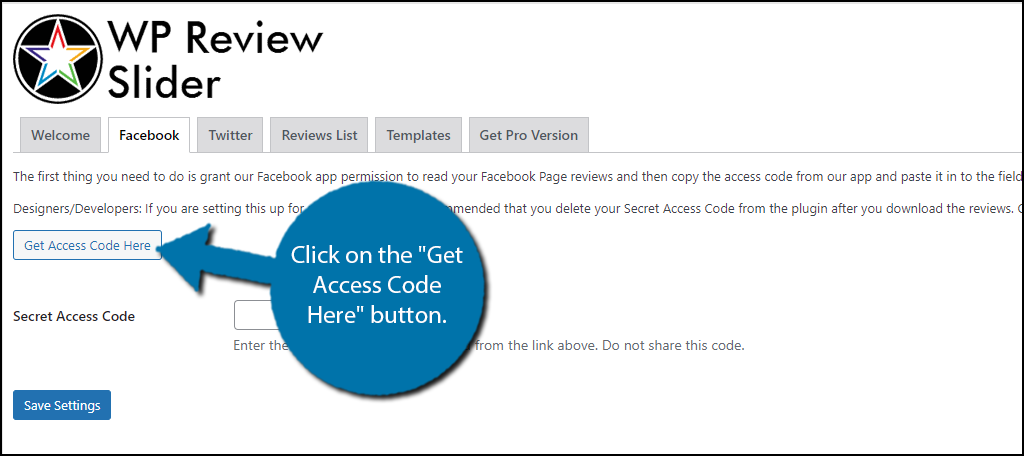
On the left-hand admin panel, click on WP Reviews and select the Facebook link.
Click on the “Get Access Code Here” button.
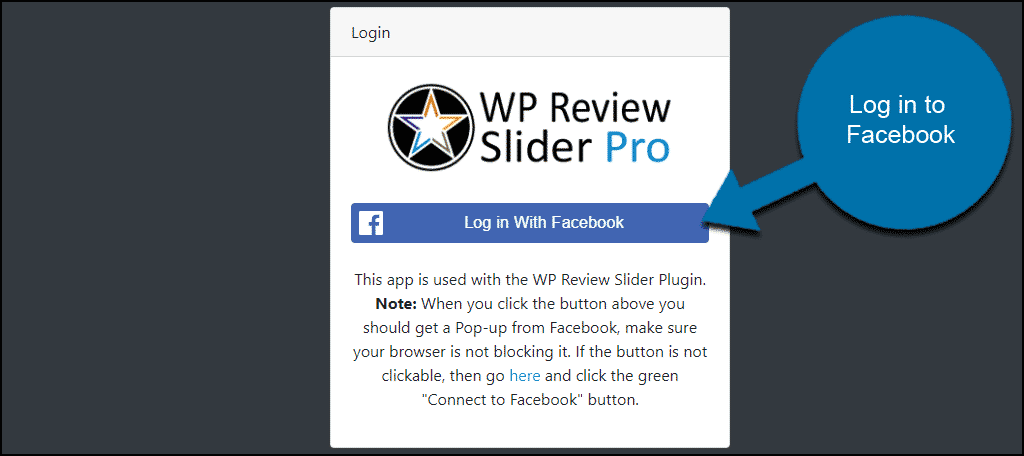
A popup window will open with a Facebook login button. Click it and log in to the Facebook account that is connected to the Facebook page for your business.
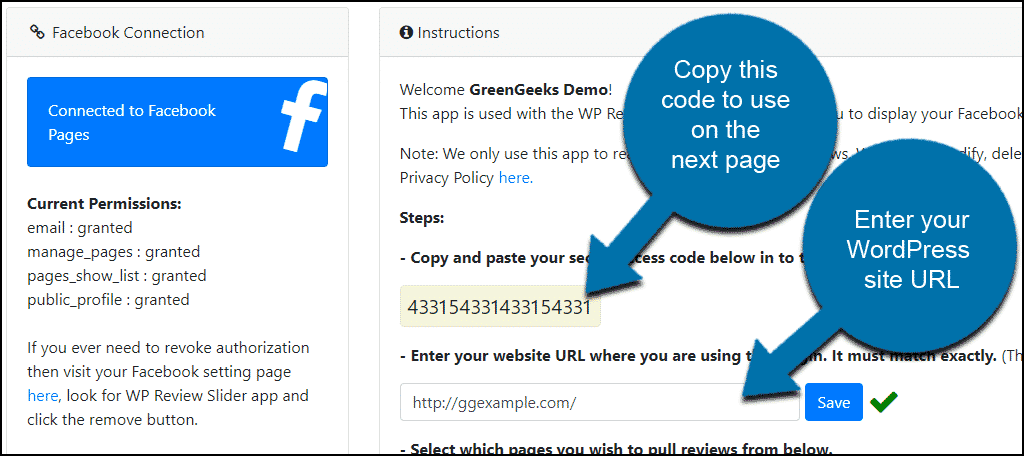
Once you have connected to your Facebook account, a new page will open.
Copy the access code (you’re going to paste it into the plugin configuration when we get back to your WordPress admin section).
Enter the URL for your WordPress site.
Note that if you are using the plugin to display the Facebook page reviews in a particular post or on a particular page of your site (we’ll talk more about that in a minute), you must enter the URL for that particular post or page.
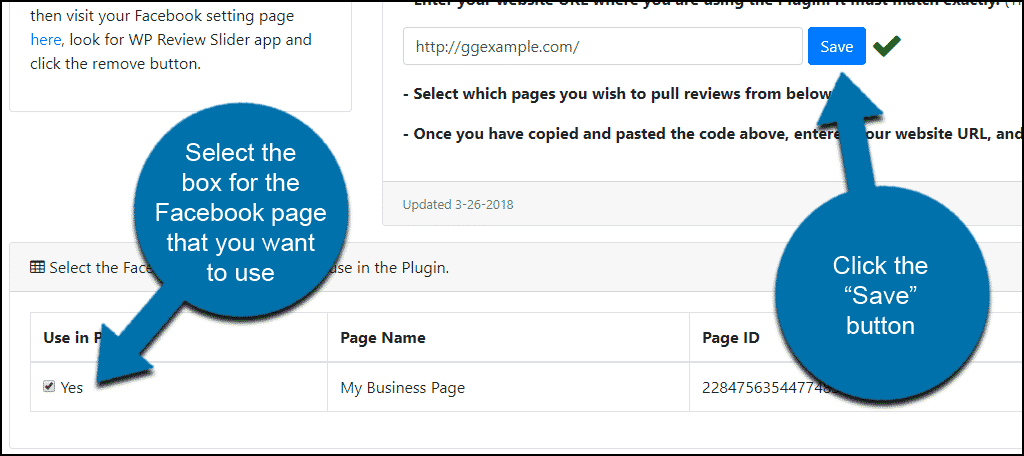
Scroll down to the bottom of the configuration page and select the Facebook page that has the reviews that you want to display on your WordPress site. All pages related to your Facebook account will be listed as options here.
Click the “Save” button.
Close the configuration window and go back to your WordPress admin area.
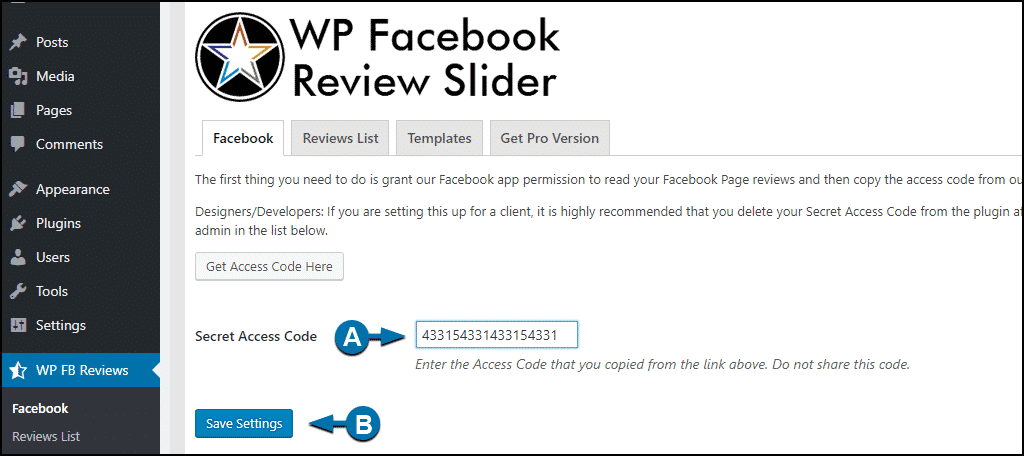
On the left-side navigation menu in your WordPress admin section, click the “WP FB Reviews” link.
Paste the access code that you copied in the previous step into the “Secret Access Code” box (A), and click the “Save Settings” button (B).
Step 3: Create a Template to Display Facebook Reviews in WordPress
The next step is to create a template that will display your Facebook reviews on your website. There are plenty of customization options here, so you may spend a lot of time in this section.
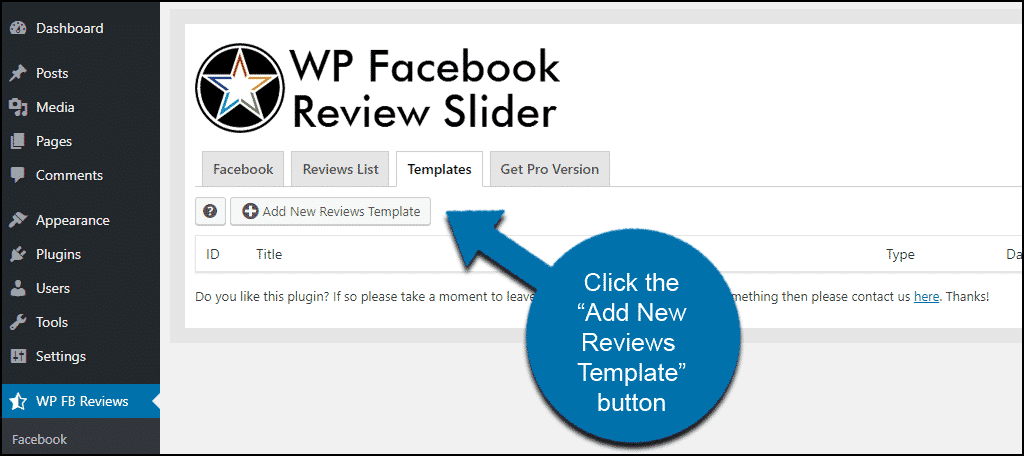
Select the Templates tab and click on the “Add New Reviews Template” button.
There are a lot of settings to control the appearance of the plugin, but for the purposes of this tutorial, we will stick to the two basic settings, first is the “Template Title” (A), which can be anything you’d like (it will not be visible on your site).
Next is “Choose Template Type” (B). For this tutorial, we are inserting the plugin into the sidebar or footer of the WordPress site, so select “Widget Area.”
If you were going to use the plugin in a particular post or page of your site (as mentioned earlier), you would choose “Post or Page,” though we’re not covering that configuration here.
Scroll down and click the “Save Template” button.

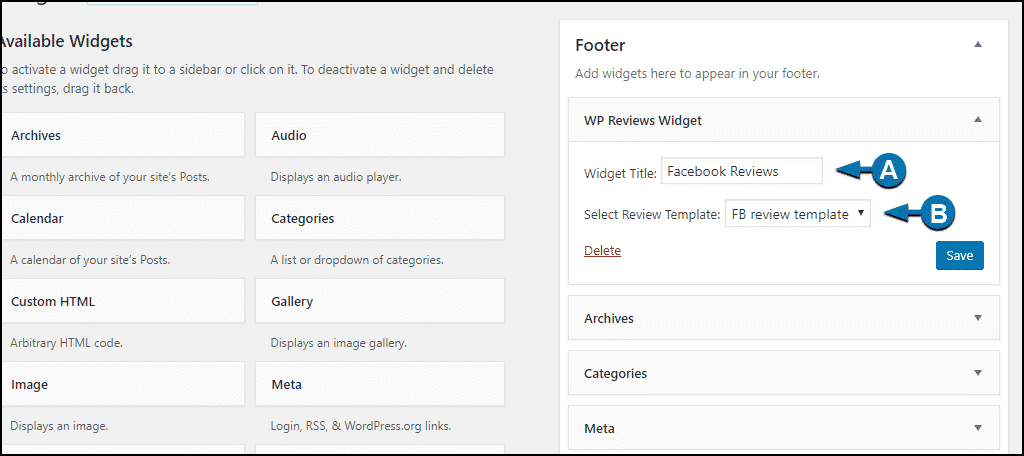
Now to add the plugin to a sidebar or footer, go to Appearance > Widgets and drag the widget to the Footer or Sidebar list.

Open the “WP Reviews Widget” box in the Footer or Sidebar list.
Enter the “Widget Title” (A) (this will be visible on your website above the Facebook reviews section), and from the “Select Review Template” drop-down select the Review Template that you created earlier (B).
Click the “Save” button.
Step 4: Retrieve Reviews from Facebook
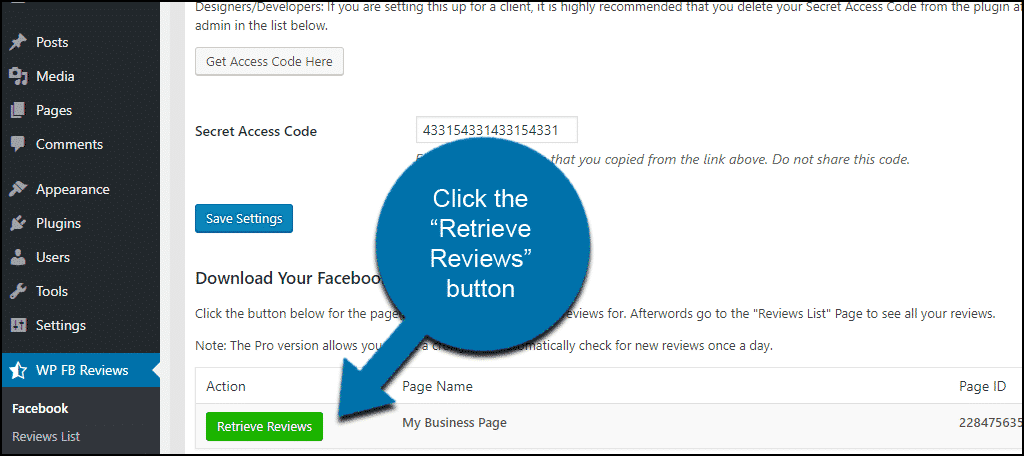
The final step is to simply retrieve or import the reviews from Facebook. Luckily, this is the easiest step.
Underneath where you entered the secret access code, click on the “Retrieve Reviews” button.
That’s it!
When you view your website now, your Facebook page reviews should be visible in the Footer or Sidebar, depending on where you placed the widget.

Review Placement is Critical
One thing you should give a lot of thought to is the placement of your reviews. You need to place them in areas of your website that will generate sales.
For instance, it’s normal to see reviews on a product page. People are curious about the product, and instead of them leaving the page to find reviews, they will stay if they see the reviews in the same location.
Another great location is on a service page. The first impression is key and if you can highlight that customers are pleased with your service, you might have gotten a new customer. And there is no better way than with reviews.
Carefully consider where you will place these reviews.
Integrate More Facebook Content
It’s no secret that Facebook is the 800-pound gorilla in the room, and you can take advantage of that to give your website a boost in traffic. Most content on Facebook can be imported into WordPress by using the appropriate plugin.
This can range from simple things like adding a Facebook “Like” button to connecting your Facebook events with WordPress or even embedding your Facebook videos into WordPress. You can even add a Facebook login to WordPress. In reality, the options are almost limitless.
Regardless of if you want to add Facebook reviews, or something else, there is a plugin for it.
Have reviews been beneficial to your business? Do you use methods other than Facebook to get reviews for your business?
Good day! Thank you very much for your article! I would also recommend this: https://elfsight.com/facebook-reviews-widget/wordpress/ – to me, it’s the easiest way to display reviews from Facebook on WordPress site with any theme or of any version. I will be glad, if someone of you will like it too!