Are you looking for a way to create a private message system in WordPress? Communicating with your visitors, staff, and anyone else is essential to running a quality website. Unfortunately, WordPress’ only way of communication is through the comments section. This is great for receiving feedback about your content, but there are many topics that are best left for private messaging.
Private messaging provides a direct line of communication between two individuals on your WordPress website. This can be useful for many reasons. As with most things in WordPress, there is a plugin that does exactly that. Today, I will demonstrate how to create a private message system in WordPress using the Front End PM plugin.
Why Add Private Messaging to WordPress
Private messaging has been around for a long time and it’s no secret that it is very useful. You can privately communicate with another person without anyone else seeing it. This is great when you are answering questions, communicating with friends, talking to staff members, and so much more.
Most social media websites like Facebook have private messaging incorporated into the platform. It has become a feature that many users expect from websites that try to focus on social and user engagement. Thus, adding it to WordPress is a pretty normal thing to do for many websites.
One thing you need to consider before adding this is how often your staff members will actually check their messages. For example, if your staff members do not check often enough they will miss questions from regular visitors. It is a bummer for visitors who take the time to send a private message to staff members and do not receive a single reply. It looks even worse when that reply is a month later.
How to Create a Private Message System in WordPress
Today, I will demonstrate how to create a private message system in WordPress using the Front End PM plugin. This plugin creates a simple interface on your website that allows you to send, receive, and check your private messages. It is very simple to set up and allows for your WordPress users to do all of this without ever entering the admin area. It is all done on the front end of your website.
Installing Front End PM
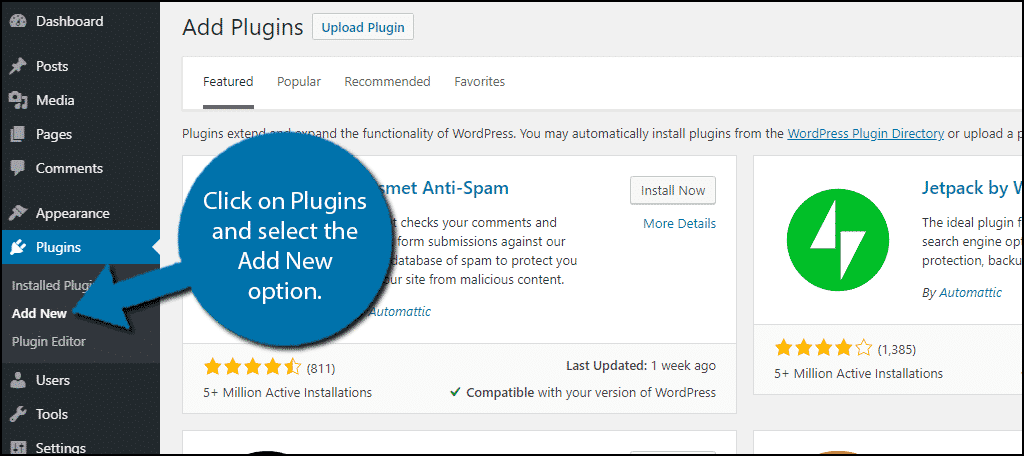
Let’s start by clicking on Plugins and selecting the Add New option on the left-hand admin panel.
Search for Front End PM in the available search box. This will pull up additional plugins that you may find helpful.

Scroll down until you find the Front End PM plugin and click on the “Install Now” button and activate the plugin for use.

On the left-hand admin panel click on Front End PM and select the Settings option. This will pull up the main settings page.

Setting Up Front End PM
This plugin has a lot of settings to change and customize to get the best results for your website. There are a handful of features that are exclusive to the Pro version of the plugin. If you want to add any of the features that say “Pro Only” you will need to upgrade.
Remember that there is no right way to set up the plugin, so choose the options that best suit your website and keep in mind that you can change them at any time.
The first option is actually what page you want the messaging system to appear on. I recommend creating a new page and using it exclusively for this plugin. I also recommend adding it to your website’s navigation menu so visitors can find it easier.
If you click on the “Create New Page” button, it will create a page called Front End PM and place the shortcode needed.
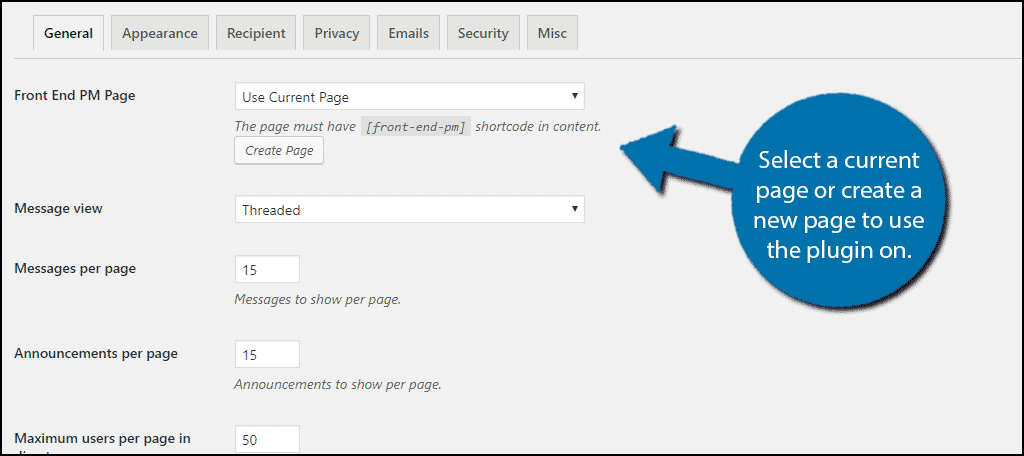
Now go through each setting carefully and select the best option for you. There are seven tabs worth of settings that you can change. Most of the more common things you will change are on the General and the Appearance tabs. You can change these settings at any time so do not be afraid to experiment.
Once you are done making changes, click on the “Save Changes” button.

Using Front End PM
Remember that if you chose not to click on the “Create New Page” button and instead chose an existing page, you must add the shortcode to that page. The plugin’s interface will appear wherever that shortcode appears. Here is what a page with just the shortcode will look like:

Using the plugin is very straightforward. To send a message click on the “New Message” button. The Message Box allows you to view every message you have received. Settings allow users to change their individual settings.
Congratulations, you have successfully added a Private Message system to your WordPress website. Remember that you can change the settings at any time and that you need to make sure users are aware of the system in place.
Stay Connected With Users
Private messages are just another way to stay connected with your visitors. You should also be mindful of other ways to communicate like the comments section, emails, and the various social media websites. Staying connected with your visitors is crucial to building a strong community. Having a strong community will help spread the word about your content and attract new visitors.
How easy do you find the Front End PM plugin to use? What made you consider adding a private messaging system in WordPress?
Hi! So happy to come across your site! Do you think this tool will help my use case:
I build and sell DFY premade web templates. The buyers are not designers and they would go in and change a few things like name logo etc (I would give them editor permissions). I want to be able to communicate with them and contact them with specials etc
You would just have to try it and see if it does what you need.