
If you run a multi-author website, you probably have an editing process in place to review what each author creates. However, the only tool WordPress provides for this is the user role system. It’s really not enough to set up an editing process, but that’s where Oasis Workflow comes in.
This plugin allows you to create a robust framework that all of the content on your website must go through. For example, you can make it so an author writes the content, then is assigned to proofread it, then require an editor to proofread it, and finally publish the article.
The entire process is customizable, so it can fit any work environment. Today, I’ll show you how to do all of this with Oasis Workflow.
What Is A WordPress Workflow?
Anyone who creates content regularly already knows this, but every website has a process they go through before content goes live.
It’s different for everyone, but generally speaking, the content is written, it is then proofread for typos, it is examined from an SEO standpoint, and then it is published. On larger websites, content is rarely ever just typed and published.
This entire process is what is known as a workflow, and every website that is successful adopts one.
Following one of these processes increases the quality of the content. It catches simple mistakes like typos, run-on sentences, and other simple mistakes that hamper visitors that read the content. While SEO checks ensure the content will rank well on search engines.
Even a website run by one person will follow a workflow, and Oasis Workflow can help you create workflows for free.
How to Use Oasis Workflow in WordPress
Step 1: Install Oasis Workflow
Oasis Workflow is a free WordPress workflow plugin that can drastically improve the editorial process in any environment. While it was designed with teams in mind, it is also a great addition to websites that only consist of one person.
The tool allows you to create your own unique workflow and it even has the option to allow authors to swap tasks if the need arises. While it can make very complex workflows, you can also set up simple ones like write article -> proofread article -> publish.
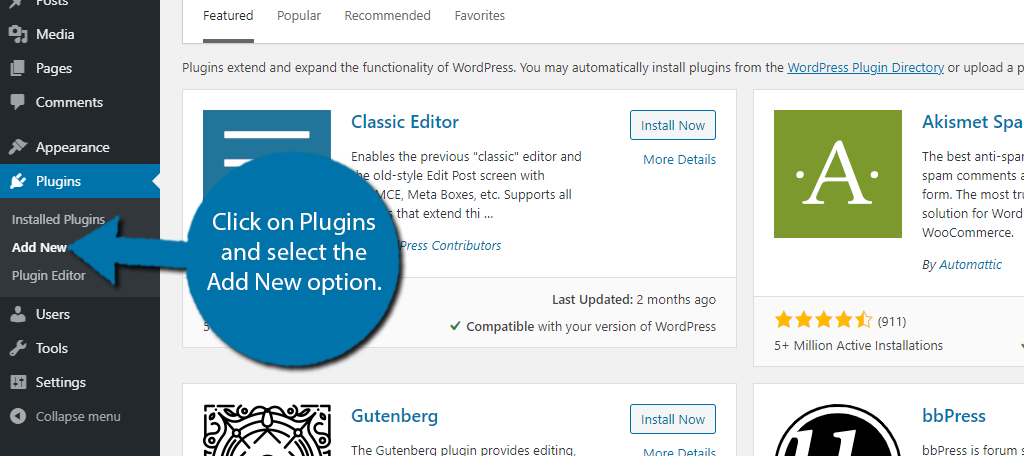
Let’s start by clicking on Plugins and selecting the Add New option on the left-hand admin panel.
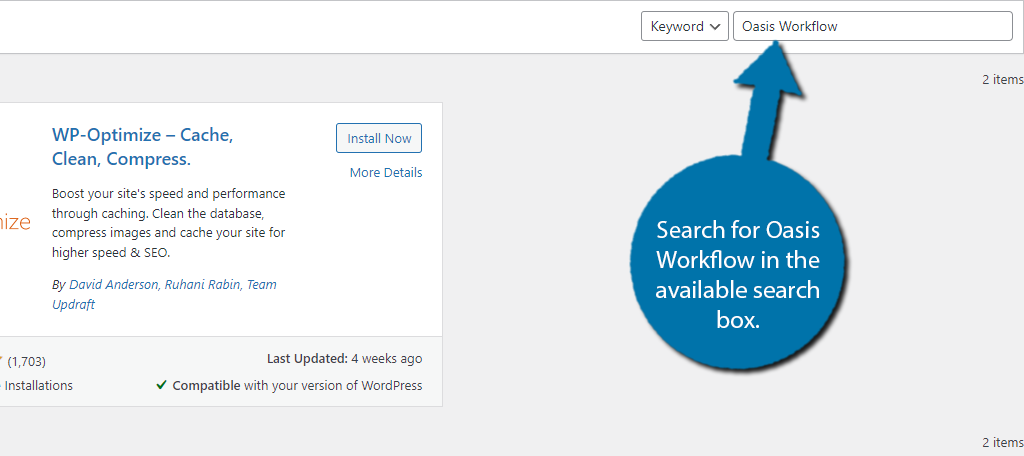
Search for Oasis Workflow in the available search box. This will pull up additional plugins that you may find helpful.
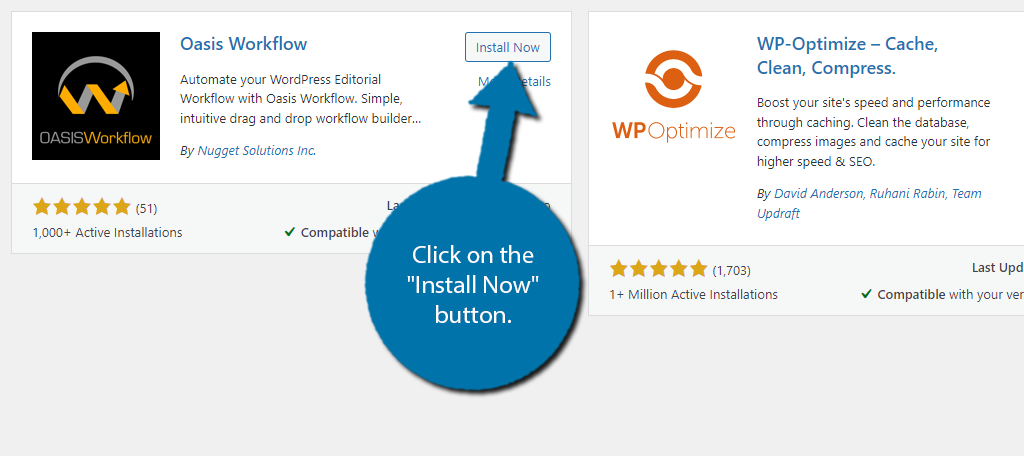
Scroll down until you find the Oasis Workflow plugin and click on the “Install Now” button and activate the plugin for use.
Upon activations, you will be asked to subscribe for regular updates. Feel free to sign-up or skip this because it is not required to use the plugin.
Step 2: Create Workflow
The first thing you should do is actually create a workflow. The good news is that the plugin automatically generates two generic workflows that you can use as a starting point. Overall, the process is pretty straightforward, so you shouldn’t have any issues.
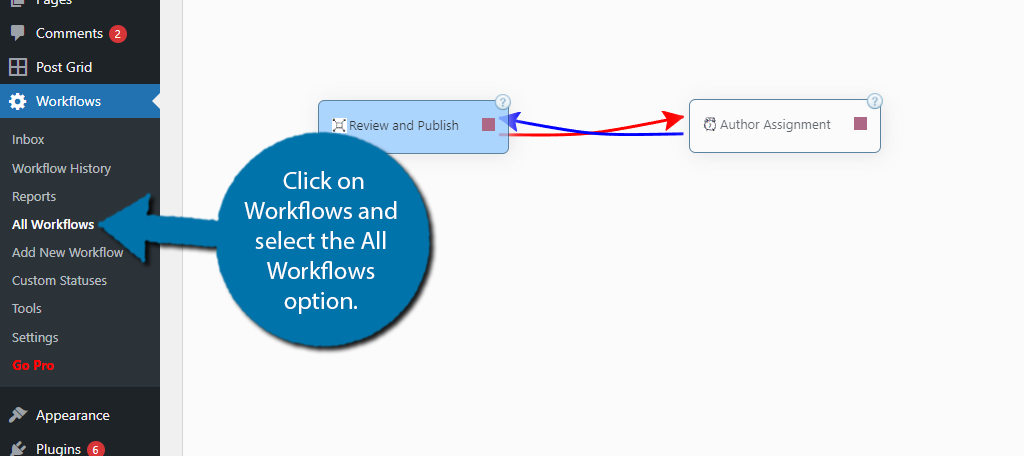
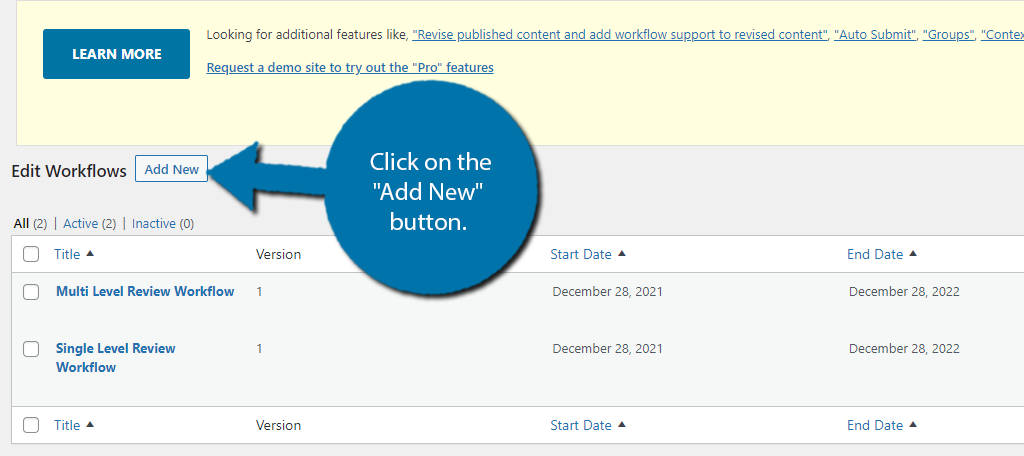
On the left-hand admin panel, click on Workflow and select the All Workflows option.
As I said before, there are two workflows to start with a single and multilevel template. You are free to use these as a base, but I will start from scratch.
Click on the “Add New” button at the top.
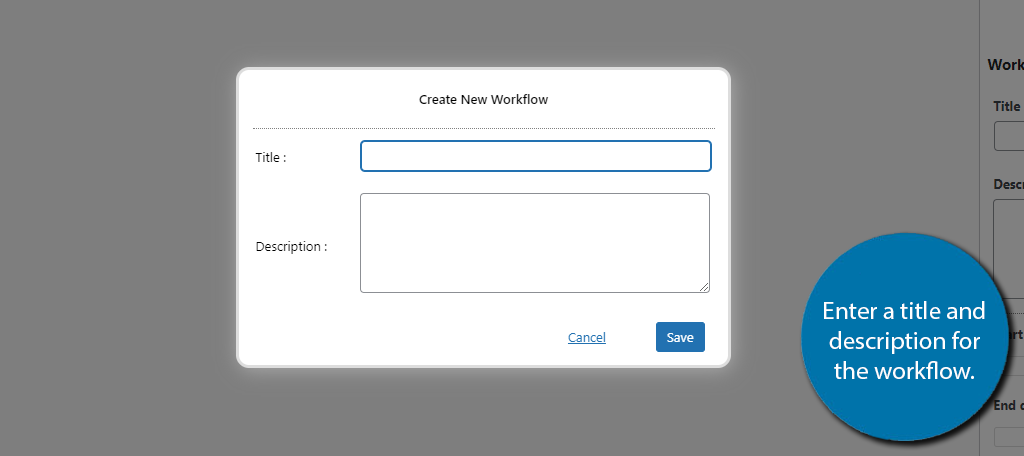
The first thing you will be asked to do is enter a name and description for the Workflow. It’s a good policy to be pretty specific so for example, if this is intended for blog posts, Blog Workflow would be a good choice.
Ultimately, what you enter is up to you.
The first thing you should notice is that this is not Gutenberg or the Classic WordPress editor. Instead, it is the Oasis editor, but rest assured it is pretty simple to you use.
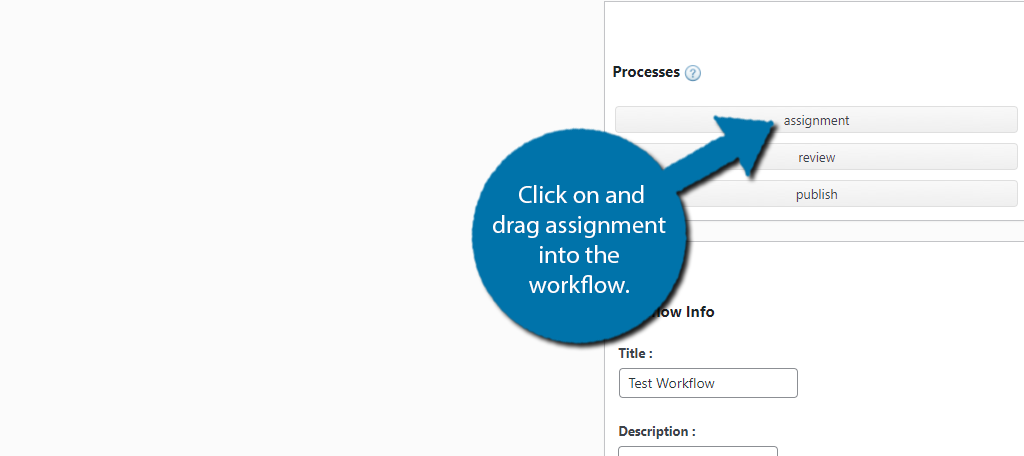
First, notice in the top right corner there is a box with processes. You can add these to the workflow.
Step 3: Add Assignment
Click on and drag assignment into the workflow (location doesn’t matter).
Note: Below the Processes, you will see a start and end date for the assignment. This is required, thus even if you are not sure what date to enter, you must enter a placeholder date.
A small pop-up will appear with all of the assignment options. First, set the name of the assignment and then assign it to someone. The choices are limited to the users on your website.
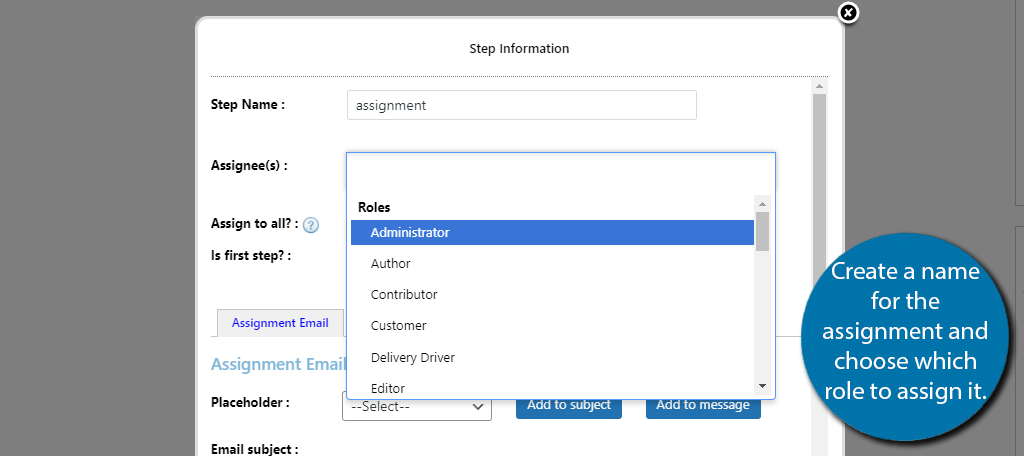
There’s a small check box that you can check if this is the first step. If checked, this will allow you to choose the status of the post (draft, published, etc.) when it is complete.
In this case, a Draft is the best option.
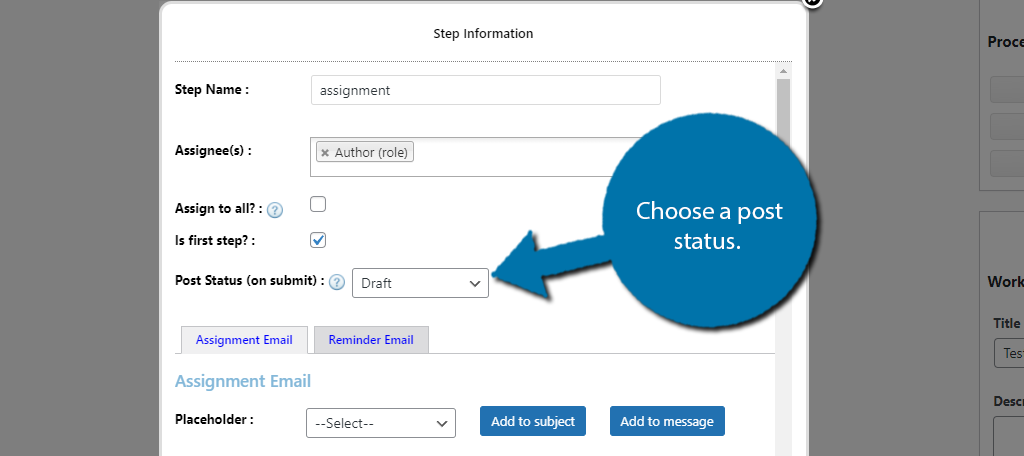
You can also go through the process of creating an assignment email, but I will leave that to you. Save the assignment.
Next, add a review process to the workflow. In terms of settings, this is practically identical to assignment, but instead, you would want to assign it to an editor (most likely).
Save the review process when you are done. You should now have two processes in the editor. Let’s connect them!
Step 4: Connect Processes
All of the processes can be connected to each other. You should notice a red square on each process, Click on and drag a line from the assignment to the review steps.

A small pop-up will appear showing what the source (step 1) and target (step 2) are. You will also need to set up a post status. Again, for almost every post status choice, the best option is draft.
The only exception is the final option which should be “publish.”
The most important option is the Path. You have two choices: success and failure. So for example, you would want to go from assignment to review if everything is good to go. But if step 2 is to proofread it and it turns out that it needs some more work, then you may want to set a failure path back to assignment.
It is required to set up a failure path for every connection.
After saving the options, you should see an arrow connecting the steps.
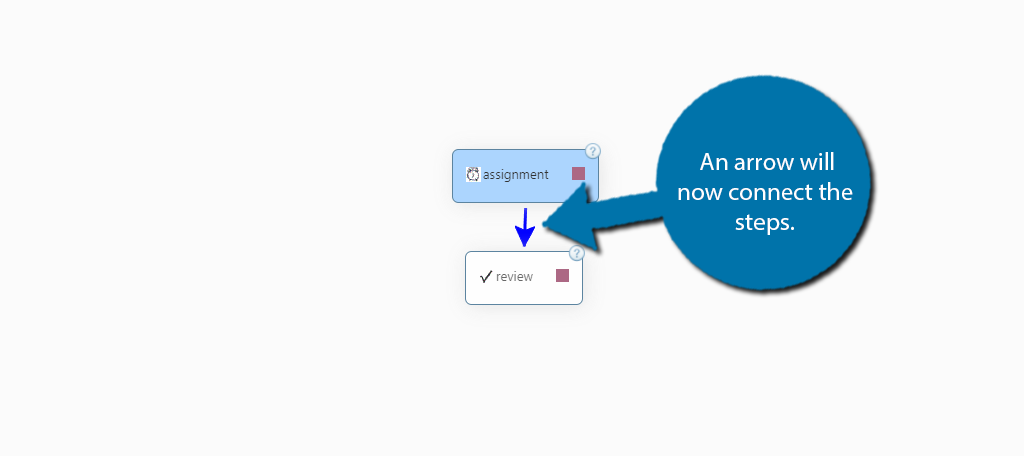
Note: The arrow is blue because it is a success path. You now must repeat the step but create a failure path which is represented by a red arrow.
This process is identical regardless of the steps you are connecting. It is also important to mention that you can connect one step to multiple steps. For example, after the initial post is written you can connect it to a proofreading step and to a separate SEO ranking step.
At this point, you know just about everything you need. You can now freely create a workflow for your website. Click on the “Save” button to finish creating the Workflow.
Note: You can right-click on any process in the workflow to edit, copy, or delete it.
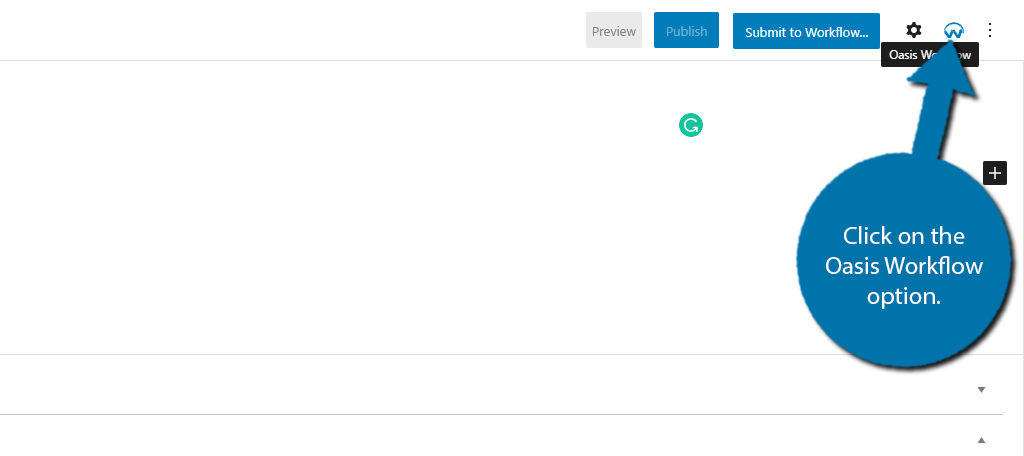
Step 5: Assign & Submit Workflow
All that’s left is to actually assign and publish the Workflow. Go into any draft post on your website, and yes, it must be a draft. The Pro version of the plugin is required for live posts.
Click on the Oasis Workflow option next to the “Publish” button.
This will allow you to select a workflow, assuming you are in the right role, and submit it for a particular step. If you are logged in as an administrator, you may need to swap to an account with a lower user role to actually interact with these options.
Congratulations on learning how to use the Oasis Workflow plugin.
Improve Your Editorial Experience Today With Oasis Workflow
Managing multiple writers on a website can be very tiresome, but the results speak for themselves. Oasis Workflow is a great tool to alleviate some of the stress and ensure work gets done in an efficient manner.
Has using Oasis improved your workflow? Do you use a different tool to assign tasks to writers?
