Are you looking for a way to block spam comments in WordPress? The comments section in WordPress should be a place for visitors to leave their opinions and feedback on your content. Enter Antispam Bee and what it can do for your website.
Trying to maintain a spam-free comments section manually would require a 24/7 staff. The best way to deal with spam in WordPress is to use any of the powerful antispam plugins available.
Of course, another alternative would be to simply disable the comments section, but that can do more harm than good.
Today, I will demonstrate how to block spam comments with the Antispam Bee plugin in WordPress.
The Importance of the Comment Section
The comment section’s main purpose is for visitors to share their opinions and feedback on content. This helps writers improve and lets the readers know you are listening. Sadly, the Internet is not the nicest place in the world.
Many comments are full of terrible things and offer no criticism or relevance to the content they are written on. Your moderators need to handle these because they make your content and community look bad.
The comments left by spambots can also greatly disrupt your comments section. These can range from advertisements for products or other websites all the way to political messages. If left unchecked, this is all you would see in a comments section.
This means that all of the real comments will be lost beneath all of the spam and that is not good for visitors or for you. To prevent this, you are going to need to protect your comment section from spam.
How to Block Spam Comments With Antispam Bee in WordPress
The Antispam Bee plugin is very popular with over 500,000 active installs and for good reason. It has plenty of customization options to deal with spam comments in a plethora of ways. For example, you can block comments that are in certain languages.
There are plenty of filters like this, so you can really customize your website the way you want.
Note: Make sure to only have one anti-spam plugin on your website. The vast majority of these plugins do not work with each other. In most cases, they interfere with each other.
Installing Antispam Bee
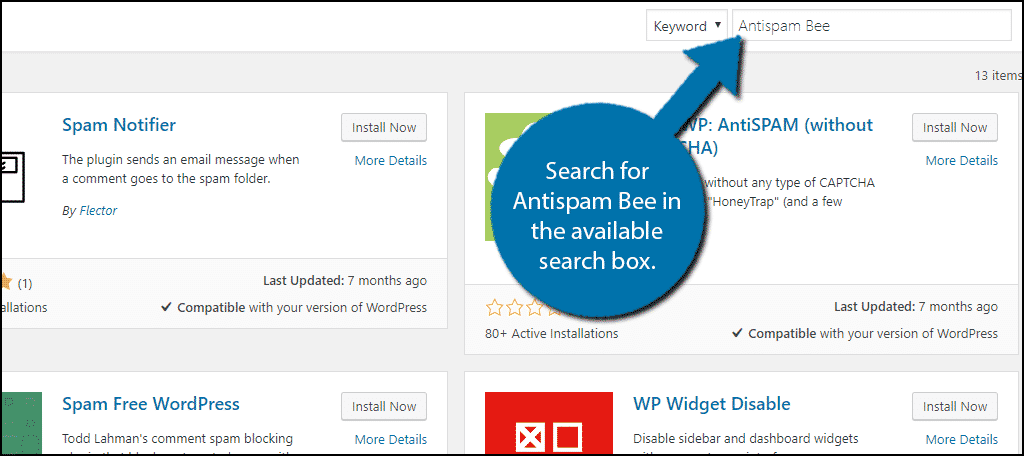
Begin by clicking on Plugins and selecting the Add New option on the left-hand admin panel.

Search for Antispam Bee in the available search box. This will pull up additional plugins that you may find helpful.
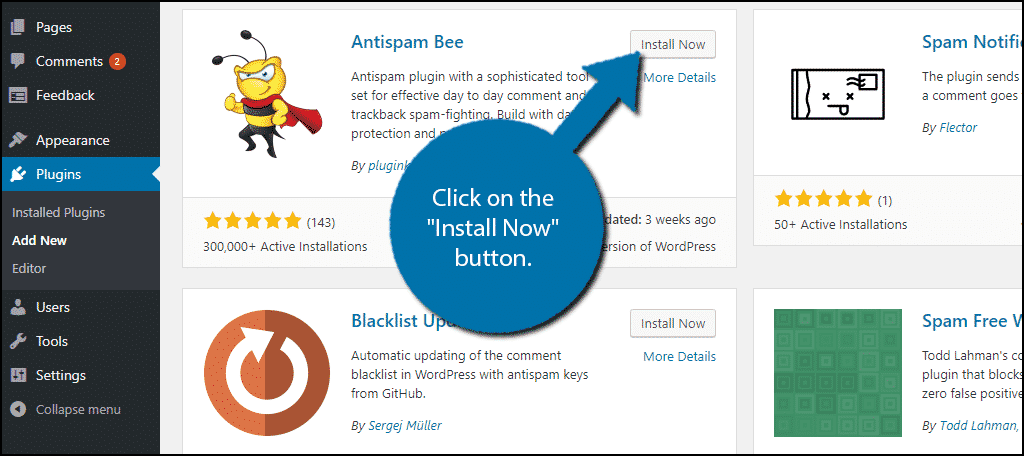
Scroll down until you find the Antispam Bee plugin and click on the “Install Now” button and activate the plugin for use.
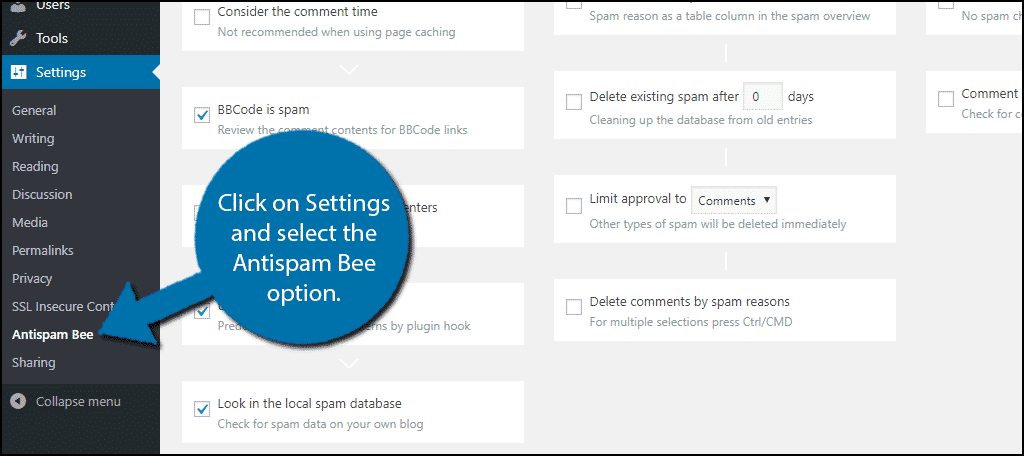
On the left-hand admin panel click on Settings and select the Antispam Bee option. This will pull up the main settings page.
Using Antispam Bee
When first entering the main settings page, you will notice a large number of options to edit. The plugin breaks its options into three columns which include the Antispam Filter, Advanced, and More. Each one of these has a unique purpose that can help your website.
The default options in this plugin will meet most website’s needs, and you may not feel the need to change too much. However, I will go through each of the options to give you a better understanding of what each one entails.
Antispam Filter
This is the place where all of the magic happens: blocking spam. The default options will cover most of the bases and fix any website’s spam problems without changing anything.
Trust Approved Comments: This option is on by default. Once a user has been recognized as trustworthy, their comments will be automatically approved. This speeds up how fast comments will appear on your website.
Trust Commenters with a Gravatar: This option is off by default. It is quite similar to the last option but will remember the Gravatar image instead of the name. If you do not use Gravatars, then I would recommend leaving this off.
Consider the Comment Time: This option is off by default. This option will look at the time a comment was posted and use that as a factor in determining if it is spam. The plugin does not recommend it when using page caching.
BBCode is Spam: This option is on by default. The majority of spam includes Bulletin Board Code (BBCode), this blocks it completely.
Use Regular Expressions: This option is on by default. The plugin will analyze the comment and determine if it uses a particular speech pattern that most spambots use. If it finds similarities, the comment will be blocked.
Look in the Local Spam Database: This option is on by default. This will use any spam data you have collected in your database and use it to find spam more accurately on your website.
Block or Allow Comments From Specific Countries: This option is off by default. You can use this to block users from specific countries from leaving comments.
Allow Comments Only in Certain Language: This option is off by default. As the name suggests, you can have a comment marked as spam if it is in a certain language.
Advanced
The Advanced options will help you manage how the spam you detect is handled. This section will help save you hours of time you would spend manually sorting spam.
Mark as Spam, Do Not Delete: This option is on by default. All spam detected on your website will be kept and you will have to manually delete it later. This will allow you to make sure the plugin is catching spam and not loyal visitors.
Keep in mind that if you do choose to disable this option, the rest of the options in this section will not be available.
Spam-Notification by Email: This option is off by default. If this option is on it will alert admin accounts that spam is being detected by email. If you have a high amount of spam, your emails could get spammed by the plugin. I would recommend keeping this option off.
Do Not Save the Spam Reason: This option is off by default. This option will not save the reason the comment was marked as spam. This includes information like comment time, links and more.
Delete Existing Spam After X Days: This option is off by default. You can set a number of days. Once that number of days passes, the deletion will begin. This will help you manage the spam you block.
Limit Approval to Comments/Pings: This option is off by default. This will either approve comments based on the comments or trackbacks.
Delete Comments by Spam Reasons: This option is off by default. This option allows you to select the reasons why spam will be deleted by the plugin.
More
This column will help you track everything spam related. This will give you statistics showing exactly what the plugin does to help your website
Generate Statistics as a Dashboard Widget: This option is off by default. This option will show you all of the plugin’s statistics as a dashboard widget. It’s a great way to view all of the information.
Spam Counter on the Dashboard: This option is off by default. This is very similar to the last option, but it will only show a spam counter.
Do Not Check Trackbacks/Pingbacks: This option is off by default. This option will ignore all pingbacks and trackbacks.
Comment Form Used Outside of Posts: This option is off by default. This option will track all of the comments on your archives page. This is a pretty handy option if those pages get a lot of attention.
Keep Your Website Spam-Free
Guarding your website’s comments section is essential to helping your community grow. Spam comments move real comments to the bottom and ruin any form of discussion. A busy comment section in which the authors regularly reply are a great way to build a community.
Always support options that let visitors give you feedback and interact with each other. And letting Antispam Bee do its thing helps keep the clutter at bay.
What settings block the most spam comments on your website? Do you find the plugin easy to use?