Are you looking for a way to display all of your partner’s logos in WordPress? If so, I have some good news. The Logo Slider plugin for WordPress allows you to easily add logos for all of your partners or even pictures for donators.
It’s a great way to thank the companies or fans who have supported your business so far. It can also help make your website more credible. After all, if other businesses or people are willing to support you, your brand is worth trusting.
Today, I will demonstrate how to add a WordPress logo slider to display your partners or supporters.
What Is A Logo Slider?
A logo slider works like a regular slider. It will cycle through images, but instead of focusing on those images, it centers on company logos. Although, it can also display images, which makes it good for displaying things like Patreon donators as well.
There are many advantages to displaying sponsor logos in WordPress.
Firstly, it’s a big sign of respect to those companies or individuals who support your business. And it can help promote their own brand in the same process, which is a nice way to thank them.
One of the biggest advantages is being able to say company X is a supporter of your business. It makes your company more trustworthy by extension and that can lead to more sales.
If you are displaying Patrons, displaying those supporters can encourage others to donate as well. After all, no one likes being left out in a community they really like.
How to Display Sponsor Logos in WordPress
Step 1: Install Logo Slider
The Logo Slider plugin allows users to easily and quickly add logos almost anywhere on your website. It utilizes shortcodes to allow you to add it to posts, pages, and even text widgets. You can customize the plugin to meet your needs in a variety of ways.
This includes controlling the slide speed, autoplay timeout, margin dimensions, hover effects, and the background color to name a few.
It doesn’t take long to set up, so let’s begin.
Click on Plugins and select the Add New option on the left-hand admin panel.

Search for Logo Slider in the available search box. This will pull up additional plugins that you may find helpful.

Scroll down until you find the Logo Slider plugin and click on the “Install Now” button and activate the plugin for use.

Step 2: Creating A Category (Slider)
There are two ways to create a slider, or to be more specific, two different shortcodes. The more basic one will just display all of the logos you upload into one slider. This will be fine for many websites, but others may want to create multiple sliders.
In this case, you are going to need to create categories. Creating a slider is really easy, however, the plugin doesn’t explain the process very well.
Thus, you can think of the category as the slider itself.
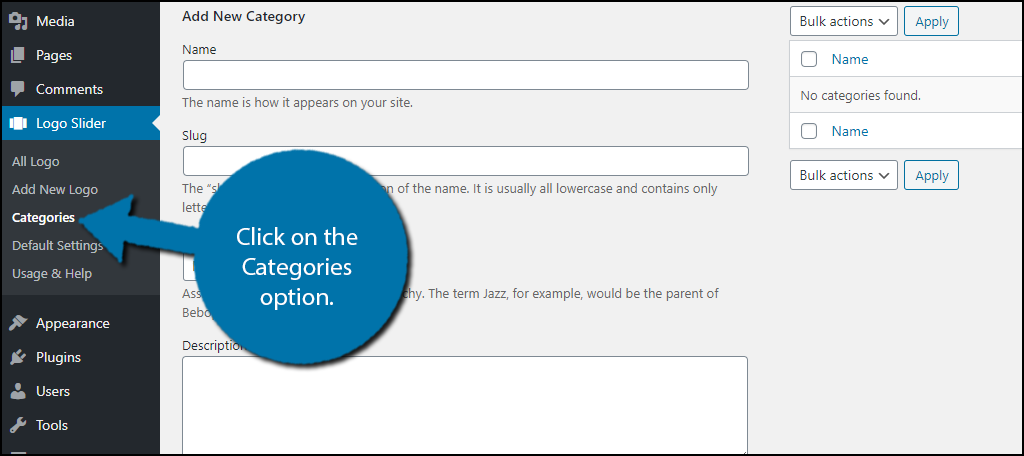
Click on the Categories option under the Logo Slider function. Don’t confuse this with the categories WordPress uses for creating posts.

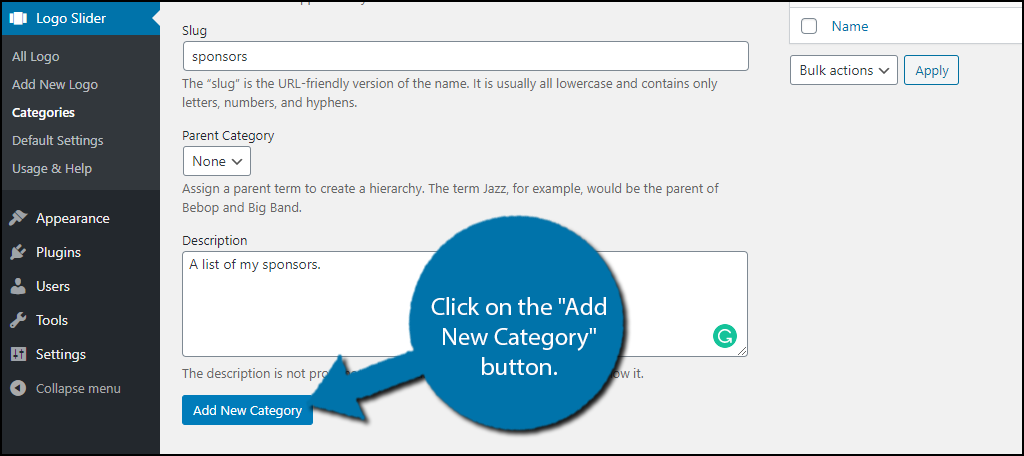
Fill out the name, slug, and description of the category. Click on the “Add New Category” button when you are done.

Now you just need to add logos to the categories and yes, these are separate from the ones the rest of your website uses.
Step 3: Adding Logos
The next step is to add the individual logos to your website. This simply includes adding a title, company name, company URL (if you want to make it clickable), company description, and the logo itself.
If the slider is for showing off Patreon supporters, try to obtain an image from the patron themselves. This makes it more personal and shows that you care. You can also include other information if they wish.
On the left-hand admin panel, click on Logo Slider and select the Add New Logo option.

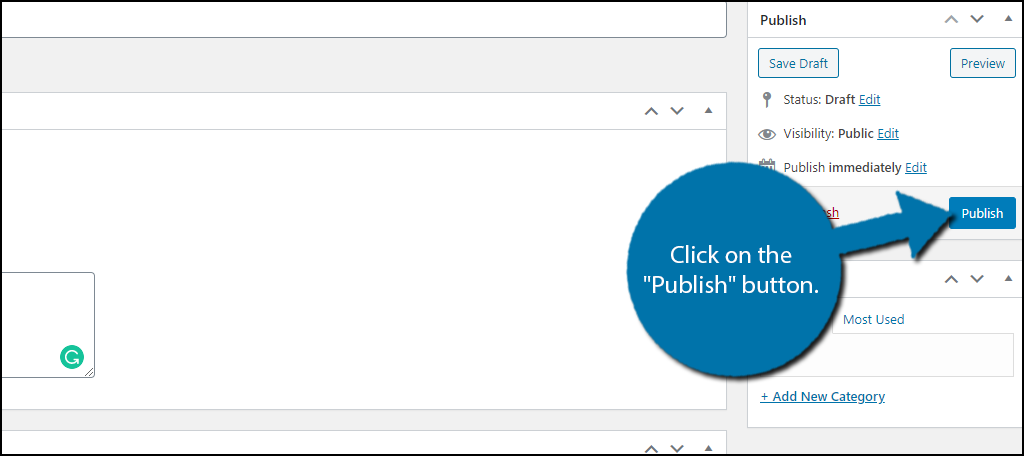
Fill in all of the information you think is necessary, add the logo from your media library and most importantly pick a category (only appears if you did the last step). Click on the “Publish” button when you are done.

Note: If you do not add a category it will not appear in a category-based slider. You can add or remove categories at any time, but it’s quicker to do it in one shot.
You must do this for each logo you want to add, so prepare to spend some time here if you are planning to add a lot of sponsors to the slider.
Note: To get the best results, make sure that the logos are similarly sized. It will make the slider look weird if the logos are all different sizes.
Step 4: Settings
There are a variety of settings you can configure and they are broken up into 5 distinct tabs that include Basic Settings, Style Settings, Responsive Control, Slider Options, and Advanced Settings.
The options are very straightforward and consist of a check box, radio button, or a text box to insert a specific number. Unfortunately, there is no way to view what the changes actually do in real-time.
Thus, my recommendation is to have a second tab with the slider up so you can check to see what each one does.
However, for most websites, the default setting will work just fine. But know that the customization is there for websites that need it.
Step 5: Displaying the Logos in WordPress
Now that everything has been added, it’s time to actually display the logos.
Go to any existing post or page where you want to display the slider or create a new one. Typically the home page is the best location for this.
You can add the shortcode to either a shortcode block or text block, both will have the same effect.
As I stated earlier, there are two shortcodes. The first is the simplest and will display all logos in a slider.
[ht_message mstyle=”info” title=”” show_icon=”” id=”” class=”” style=”” ][logo-slider][/ht_message]
The second shortcode only displays logos with the same category.
[ht_message mstyle=”info” title=”” show_icon=”” id=”” class=”” style=”” ][logo-slider cat=”category slug here” ][/ht_message]
Here are the results:

Congratulations on learning how to use the Logo Slider in WordPress. Remember you can remove logos at any time and only categories allow you to make specific sliders.
What You Can Do With A Logo Slider
While it is a logo slider, keep in mind that it works like any other. simply insert an image and you can put it in the carousel. Here are a few things you can do with one.
First and foremost is to display the logos of companies that either sponsor you or big-name companies that use your service. After all, if your product is good enough for a major company, it’s good enough for anyone.
You can use it to display family photos from your customers. For example, it is very common for a veterinarian to receive photos of the pets he or she helps during the holiday season. This is a good place to display them.
If you own a restaurant, you can display images of happy customers at a dinner table or being served food by staff. Or you can display something else related to your business like a mechanic fixing specific types of cars.
Sliders are powerful tools, so make sure you get the most out of them.
Did you create categories to create multiple sliders or use the simple shortcode? How many logos did you add to the plugin?
