A lot of people find themselves collecting a myriad of WordPress sites for many reasons. It can be quite a tedious process to log in to each one individually in order to manage them. Luckily, you can set up your digital empire to use a single access point through a WordPress multisite network.
These networks are incredibly useful when you have to manage several sites from a single location. As a super administrator, you can govern over all of the sites with ease.
In this tutorial, we’re going to show you how to set up that WordPress multisite network.
NOTE: GreenGeeks does not recommend using Multisite with multiple domains as Multisite is designed for subdomain environments. For multiple domains, create multiple independent WordPress installations.
Why Would You Use a Multisite Network?
Many people enjoy creating new blogs and websites with WordPress. The multisite function allows you to control all of those instances from a single point. This can greatly reduce the amount of time it takes you to manage each one.
This is especially true since you can install plugins and themes across the whole network.
Because you can set WordPress to allow registered users to make their own websites, some people build blogging communities. From a single domain, you and your users can create a collection of sites.
An example of this is how the WordPress.com site operates. Users can register for a free website, which is placed into its own subdomain at WordPress.com
Even large corporations can find value in using a multisite network. For instance, each department can have its own portal for everything from news to team production and workflow.
How to Setup A Multisite Network
First, you need to decide how you will structure the network. You can either choose to put new installations of WordPress as subdomains or as separate subdirectories. For instance, the site URLs will look like this:
- Subdomains: https://new_site.your_domain.com
- Subdirectories: https://your_domain.com/new_site
Since creating a subdomain, is very simple, I will go with that approach, but a subdirectory is just as viable.
Step 1: Create A Subdomain
If you choose to use subdomains, you will need to set up “Wildcards.” This is essentially a placeholder for when a new site is created. To do this:
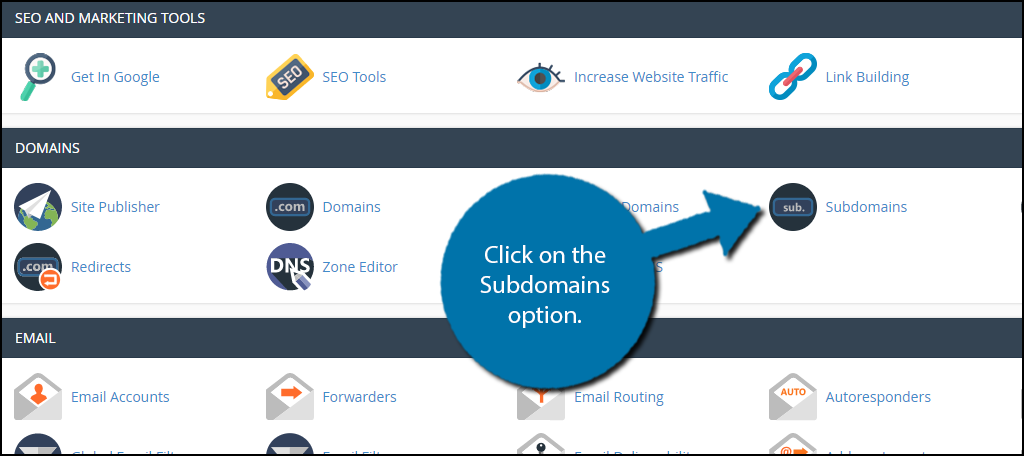
Log into your cPanel, locate the Domains section, and click on the Subdomains option.
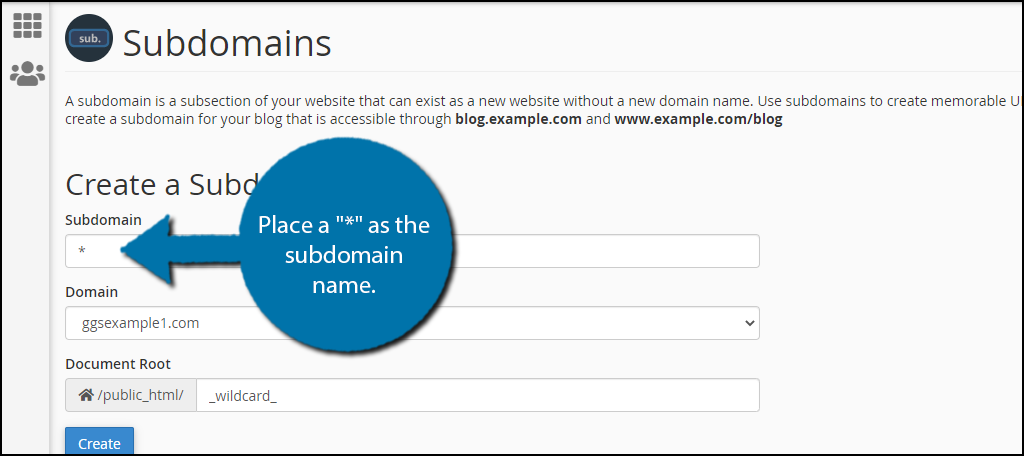
Creating a subdomain takes less than a minute. Simply fill out the following pieces of information and click on the “Create” button.
In the subdomains textbox, place a “*” as the subdomain name. This will create a “wildcard” that is necessary to build a multisite.
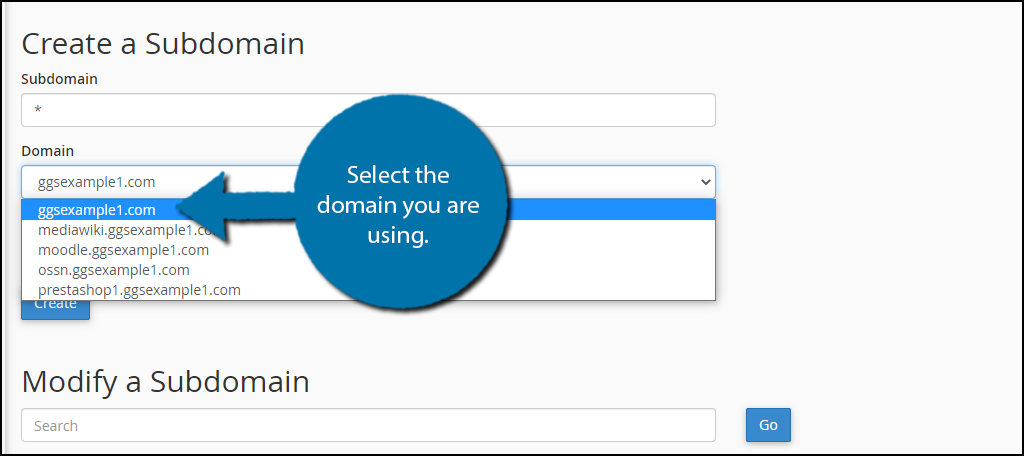
Using the drop-down box, select the domain you are using. If you only have one site, it may be the only one on the list, thus, it is already selected.
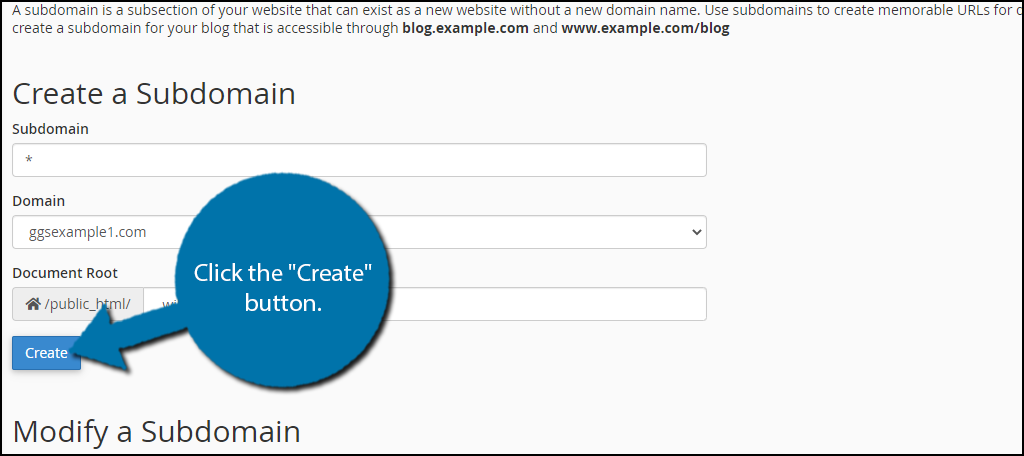
Click the “Create” button.
Step 2: Turn On The Multisite Feature in WordPress
You have to do this in the wp-config.php file for your main WordPress account.
Before you continue, it’s advisable to backup your WordPress website. In the event something goes wrong, you want to be able to recover your files. Luckily, you are just adding a simple line of code, so it’s very unlikely anything will go wrong.
Deactivate all of the plugins you are currently using on your primary WordPress site.
Go into the File Manager, and locate the wp-config file.
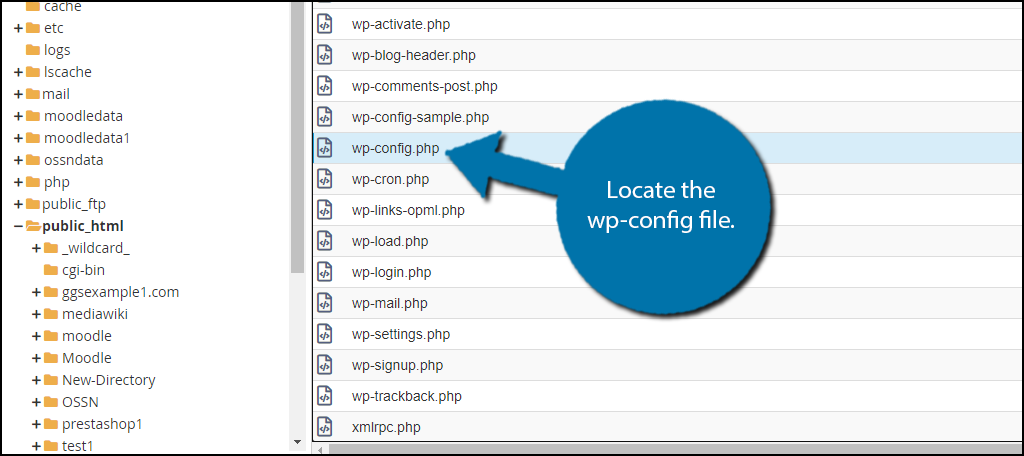
right-click the file and choose the “Edit” option. Within the file, scroll down to the bottom to find the following line:
/* That’s all, stop editing! Happy blogging. */
Underneath it, add the following lines of code:
/* Multisite */

define( 'WP_ALLOW_MULTISITE', true );
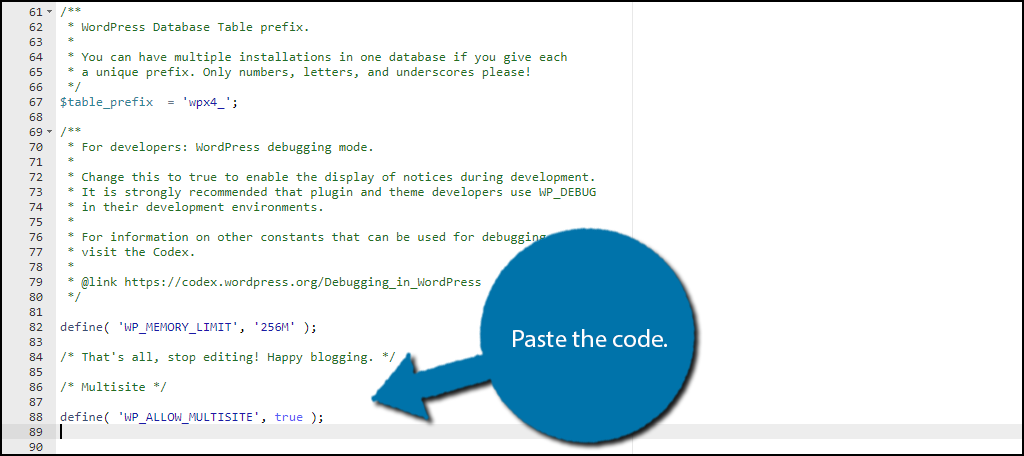
And finally, save the file.
Step 3: Set up the Network for Your Multisite
After you alter the configuration file, reload your WordPress site.
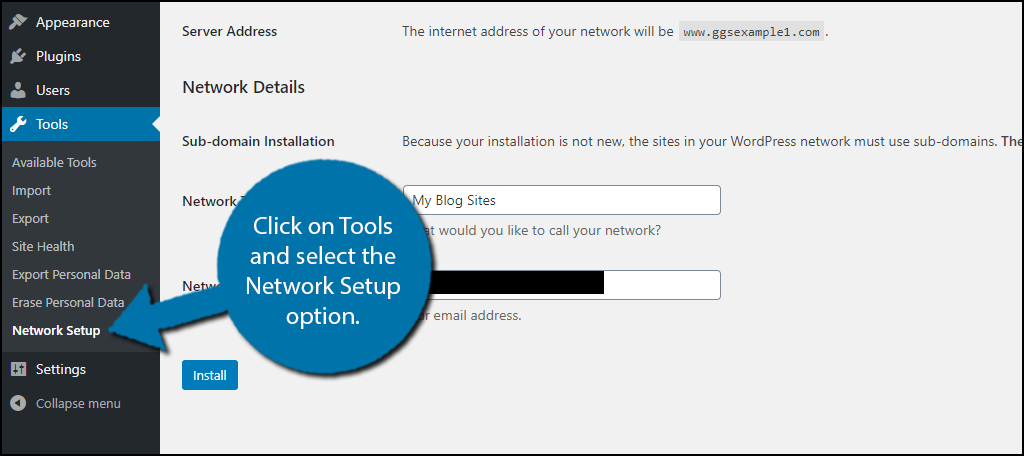
Click on Tools and select the Network Setup option.
Note: If you did not do so already, you must deactivate all plugins.
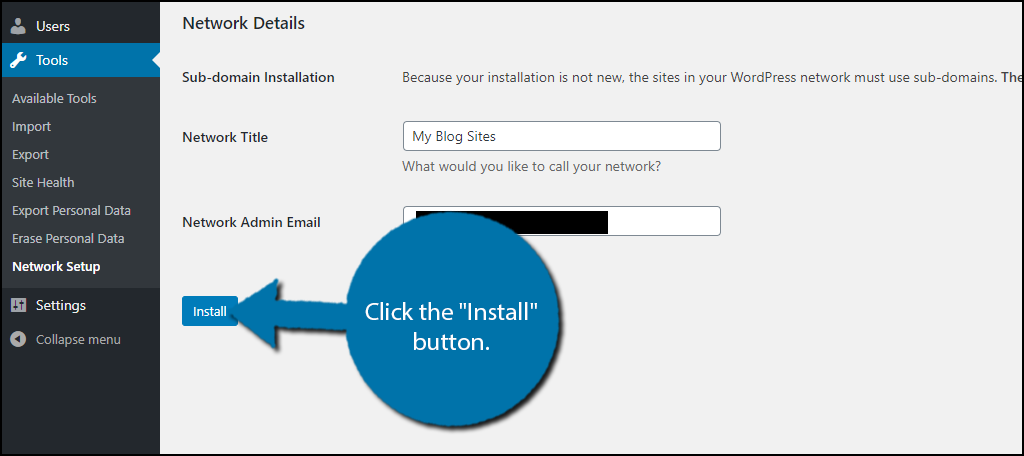
Enter a title for your network while ensuring the Network Admin Email is the one you’ll use. Once that is taken care of click the “Install” button.
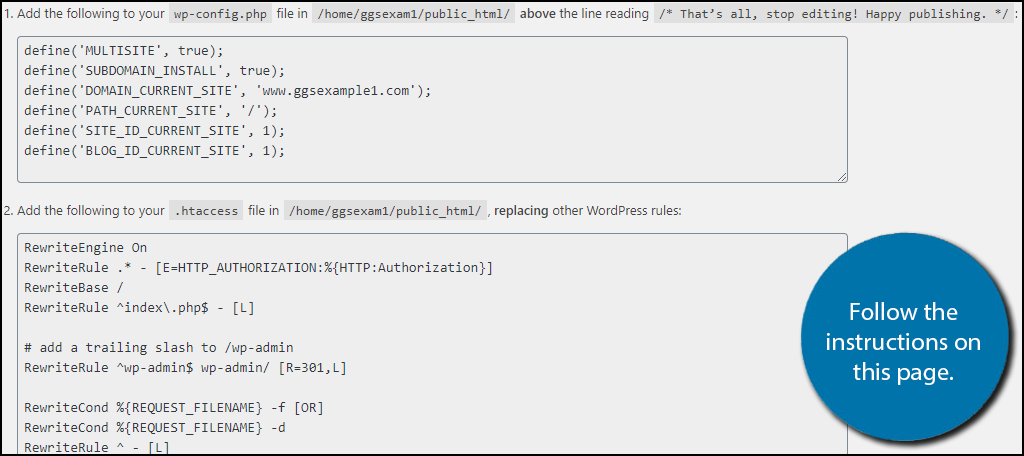
The next screen will provide two more edits you will have to make on your website. The first step is to edit your wp-config file, like in the previous step, and all of the code is provided to you.
The second step is identical, but instead, you will be editing the htaccess file. Once again, the code is provided, simply follow the directions on-screen and save the changes you make to each file.
Note: Some users may have trouble finding their htaccess file. Luckily, there is an easy fix that we have covered in a past tutorial.
Once the changes have been made, reload your website and you will be asked to log in again. It will ask you to verify that the admin email is correct.
Step 4: Configuring the Settings of the Multisite Network
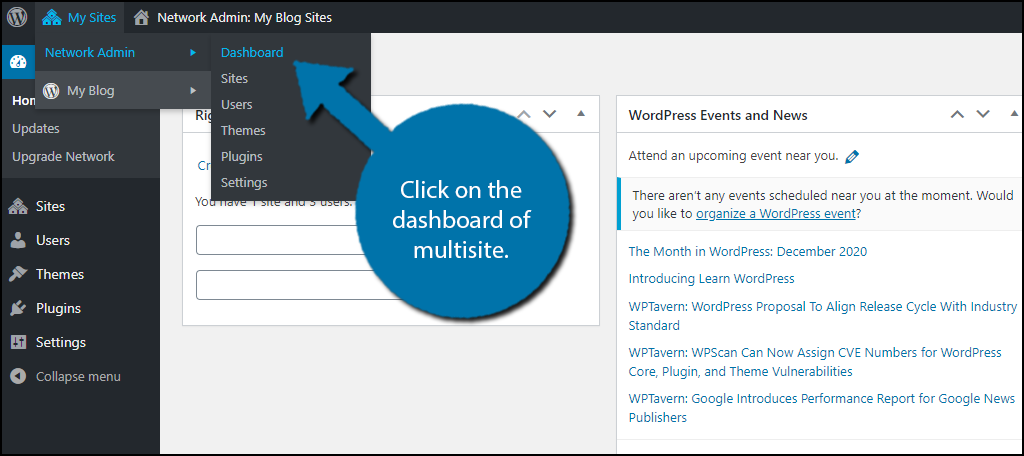
Once the above has been completed, you’ll see a new option on the top left of your WordPress dashboard called, “My Sites.”

This gives you access to the multisite dashboard, users, themes, plugins, and sites. Click on the dashboard of multisite.
Note: If you want to access a specific site you must access it by selecting that website.
Now if you click on the Settings option, you can:
- Change how new sites are created
- Limit email registrations to prevent duplication
- Ban specific domains from registering and creating sites
- Modify the welcome messages for new sites
- Change maximum upload types and sizes
- Allow site admins to activate or deactivate plugins while denying them the ability to install new ones
Essentially, you are in full control of all of the sites for this domain.
Step 5: Adding Sites
Once you have the super admin settings done, it’s time to start adding additional sites, themes, and plugins.
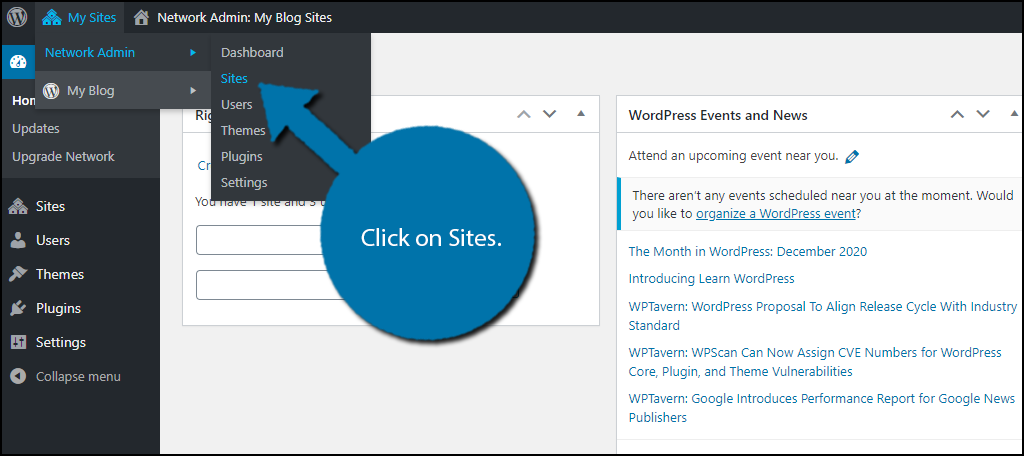
From Network Admin, you can add sites, themes, and plugins to all of your new WordPress areas without logging into each one. This makes it easy to add the same plugins to each domain.
Click on Sites.
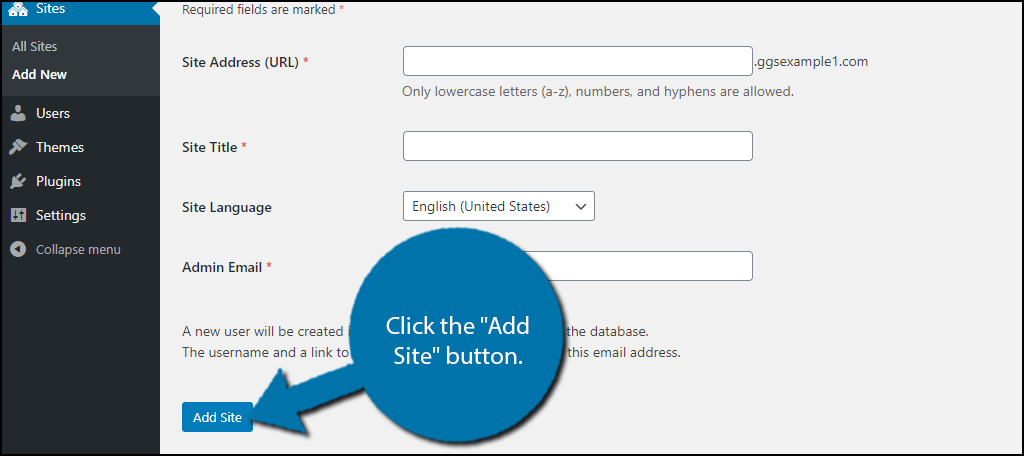
Click the “Add New” button on the top left.
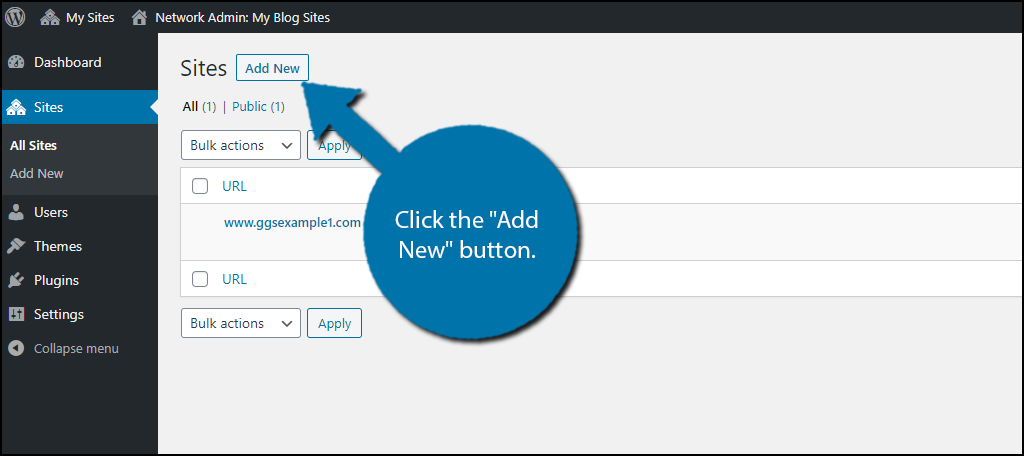
Enter the Site Address (URL), Site Title, Site Language, Admin Email, and click on the “Add Site” button.
Note: The Admin email if that website’s email. It is not your super admin account’s email.
Step 6: Adding Themes and Plugins
Adding themes and plugins works much the same way as a regular website. From the Network Admin screen, you can click on Themes and Plugins to change each one respectively.
This allows you to do the following across the entire network:
- Enable or disable themes
- Activate and deactivate plugins
- Install new or delete themes and plugins
If you changed the admin setting noted above, administrators of individual websites will be able to activate and deactivate their own plugins and themes. Thus, make sure you alert them of any changes you are making, otherwise, they may undo your changes.
This allows them to have a sense of customization for each individual site and allows them to troubleshoot any errors they encounter.
FAQ
Can you have admins on the sites themselves other than the super administrator?
Each site on the network has its own features and admins just like any other WordPress installation.
Can you update plugins and themes from the super admin panel?
The super administrator of a multisite network is capable of updating all plugins and themes with a single download.
Will all of the sites be affected if the super admin password is hacked?
Because the super administrator has complete access to all sites in the network, a compromised password can put all sites at risk.
Do all plugins work in a multisite environment?
Unfortunately, some plugins do not play well with multisite features. You will have to test these to find out if you have some that don’t work with multisite turned on.
What Do You Need for a Multisite Network?
In reality, you can set up a multisite network on many kinds of hosting platforms. However, it’s advisable that you use dedicated server hosting or even VPS because all of the websites will share the server’s resources.
If you use a shared server plan, all of your sites as well as the websites of others will use those components. This may cause your sites to operate slowly.
You’ll also need access to your configuration file of WordPress and possibly domain attributes if you choose to use subdomains for the network. We’ll explain more about this later.
Multisite networks cannot be used on the WordPress.com platform.
NOTE: For more information regarding multisite setup on GreenGeeks’ servers, please contact support.
Customize Your Websites From One Location
Setting up a WordPress multisite has a great deal of potential for various platforms. From a school district giving each facility its own area of the web to someone who has a hobby of blogging about different topics, multisite functionality is very useful.
With just a few steps, you could explore the possibilities of what this can do for you personally or in a business dynamic.
What are some of your favorite features of WordPress? How would you use multisite abilities?
Very good tutorial. I’m sure everyone else knows this and I’m the WordPress dummy but where do I find this file?
Using an FTP program such as FileZilla, open the wp-config.php file
Hello, thanks.
Is it possible to do it with different domains?